Alerts
Deprecation
Modern browsers no longer support Flash applications. As of KX Delta Platform v4.6.0 alerts should be configured using ControlUI.
The KX Stream alert framework provides a mechanism to generate alerts based on the data flowing through the system. An alert is a message, which is published into the system and can be used to generate another event, such as triggering an email. The main benefit of the alert framework is that it provides the tools required to generate alerts on streaming data, thereby making it easier for inexperienced programmers.
- Alert Definition
- A parameterized analytic which fits a specific format, and a definition of how the corresponding alert is packaged and distributed. An alert analytic builder is also provided.
- Alert Instance
- An alert definition with a set of parameters and actions specified. Emails can be generated from alert instances, and the alert content distributed within the email.
The same alert can be run on multiple processes, with all or only one of the processes generating the alert. Alerts are managed through the DS_AlertOverview dashboard.
This dashboard allows you to define alert criteria and alert instances as well as actions to be taken when alerts are triggered. You can also suspend emails generated by certain alerts and view logs of alert activity.
The dashboard is divided into six tabs: the Alerts Editor, the Alert Instance Editor, the Actions Editor, Email Suspension, and Logs.
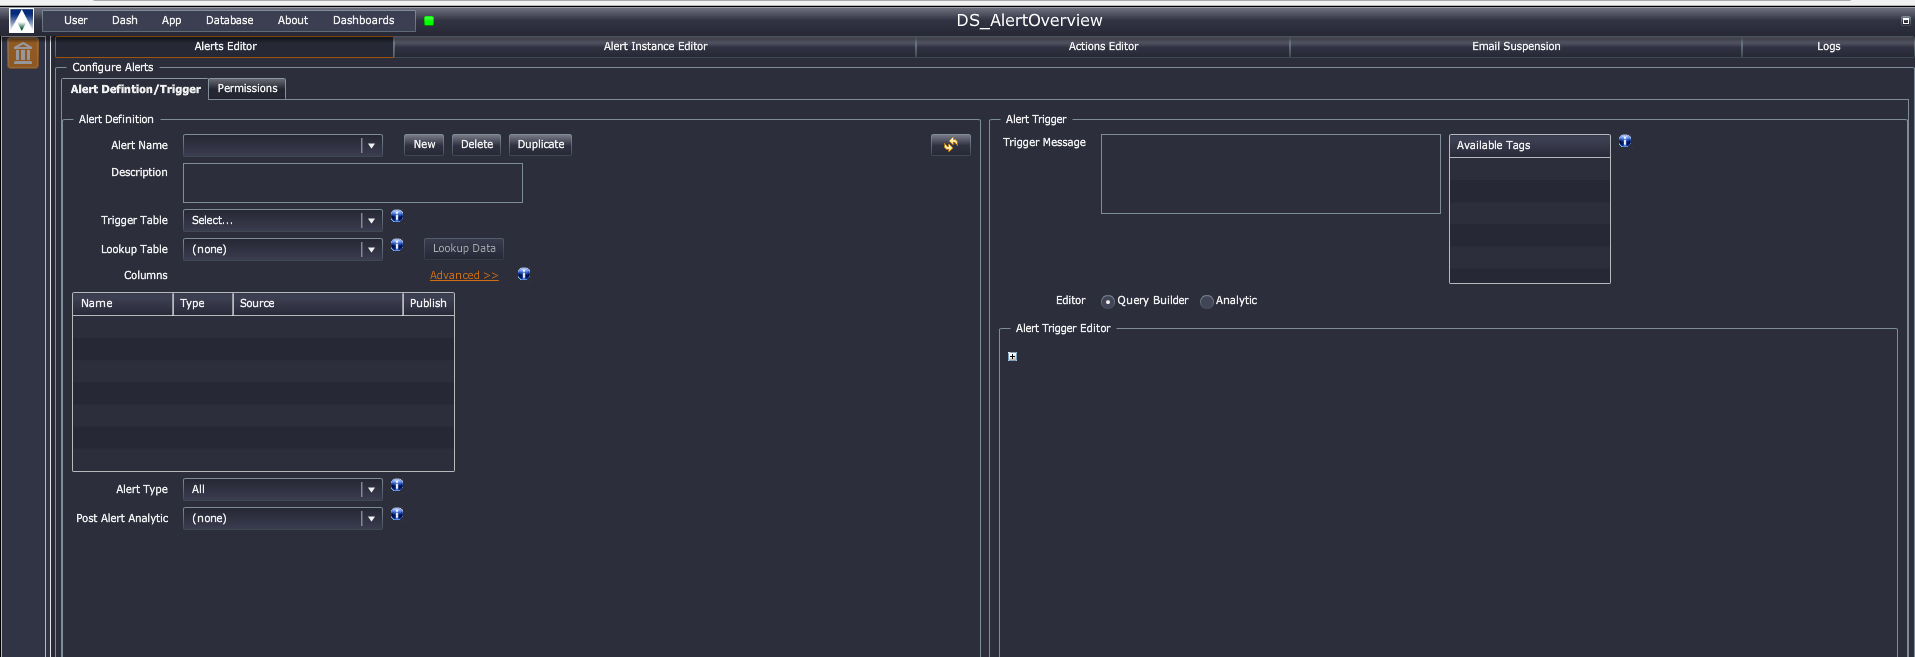
Alerts editor
Define alerts and the conditions that trigger them. It has two panels.
Alert definition
- Alert Name
- (required) A pre-defined alert
- Description
- Text description of the alert
- Trigger Table
- (required) Name of the table the alert reacts to. Updates to this table may trigger an alert, according to the trigger conditions you set. For example, to monitor bid and ask prices you might select a quote table. Once the process has been set within the Alert Instance, a dropdown list of all tables available on that process will be shown. The Lookup Data table allows you to view sample data for the Lookup Table.
- Lookup Table
- An additional table to which the alert can react: can be either a schema from the process or a configuration parameter from KX Control; must have at least one column in common with the trigger table
- Lookup Data
- Displays data in the Lookup Table
- Columns
- (required) Columns from the Trigger and Lookup Tables to be used in the alert; checking Publish means data from the column will be published with the alert to the data column in
dxAlert. (You must publish at least one column.) 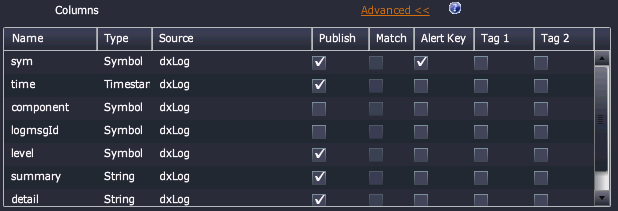
-
The Advanced button displays additional flags:
- Match
- Use column to join the alert data with the Lookup Table. (Must be present in both tables.)
- Alert Key
- Use column to create a unique identifier for the alert. (Default is a sym or symbol column, if present.)
- Tag 1/Tag 2
- Use column to enrich data in the
dxAlerttable, e.g. forCPU Usagesettag1aslogicalNameandtag2asbreachLevel, makingdxAlerta clearer view of the error
- Alert Type
-
When the alert should be raised:
All: every time an alert is triggeredOn State Change: when an alert is triggered and only when it changes stateOn True State Change: when alert is triggered and when the state changes totrue
- Post Alert Analytic
- An analytic called after an alert is generated but before it is published: selected from the
DxPostAlertAnalyticsanalytic group. The analytic takes the generated alert as its argument and returns data in the same format. Allows you to define behavior such as adding information to the alert payload or changing the value of certain fields.
Alert trigger
The right-hand panel of th!e Alerts Editor tab displays the conditions in which an alert will be triggered.
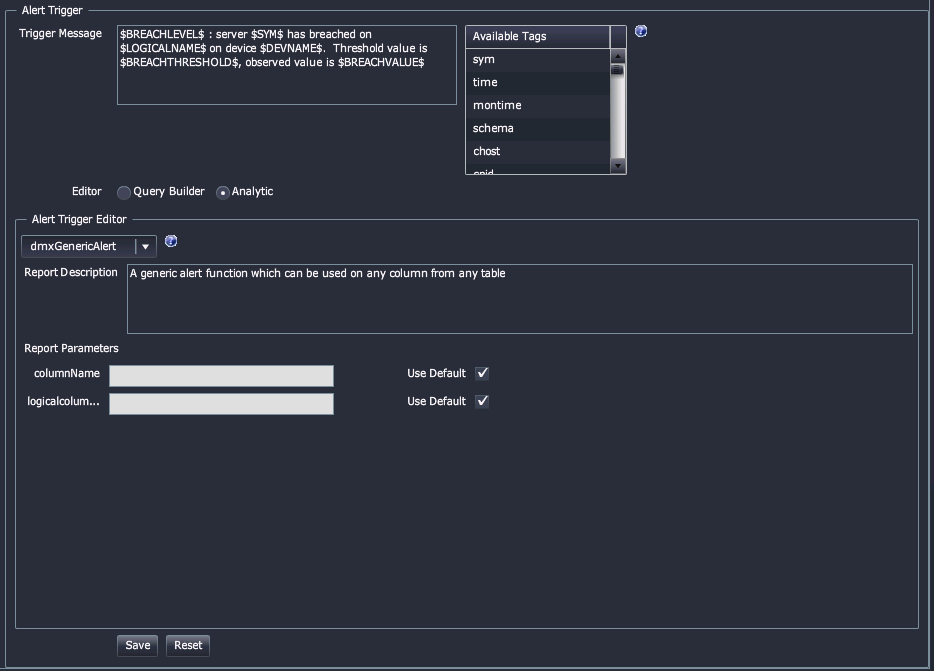
- Trigger Message
- The message to be displayed when the alert is generated
- Available Tags
- The trigger message can include tagged data, as selected from the Available Tags list
- Editor
- Set to Analytic to have alerts generated based on the true/false outcome of a pre-defined Analytics within the KX Delta Platform. A Query Builder option is also available for basic checks on incoming data against conditional statements
- Analytic
- (read only) Analytics associated with the alert group
DxAlertAnalytics, used to define the trigger condition for an alert. (Pre-defined in KX Control.) - Report Description
- (read only) A description of the report
- Report Parameters
- (read only) Parameters vary according to the analytic selected. These cannot be modified in the Alert Editor, only within the Alert Instance Editor.
Create a new alert
Open the Alerts Editor. Complete the alert definition. Specify the alert trigger. Click Save.
Once you have saved the alert you can configure permissions for users.
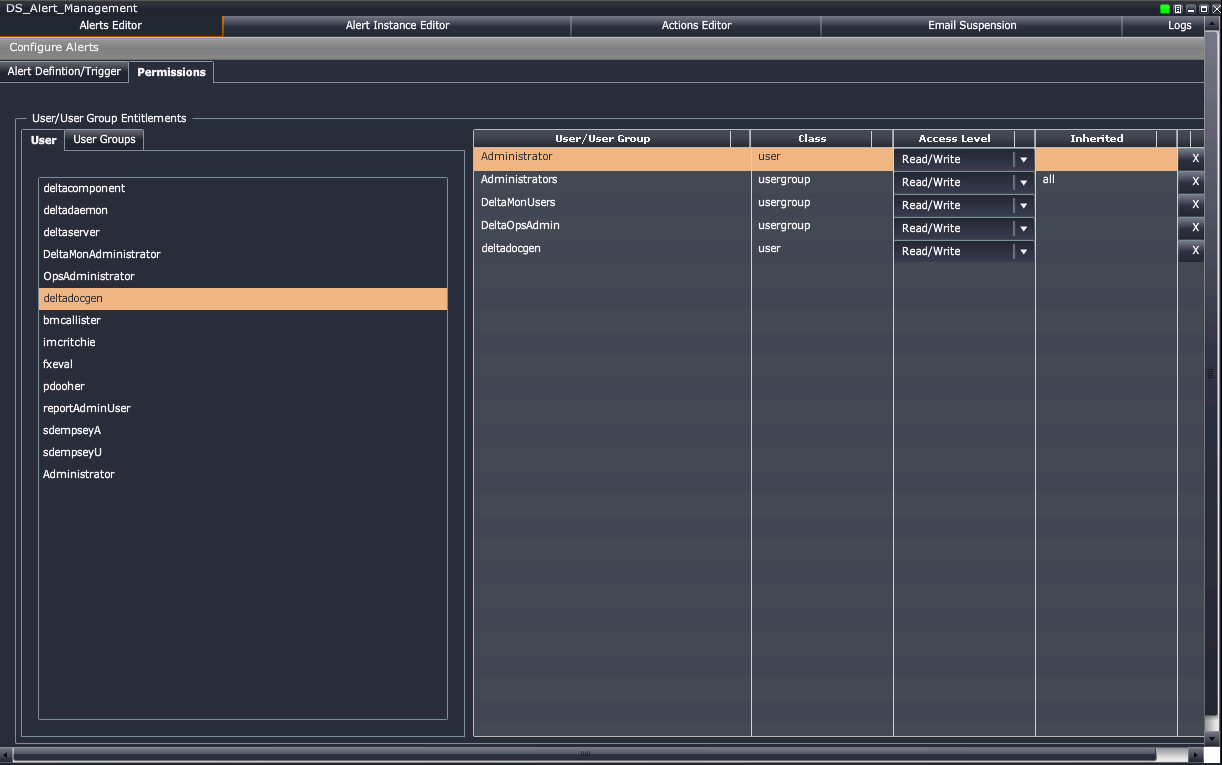
Set alert permissions
-
Open the Alerts Editor and select an alert.
-
Select the Permissions tab.
-
On the left-hand side of the screen select either a user or a user group and drag it to the right-hand side.
-
On the left-hand side of the screen select a user or group and set its Access Level:
Deny All– deny all accessRead/Deny Write– grants Read access, overrides any inherited Write permissionsRead- grants Read access, which can be overridden by explicit inheritedDeny AllpermissionRead/Write- grants Read and Write access, but can be overridden by explicit inheritedDeny Allpermission
-
Check Inherited to indicate a user inherits her permissions from her group.
-
Click X to remove a permission from any user or group.
Delete or duplicate an alert
To delete an alert: open the Alerts Editor, select an alert and click Delete.
To duplicate an alert: open the Alerts Editor, select an alert and click Duplicate.
Alert instance editor
The Alert Instance Editor tab allows you to create instances of alerts. Each instance of an alert can be configured differently.
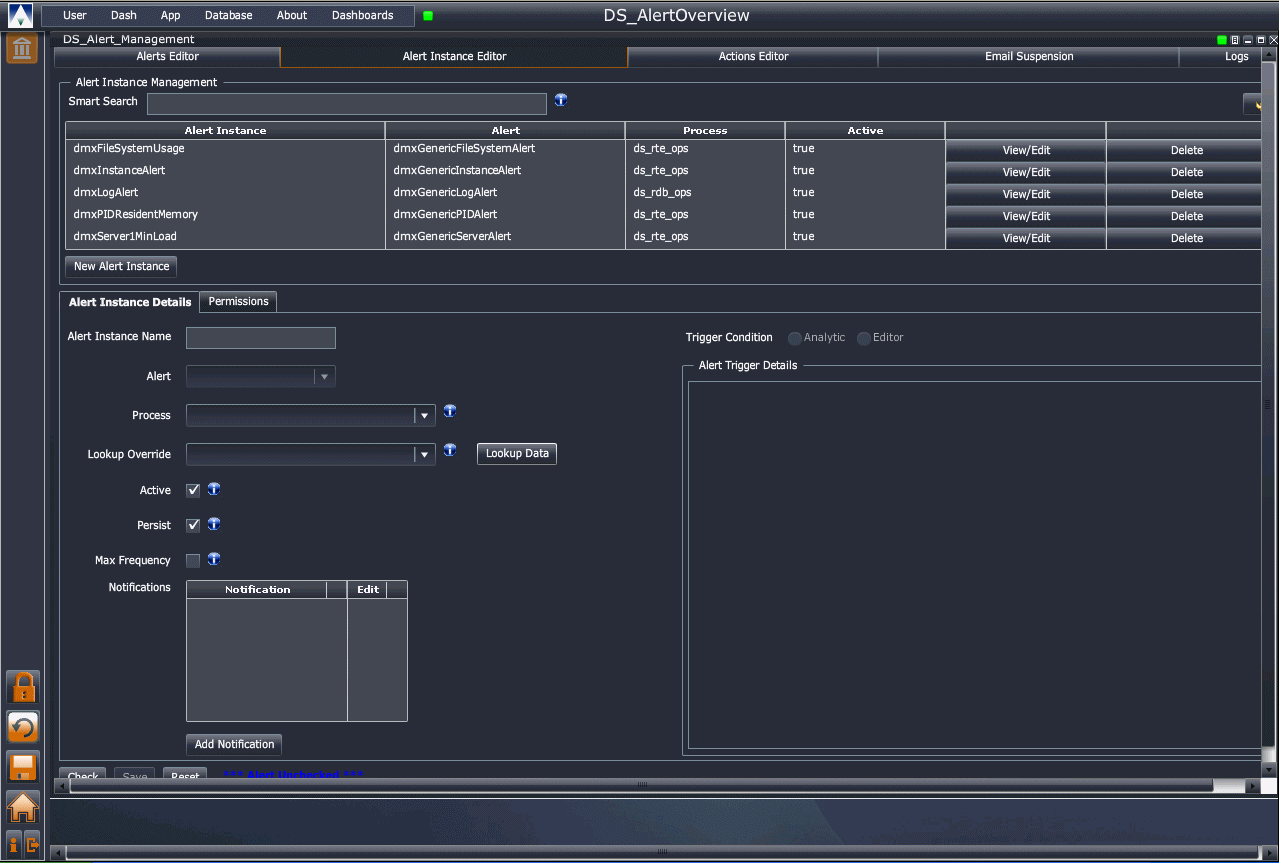
The tab has two panels.
Select an alert in the Alert Instance Management panel and click
- View/Edit to browse its details in the Alert Instance Details panel below; or
- Delete to delete it.
Or click New Alert Instance to clear the Alert Instance Details panel for a new alert definition.
The Alert Instance Details panel:
| control | effect |
|---|---|
| Alert Instance Name | A unique name for the instance |
| Alert | The alert this instance will be based on |
| Process | The process in which the alert is registered: must be running and must support alerts |
| Lookup Override | A table or configurable parameter used for comparing data. These must have at least one column in common with the trigger table so that they can successfully be joined in the alert. If specified, overrides the Lookup Table of the Alert. |
| Lookup Data | Displays data of the Lookup Override |
| Active | Check to activate the alert |
| Persist | Check the alert is to be persisted to KX Control for loading into the process each time it is started; otherwise the alert will expire when the process terminates |
| Max Frequency | The maximum frequency that an alert can be raised; if checked specify the frequency in terms of 1/x seconds |
| Notifications | A table of notifications for this alert. Actions Editor |
Once you have created a new alert instance you can specify the user permissions for the alert instance.
Actions editor
Set up email notifications to be sent when alerts are triggered. Associate a notification with an alert instance and specify the frequency and recipients.
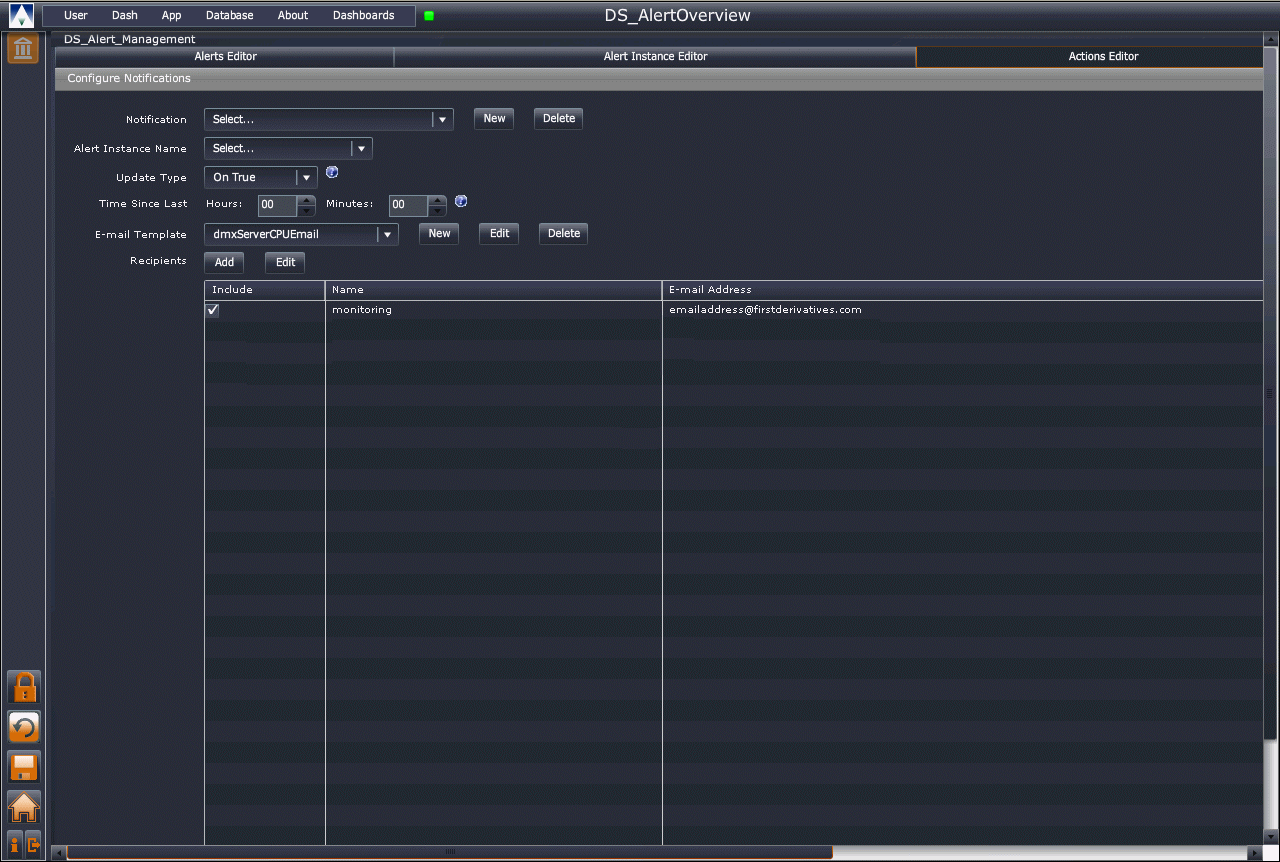
- Notification
- Select a notification from the drop-down list of existing notifications. Or click New and create a new notification. Or select a notification from the list and click Delete to remove it.
- Alert Instance Name
- The name of the alert instance to associate the notification with.
- Update Type
-
When to send the notification:
On True– whenevertriggered = trueOn False– whenevertriggered = falseOn First True– the first timetriggered = trueOn First False– the first timetriggered = falseOn Change– when the value oftriggeredchangesOn All– every time, regardless of the value oftriggered
- Time Since Last
- The delay from when an email notification is sent until the next notification is sent.
- Email Template
- The New and Edit buttons summon the Email Editor. Specify the subject and content of the email. Drag data from the Data Tags list to include it in the subject or content.
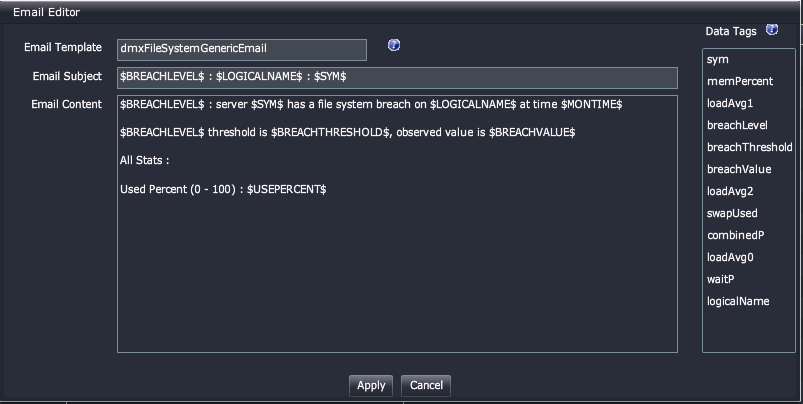
Editing an email template- Recipients
- A table of email contacts: check Include for the notifications to be sent to a recipient.
Email suspension
Set up periods when email notifications are temporarily suspended.
Simply select the notification you want to suspend and enter a start/end date and time (hh ss) for the suspension; click Add New.
Multiple suspension periods can be set for each notification.
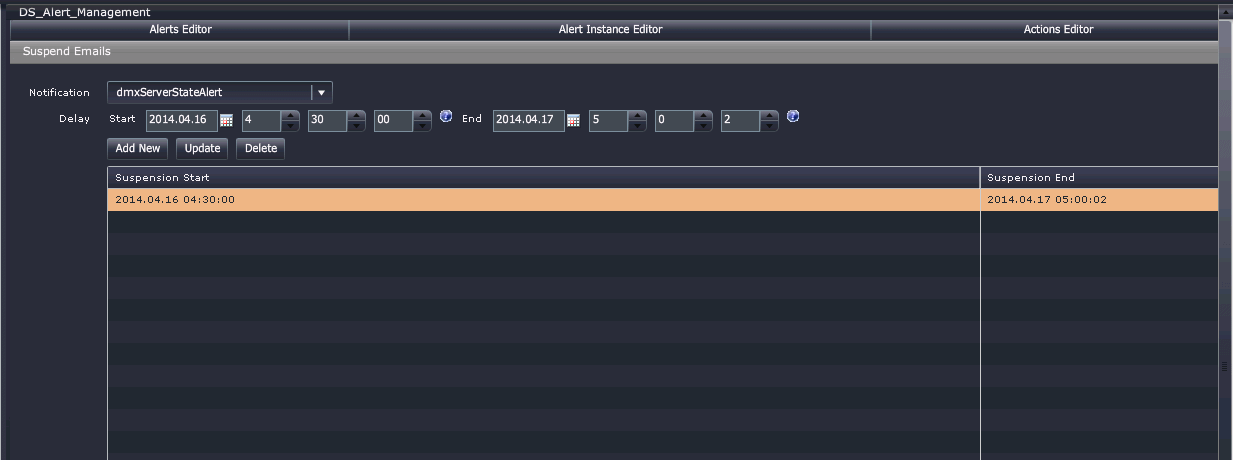
Select any suspension and click Delete to remove it.
Logs
Inspect the events that triggered an alert.
Filter the logs by notifications, alerts and date/time range. Click View to apply your filters.
Triggering alerts
All processes launched from KX Control support alerts by default. After setting up an alert on a process, as described above, the alert will remain in the process, but (by default) it might not be triggered.
To trigger alerts, the process code must call an alert-generator API function (.ag.upd) with the following two arguments:
- the trigger table name as a symbol
- a table of data corresponding to the trigger schema
Some of the analytics provided by KX Stream support this by default, e.g. dxUpdInsertPub:
{[tabName;data]
  upsert[tabName;data];
  .ds.rte.executeUpdCallBacks[tabName;data];
  .ag.upd[tabName;data];
  }