KX Connect (Python)
This section assumes that you have python installed in your system. If not, install before proceeding further.
Install dependencies
There are core dependencies that must be installed to run the code provided below. There are dependencies to perform additional functions such as exporting to a CSV file and visualizing data. Take the time now to install what you need.
Code
Here is the brief outline of authenticating with KX Connect.
Snippets of code are shown as examples but use the code in the appendix for a fully working example.
KX Connect Document
Details of KX Connect can be found in your deployed system at http://host:port/connect/index.html
This should include dynamically generated API documentation of your analytics.
Login
All users accessing Connect API must login before sending further requests.
-
The login request is made using a POST call to
https://<host>:<port>/connect/api/auth/login. -
A client must send a JSON message of type "LoginReq" and UUID with their credentials.
Example:
{ "msg" : [{ "username" : "kxSupport", "password" : "12345678" }],
"type" : "LoginReq", "id" : "e133598e-7b9e-429a-b3e5-bda881c47024",
"date" : "Fri, 26 Jul 2019 15:59:00 GMT" }
If successfully logged in, the response will include a sessionId which will be used to make further requests.
Creating request
Below are the steps to create an authorization HTTP header string.
Build StringToSign
The elements necessary to construct the signed input string are:
JSON_Data
{
    "type" : <METHOD_REQUEST>,
    "msg" : [
        <PARAMS>
    ],
    "id" : "e133598e-7b9e-429a-b3e5-bda881c47024",
    "date" : "Fri, 26 Jul 2019 16:59:00 GMT"
}

- HTTP-Verb ("POST")
- authPath ("/connect/api/< METHOD_GROUP>/<METHOD_NAME>)
- username (same as login username)
- JSON_Data hashed using MD5
- Content type ("Application-json")
- dateStr (date in RFC1123 format "EEE, dd, MMM yyyy HH:mm:ss zzz")
- sessionId (of valid login)
Create the message signature
- Encrypt
stringToSignwith HMAC-SHA1 usingsessionIdas the secret key. Then, encode the above with Base64.
// python 3
hmacEncStr = HMAC.new(sessionId.encode("UTF-8"), (stringToSign.encode("UTF-8")), SHA).digest()
signature = b64encode(hmacEncStr).decode()

// python 2
hmacEncStr = HMAC.new(sessionId, stringToSign.encode("utf-8"), SHA).digest()
signature = b64encode(hmacEncStr)
Create the authorization header
-
The
authorizationvalue is the username + the last 5 characters of the session id + colon(:) + signature. -
Set the headers and make an API call.
headers = {
    "Content-Type" : mimeHeader,
    "Authorization" : authorization
}

# Send REST API request
requests.post(url=APIRequestPath, verify=False, data=json.dumps(JSON_Data), headers=headers)
CSV and visualization
-
If exporting the API response to a CSV file and visualizing the data set, add
exportPlot.pyfile in the same directory asconnectSample.py. -
Uncomment a few lines in
connectSample.py:
## Add below if you wish to call optional functions (CSV and plot export)
# import exportPlot

## Call below if you wish to export CSV or line graph
# optFunc(queryResp, METHOD_NAME)
Running code
From where your python script is located.
- Run with default parameters:
python[2|3] connectSample.py
- Run with override parameters:
| Options | Description |
|---|---|
| --hp | host:port |
| --user | username |
| --pw | password |
| --method | method name |
Examples:
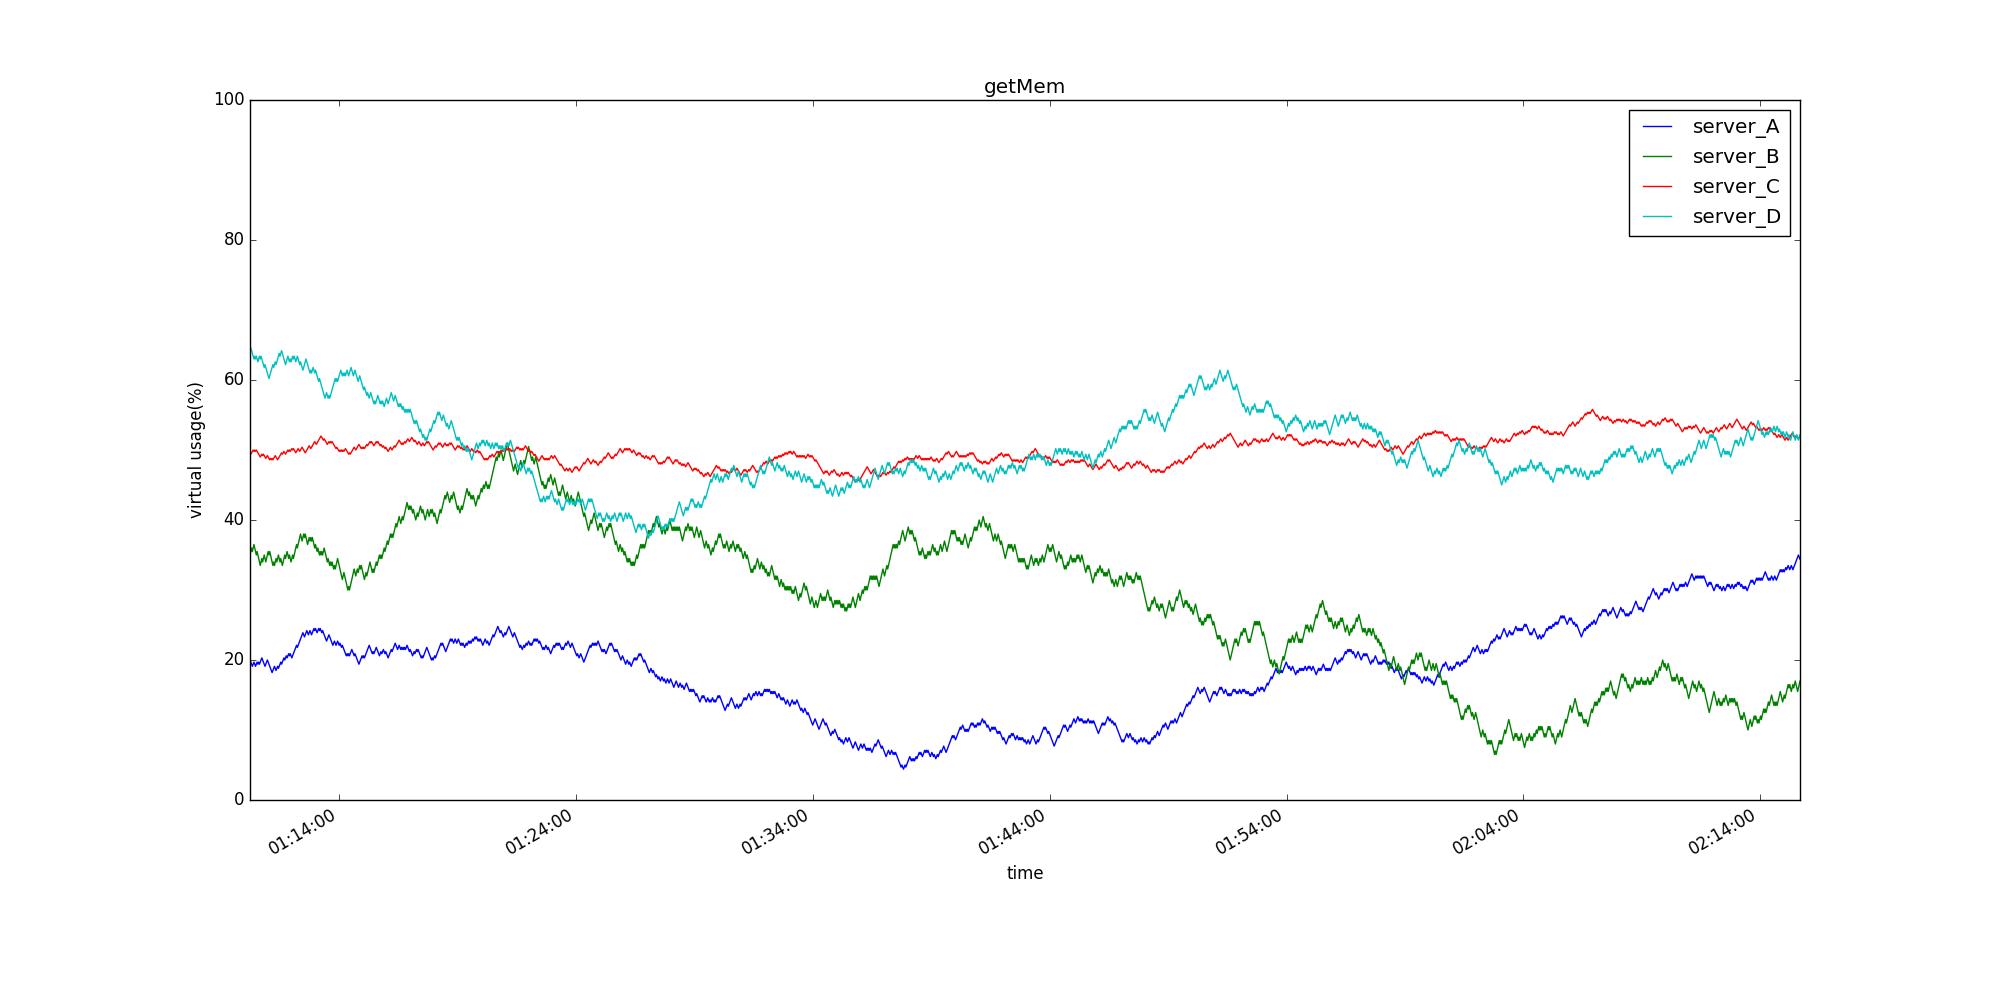
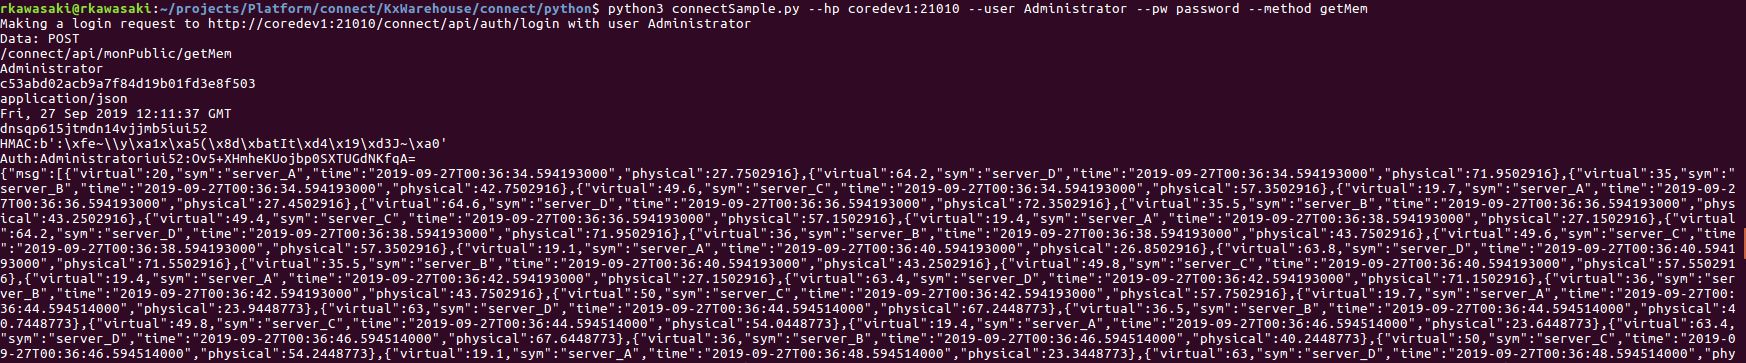
python2 connectSample.py --hp <host:port> --user Administrator --pw password --method getMem
python3 connectSample.py --hp <host:port> --method getMemBucket
If you've coded to print the result out to console, it should look like this:
If you've enabled plotting, it should create an image in your /tmp directory.