Pipelines overview
A pipeline is a customizable data ingestion service. Open a pipeline workspace from the Document bar or Perspective menu to define a pipeline.
Nodes
Nodes are the functional elements used to create a pipeline. Each node has a distinct function either to read, convert, transform or write data to the database. Nodes are connected together in a workflow to import data to kdb Insights Enterprise. Click-and-drag nodes from the left-hand entity tree into the central workspace.
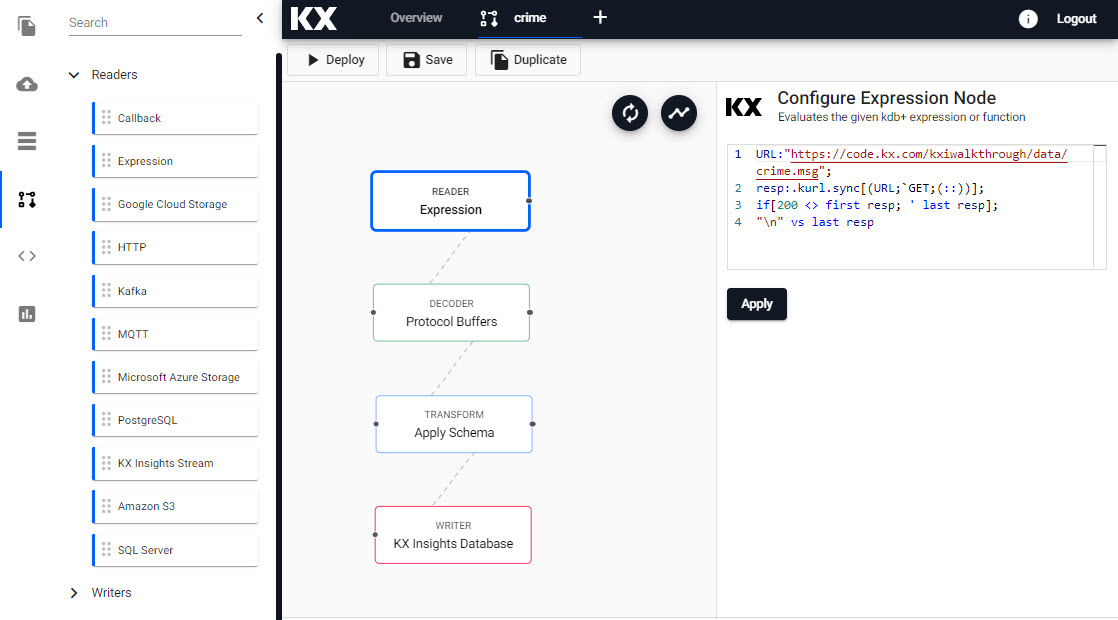
An example expression pipeline with Reader, Decoder, Transform and Writer nodes; right-click for menu options.
Actions
When a node is added, details of its function are displayed in the right-hand property panel.
Right-click on a node for a list of options: rename, remove- or duplicate. A duplicated node will retain the contents of the original, and will have the name appended with a numeric tag; -n.
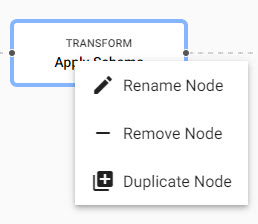
Right click menu on node editing.
Types
Select from the following types of node:
Connect nodes together and configure each node's parameters to build the pipeline. Alternatively, have kdb Insights Enterprise build a pipeline for you with import. Create a database using the simple wizard. Associate your pipeline with an assembly before deploying, or deploy the pipeline after completion to an active assembly. Query your data in scratchpad.
Options
The pipeline workspace includes:
Pipeline workspace options and configuration properties.
| icon | function |
|---|---|
 |
Reset view |
 |
Automatically layout pipeline |
- From the Document menu bar or Perspective icon menu on the left, create a new Pipeline by clicking

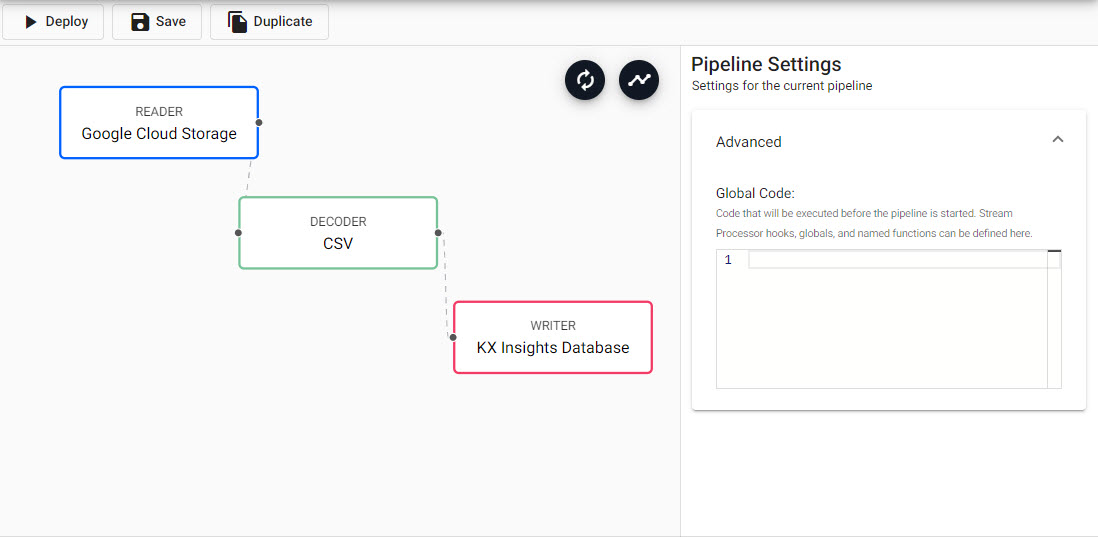
Global pipeline settings are available in the right-hand panel shared with node properties.
Global code
Under the Advanced dropdown, global code is executed before a pipeline is started; this code may be necessary for Stream Processor hooks, globals and named functions.
Get started
1. Access pipelines template
From the Document menu bar or Perspective icon menu on the left, create a new pipeline by clicking
2. Create a pipeline workflow
-
Click-and-drag a reader node into the central workspace to start the process of building a pipeline.
Alternatively, quick start with Import
Sample expression pipeline workflow
-
Add a Reader Expression node. Select the node, and in the code editor (right-hand property panel), add the following
qcode, then apply.n:2000; ([] date:n?(reverse .z.d-1+til 10); instance:n?
inst1inst2inst3inst4; sym:n?USDEURGBPJPY;
cnt:n?10) -
Add a Transform Apply Schema node, set its properties, apply, then connect it to the Reader node.
setting value Data Format Any column name column type parse strings date Timestamp Auto instance Symbol Auto sym Symbol Auto cnt Integer Auto You can create a schema table as part of a database using the wizard. This is recommended, as the database is required for receiving data in the next step. Click
 , select the database, then the schema from their respective dropdowns.
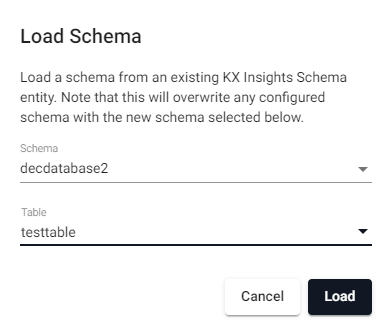
Load a schema from a database.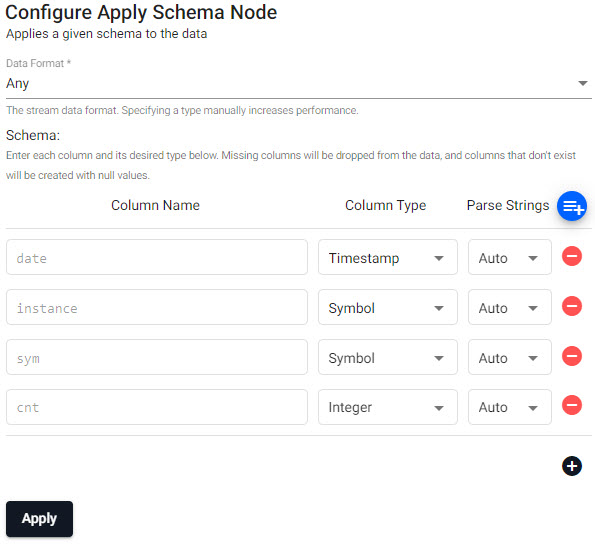
Predefined schema from database. -
Add a Writer KX Insights Database node. Create a database and add a table with the database wizard if not previously done. Complete the details of the node, apply and connect it to the Transform node.
setting value Database yourdatabasename Table yourschematablename Write Direct to HDB unchecked Deduplicate Stream checked 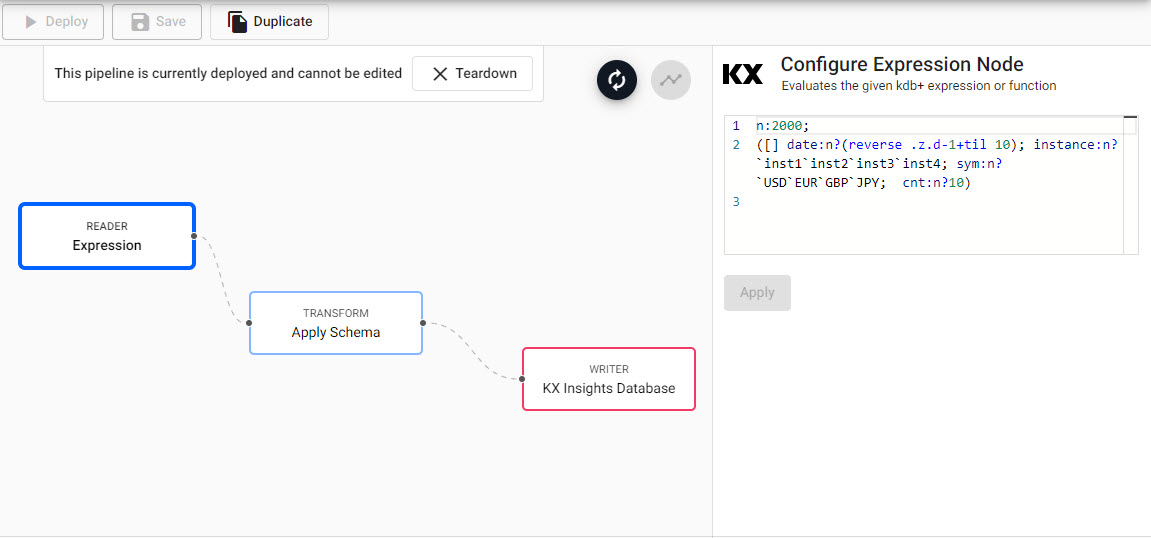
Completed expression pipeline after deployment.
-
-
Continue to build the pipeline by adding nodes to the workspace, setting and applying their properties, before connecting them together with the node-anchors.
A typical pipeline has at minimum a Reader, Transform, and Writer node.
to: take this action Remove a node right-click the node Add a node click-and-drag from the entity tree or right-click in an empty part of the workspace Change a connection rollover to display the move icon and drag-connect 
A connection of nodes by linking to the connector edges together.Every data set ingested by a pipeline requires a timestamp partition. This is configured in the schema Transform node.
All schemas require a
timestampcolumn to be compatible with a kdb+ database. kdb+ Insights Enterprise will automatically set the data partition (required) to the firsttimestampcolumn in your data. This can be changed to another column as required.
Additional requirements for Kafka and Postgres pipelines
In order to use Kafka and Postgres pipelines, relevant charts must be installed, running, and accessible on the cluster. To install, refer to installation instructions.
Lower Case required for naming
When configuring pipelines, lower case should be used in all instances of names and references.
3. Save
Save the pipeline. The pipeline name should be lowercase, only include letters and numbers, and exclude special characters other than -.

Save the pipeline
A pipeline can be associated with an assembly prior to deployment.
Duplicate
Creates a copy of the pipeline.
4. Deploy
Open the Deployment dialog.
Click  from the Deployment dialog to activate a pipeline.
Deploy the assembly with the database used by a pipeline before deploying the pipeline.
Pipelines require an active database to receive data. Pipelines can be associated with an assembly and deployed together, but if deployed separately, the assembly must be deployed before the pipeline. An active assembly shows a green circle with a tick next to its name in the left-hand Assemblies menu.
Deployed pipelines are deployed indefinitely. If a deployed pipeline errors, it will remain deployed.
Test deploy
Click  from deployment dialog to run a test deploy. A test deploy runs with data tracing enabled, and tears down the pipeline at the end of the test. The pipeline is automatically torn down if it errors, when it receives the first batch of data, or after 30 seconds of waiting for data; whichever comes first.
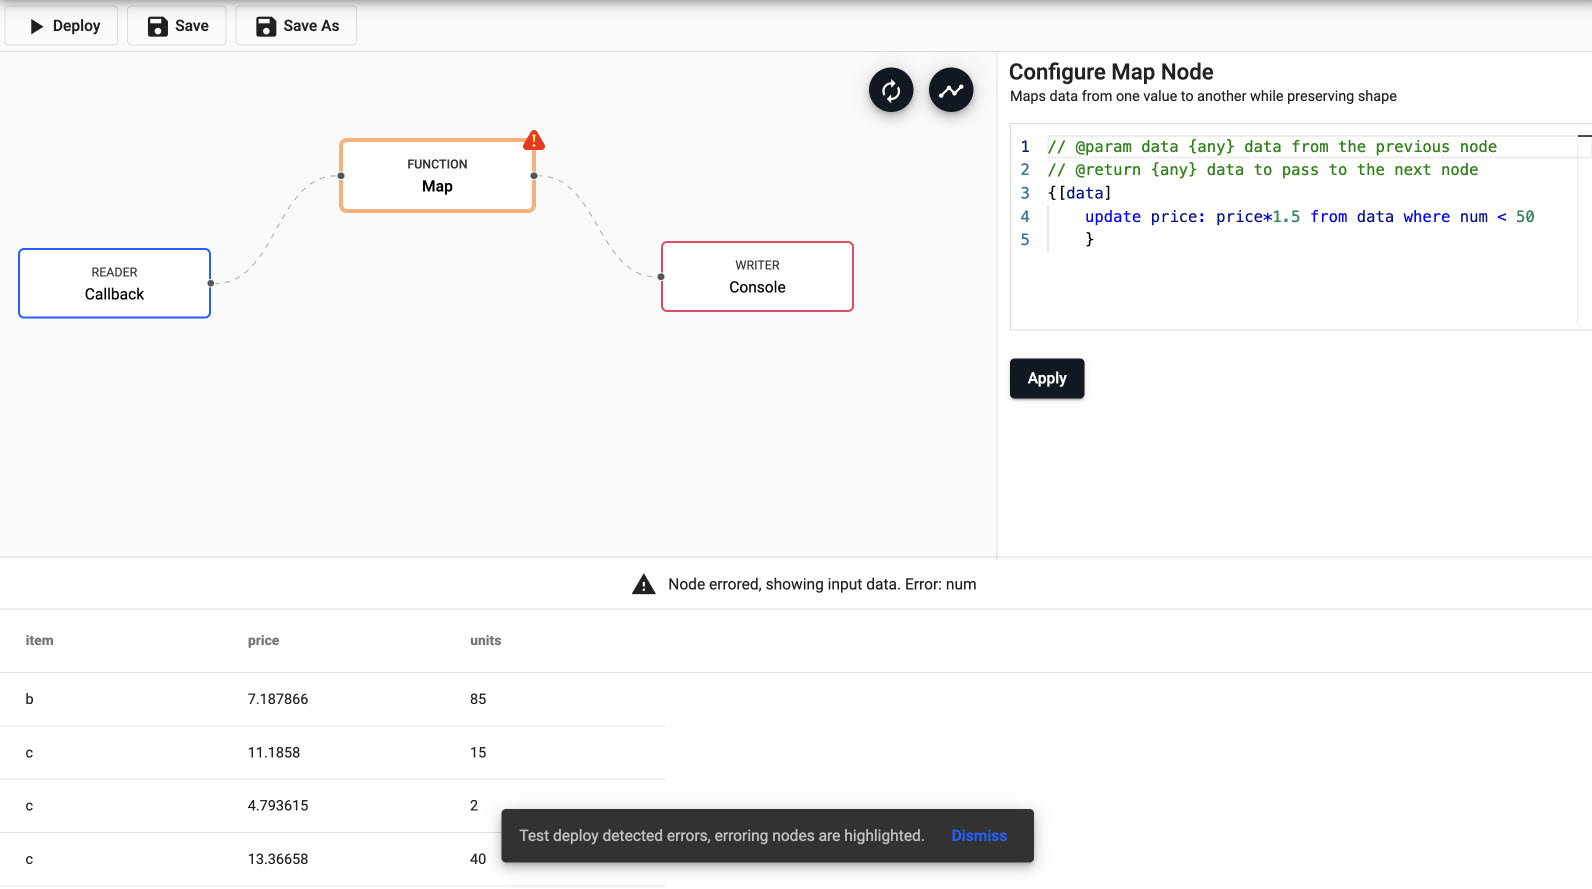
Any error nodes will be highlighted in the pipeline workflow.
Data outputted by each node is viewable by selecting the node.
Erroring nodes
When viewing data for a given node, the data being viewed is the data as it leaves that node. However, when a node errors the input data is displayed.
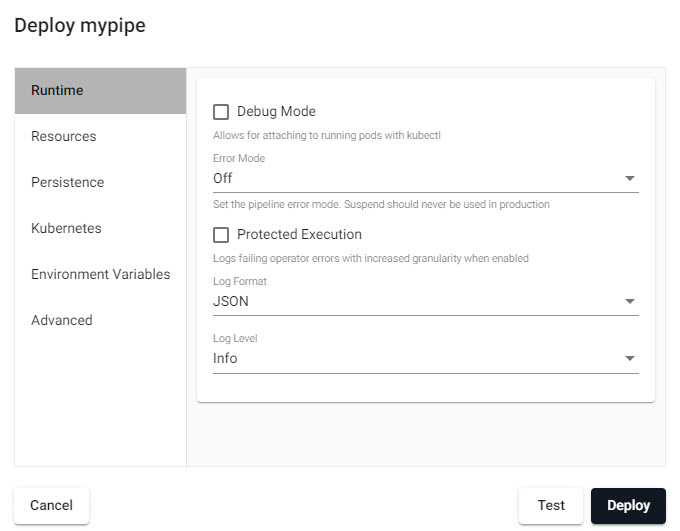
Pipeline Deployment dialog with option for a test deploy and a full deploy.
Deployment dialog
The majority of deployments do not require changes in the Deployment dialog.
Pipeline Deployment dialog.
Runtime
| item | description |
|---|---|
| Debug Mode | Enable facility to debug pipeline. |
| Error Mode | Select between Off, Suspend or Dump Stack. Don't use Suspend in a Production Environment. |
| Protected Execution | Enabled for greater granularity in error reporting. When enabled, operating performance may be impacted. |
| Log Format | Define debug reporting format; select between JSON or Text formats. |
| Log Level | Select between Info, Trace, Debug, Warning, Error or Fatal. |
Resources
Controller:
CPU
| item | description |
|---|---|
| Minimum CPU | Minimum amount of CPU for pipeline; 1 for one core, 0.5 is half time for one core (>=0.01 CPU). |
| Maximum CPU | Maximum amount of CPU for pipeline; must be <= 4 CPU. |
Memory
| item | description |
|---|---|
| Minimum Memory | Minimum memory to allocate to pipeline and always be available; >= 1 MB. |
| Maximum Memory | Maximum memory to allocate to pipeline; once reached it will return out-of-memory error; <= 2000 MB. |
Worker:
CPU
| item | description |
|---|---|
| Minimum CPU | Minimum amount of CPU for pipeline; 1 for one core, 0.5 is half time for one core (>=0.01 CPU). |
| Maximum CPU | Maximum amount of CPU for pipeline. |
Memory
| item | description |
|---|---|
| Minimum Memory | Minimum memory to allocate to pipeline and always be available; >= 1 MB. |
| Maximum Memory | Maximum memory to allocate to pipeline; once reached it will return out-of-memory error. |
Config
| item | description |
|---|---|
| Minimum number of workers | Define the minimum number of workers that can be created to run the pipeline; >= 1. |
| Maximum number of workers | Define the maximum number of workers that can be created to run the pipeline; <= 10. |
| Maximum number of worker threads | Maximum numboer of worker threads; value between 1 and 16. |
Persistence
Configure a custom image for different SP cluster components.
Controller
Kubernetes persistence configuration.
| item | description |
|---|---|
| Disabled | Enabled by default, click to disable. |
| Storage Class | Kubernetes storage class name; e.g. standard. |
| Storage Size | Size volume allocated to each controller; defaults to 20Gi. |
| Checkpoint Frequency | Check frequency in milliseconds, defaults to 5,000. |
Storage Class
Ensure Storage Class is set to a valid class. This is defined in the cluster and may be different across cloud providers i.e. GCP: standard, AWS: gp2, Azure: default. This information can be retrieved by running:
kubectl get storageclass
Worker
Kubernetes persistence configuration.
| item | description |
|---|---|
| Disabled | Enabled by default, click to disable. |
| Storage Class | Kubernetes storage class name; e.g. standard. |
| Storage Size | Size volume allocated to each Worker; defaults to 20Gi. |
| Checkpoint Frequency | Check frequency in milliseconds, defaults to 5,000. |
Kubernetes
| item | description |
|---|---|
| Label | Add a label and value to created resources. |
| Image Pull Secrets | Add Kubernetes secret reference name; for example, kx-access |
Environment variables
Add listed variable and values, as many as required.
| item | description |
|---|---|
| Variable | Value |
For more information on Kubernetes configuration.
Advanced
| item | description |
|---|---|
| Worker Image | A registry URL that points to a custom Stream Processor worker image. |
| Controller Image | A registry URL that points to a custom Stream Processor controller image. |
5. Query
Data from a successfully deployed pipeline is then queried; open an Query workspace in the Document menu bar from the "+" menu, Overview page, or from the icon menu on the left.
-
Open the SQL tab, in the SQL editor, query the table name as defined in the KX Insights Database Writer node of the pipeline:
SQL query
SELECT * FROM databasetablename
-
Click

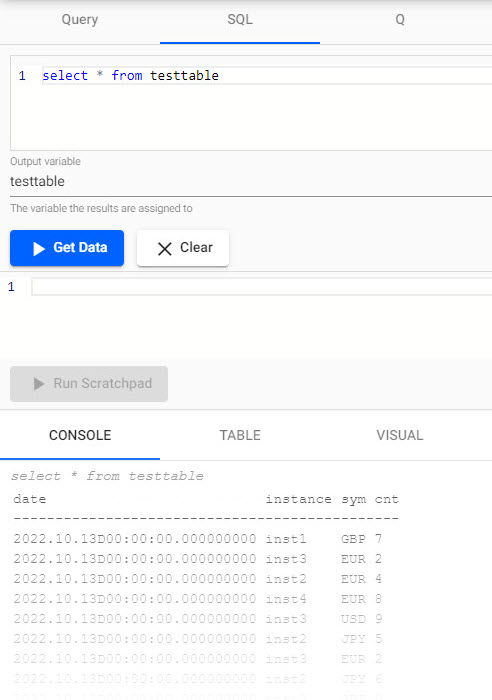
Console output of SQL query. -
A running pipeline consumes memory and cpu resources. When done with a pipeline, tear it down to free up resources.
6. Teardown a pipeline
Running pipelines consume memory and CPU resoruces. When you no longer require a pipeline, tear it down to free resources.
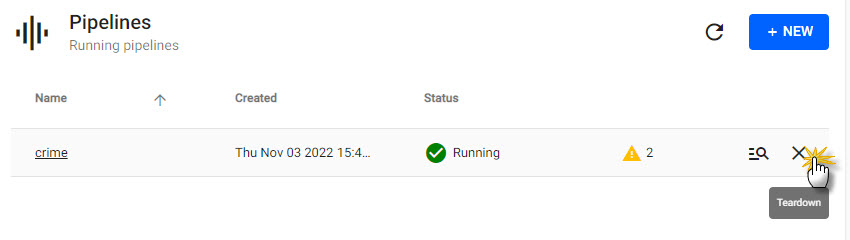
Teardown a pipeline from the list of running pipelines.
Click Clean up resources after tearing down to delete pipeline data to help free up additional resources.
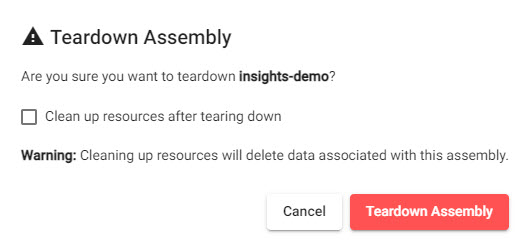
Clean up resources after tearing down deletes pipeline data.