Quick start
This section will walk through the process of generating a license for a local workstation. This aims to introduce the basic commands of the tools and interactions with KX.
It assumes;
- the target system is the local machine, and is a supported OS
- it has klic installed and is connected to the Internet
- has a version of kdb+ Cloud Edition 4.0 (>=2022.01.31) installed at
$QHOMEor$HOME/q(no license is required) - the current directory or
$QLICis a writable location
Authentication
Using a connected browser
If the environment you are running on has a connected browser, use the following mechanism to authenticate.
Start by authenticating with KX's license server. Replace your email address in the command below:
klic authenticate login --email <EMAIL>@example.com
This will prompt you to open a URL in your browser, similar to below but with your email address.
Your browser has been opened to visit:

    https://ll.kx.com/oauth/authorize?email=youremail%example.com&redirect_uri=http%3A%2F%2Flocalhost%3A46107%2Fredirect_uri
A browser session will open like this:
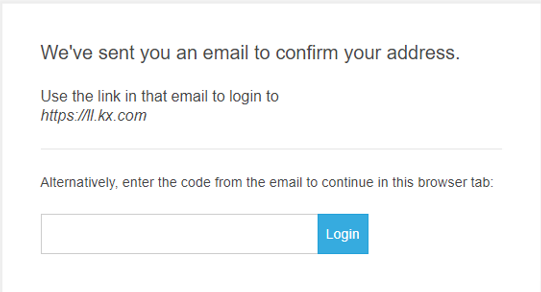
Go to your email. You will have received an email from Portier noreply@kx.com - with a unique code composed of two five digit pairs, e.g.:
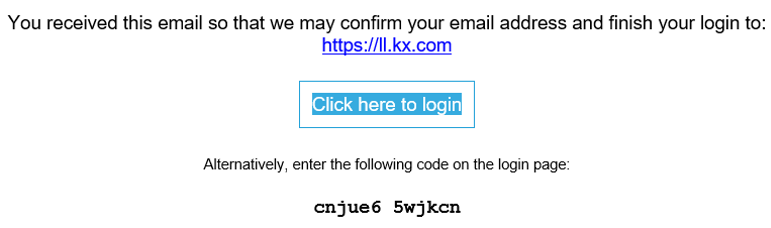
You now have two options, either:
- Click "Click here to login", or
- Enter the five digit code pairs into th browser input screen above. Check you have removed any trailing spaces, though leave the gap inbetween, and click "Login"
In both cases the email loop will complete, with the following message:

Now, return to your shell session and you will be authenticated correctly.
Using a browser that is not connected
If you wish to authenticate and there is no browser available on the environment, you can invoke the authentication thus:
klic authenticate login --force-code --email <EMAIL>@example.com
This will produce a URL ready to pasted into a remote browser, with your email address, e.g.:
Go to the following link in your browser:
    https://ll.kx.com/oauth/authorize?email=youremail%40example.com&redirect_uri=urn%3Aietf%3Awg%3Aoauth%3A2.0%3Aoob
This triggers the sending of an email to the provided email address and shows the following page:
DO NOT click the link in the email page
Instead, copy the two five digit code pairs and paste into the Login input box above. Check you have removed any trailing spaces, though leave the gap inbetween.
This will give you a new page with a verification code like below:

Copy this into your shell session at the Enter verification code: prompt.
Press Enter. There will be no further prompt, you are now authenticated.
Enrolment
Now that you have successfully authenticated, you create a tenant using the command below, replacing My Tenant with a name of your choosing:
klic tenant create 'My Tenant' --description "klic docs tenant"
Once created, you will be provided with a UUID, referred to as TENANT-UUID; make a note of this as you will need it later.
However, it can always be recovered by running the command to list the tenants:
klic tenant list
Entitlement
Send your TENANT-UUID to your account manager and licadmin@kx.com who will arrange
for you to be able to issue licenses to your tenant.
Environment
Creating the environment captures an identity for the target system.
klic environment create <TENANT-UUID> 'My Environment' --description "klic docs environment"
Once created you will be provided with a UUID (referred to as ENVIRONMENT-UUID) that you will need to make a note of.
You may recover it by listing the environments available to you with:
klic environment list <TENANT-UUID>
License Creation
Now you have enrolled your environment, you may issue licenses for it by running:
klic license create <ENVIRONMENT-UUID> 'My License' --description "klic docs license"
Once created you will be provided with a UUID (referred to as LICENSE-UUID) that you will need to make a note of.
You may recover it by listing the licenses issued to you with:
klic license list ENVIRONMENT-UUID
Tip
The LICENSE-UUID is included in the banner when you start q
When you create a license, the process will write out a kx.lic file to the directory pointed to by your
$QLIC variable or $PWD if not not set.
Then run kdb+, kdb Insights, or kdb Insights Enterprise against this license. You should now be presented with a functioning instance.