GPU Setup for KDB-X
This guide explains how to configure and verify a GPU-capable environment for running KDB-X GPU-accelerated workloads.
Prerequisites
- NVIDIA drivers compatible with
CUDA 13.1orCUDA 12.9 - Linux host with CUDA-capable Data Center GPUs
- Docker (optional but recommended)
Overview of CUDA environment
The CUDA software environment consists of three parts:
- CUDA Toolkit - SDK containing runtime libraries, headers, and development tools
- CUDA driver - user-mode driver for running CUDA applications (
libcuda.so) - NVIDIA kernel driver - kernel-mode driver providing OS-level GPU support (
nvidia.ko)
On Linux systems, the CUDA driver and kernel mode components are delivered together in the NVIDIA display driver package, as shown below:
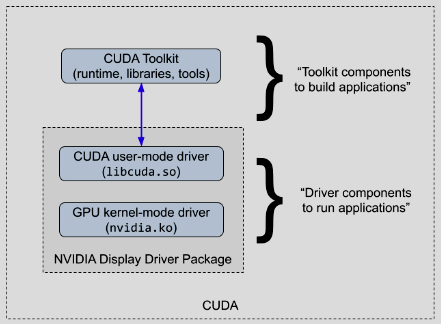
The CUDA Toolkit is required to build CUDA applications, not to run them.
However, the KDB‑X GPU module relies on several shared CUDA libraries. You must make these libraries available, either by installing the CUDA Toolkit or by using an environment (such as a container) that provides them.
Purpose of this guide
This guide covers the recommended approach for running the KDB-X GPU module CUDA application and includes:
- host installation of the required drivers compatible with the KDB-X module CUDA build
- running the KDB-X application in an environment that provides the required CUDA shared libraries
Note
To run any CUDA application, your system must include a CUDA‑capable GPU and an NVIDIA driver compatible with the CUDA Toolkit version used to build the application. If you previously installed the CUDA Toolkit on the host, it likely installed a matching driver as well, but you must still verify that the version aligns with the KDB‑X CUDA build.
CUDA-capable GPUs
To run the GPU module, the host machine must include one or more CUDA‑capable data‑centre GPUs. To check whether the system has a CUDA-capable NVIDIA GPU, run:
lspci | grep -i nvidia
38:00.0 3D controller: NVIDIA Corporation AD104GL [L4] (rev a1)
3a:00.0 3D controller: NVIDIA Corporation AD104GL [L4] (rev a1)
3c:00.0 3D controller: NVIDIA Corporation AD104GL [L4] (rev a1)
3e:00.0 3D controller: NVIDIA Corporation AD104GL [L4] (rev a1)
L4 GPUs, which are data‑centre-class devices suitable for CUDA workloads.
Note
If the command does not return any results, contact your system administrator.
You can find a full list of CUDA‑capable GPUs on NVIDIA's website: CUDA GPU Compute Capability.
NVIDIA designates hardware architectures with a compute capability and streaming multiprocessor (SM) version. The KDB-X GPU module supports the following SM versions:
| SM version | Architecture | Example GPU |
|---|---|---|
sm_80 |
Ampere | A100 |
sm_89 |
Ada Lovelace | L4 |
sm_90 |
Hopper | H100 |
Check existing drivers with NVIDIA SMI (System Management Interface)
To check whether the CUDA Toolkit or NVIDIA drivers are already installed, run:
nvidia-smi
+-----------------------------------------------------------------------------------------+
| NVIDIA-SMI 590.48.01              Driver Version: 590.48.01      CUDA Version: 13.1     |
+-----------------------------------------+------------------------+----------------------+
| GPU  Name                 Persistence-M | Bus-Id          Disp.A | Volatile Uncorr. ECC |
| Fan  Temp   Perf          Pwr:Usage/Cap |           Memory-Usage | GPU-Util  Compute M. |
|                                         |                        |               MIG M. |
|=========================================+========================+======================|
|   0  NVIDIA L4                      Off |   00000000:38:00.0 Off |                    0 |
| N/A   38C    P0             27W /   72W |       0MiB /  23034MiB |      0%      Default |
|                                         |                        |                  N/A |
+-----------------------------------------+------------------------+----------------------+
|   1  NVIDIA L4                      Off |   00000000:3A:00.0 Off |                    0 |
| N/A   36C    P0             27W /   72W |       0MiB /  23034MiB |      0%      Default |
|                                         |                        |                  N/A |
+-----------------------------------------+------------------------+----------------------+
|   2  NVIDIA L4                      Off |   00000000:3C:00.0 Off |                    0 |
| N/A   40C    P0             28W /   72W |       0MiB /  23034MiB |      2%      Default |
|                                         |                        |                  N/A |
+-----------------------------------------+------------------------+----------------------+
|   3  NVIDIA L4                      Off |   00000000:3E:00.0 Off |                    0 |
| N/A   38C    P0             27W /   72W |       0MiB /  23034MiB |      0%      Default |
|                                         |                        |                  N/A |
+-----------------------------------------+------------------------+----------------------+

+-----------------------------------------------------------------------------------------+
| Processes:                                                                              |
|  GPU   GI   CI              PID   Type   Process name                        GPU Memory |
|        ID   ID                                                               Usage      |
|=========================================================================================|
|  No running processes found                                                             |
+-----------------------------------------------------------------------------------------+
If the command returns nvidia-smi not found, the drivers are not installed. Proceed to the next section.
If a driver is installed, you still need to check forward compatibility.
Driver dependencies and CUDA compatibility
The KDB-X GPU module is compatible with the CUDA Toolkit 12.9 and 13.1.
CUDA provides backward compatibility, meaning a newer NVIDIA driver can run applications built with an older CUDA Toolkit. We recommend installing the latest driver. Use the following links to install version v590 for your OS:
For driver details, refer to the Data Center driver documentation. For reference, you can view the list of all Tesla‑class driver versions.
You must install the required drivers for a compatible host OS.
For installation examples and verification, refer to:
Forward compatibility of existing drivers
If GPU drivers are already installed on the host, you still need to check forward compatibility for CUDA 13.1 and you may need to install the CUDA forward compatibility package if a full driver update is not possible.
Fabric Manager
GPUs that use NVSwitch/NVLink for GPU-to-GPU communication, such as H100's, require Fabric Manager.
Install the Fabric Manager service on the host, then start it. The installation process depends on your hardware and deployment mode. For example, refer to the instructions for the bare metal mode.
CUDA library dependencies
In addition to the drivers, the KDB-X module dynamically links against the CUDA runtime and multiple other CUDA libraries. You can provide these libraries in multiple ways as shown in the following sections.
NVIDIA containers
We recommend running the KDB-X application in an NVIDIA container, which packages the required dependencies for running applications built for a specific CUDA Toolkit version (refer to the NVIDIA Docker images).
When using CUDA containers:
- The host only needs the NVIDIA driver.
- You do not need to install the CUDA Toolkit.
- You avoid modifying or upgrading system‑wide CUDA libraries that other applications might rely on.
CUDA applications maintain backward compatibility with newer drivers, so driver updates performed on the host will still work with the containerized CUDA application.
Running application on the host (non-containerized)
Run the application directly on the host when:
- Docker is not available
- Pulling and using Docker images is not preferred
- The CUDA Toolkit is already installed or will be installed
In this case, install the CUDA 13.1 Toolkit or ensure the CUDA 13.1 runtime and shared libraries are available to the KDB-X application. For more information, refer to the CUDA Installation Guide for Linux - v13.1.
NVIDIA Docker images
NVIDIA publishes CUDA images in three flavors using the tag format nvidia/cuda:<version>-<flavor>-<os>:
base- minimallibcudart(runtime) and compatibility libs for deploying pre-built applicationsruntime- full CUDA shared libraries for running pre-built applications (recommended for KDB‑X)devel- includes headers andnvcctoolchain (only if you need to compile)
NVIDIA Container Toolkit
The container image only packages the user-mode libraries. It cannot include the kernel-mode drivers because those modules must match the exact Linux kernel version running on the host.
Install the NVIDIA Container Toolkit to allow Docker to bind the host's devices to the container at launch. This enables CUDA applications inside the container to interact with the host GPU. You can then run GPU‑enabled containers using the --gpus flag.
Install the container toolkit for your host OS.
Example installation guides:
Running a KDB-X CUDA application
With the environment fully configured, install the specific KDB-X components and run the GPU‑accelerated application as described in Running a KDB-X GPU Application.
Example install and component overview (Ubuntu)
This section provides an example installation on an Ubuntu 24.04 operating system which uses L4 data center GPUs. It walks through each step, explains the components installed, and identifies important file locations. While the steps and details vary across operating systems, the dependencies remain the same.
Driver install
NVIDIA driver components
To run the application, you need the following CUDA drivers:
- CUDA user-mode driver (
libcuda.so) - called by the KDB‑X application - GPU kernel-mode driver (
nvidia.ko) - talks directly to GPU hardware (thekernel module)
Example dependency call chain:
KDB-X App → libcudart.so (CUDA Runtime API - high-level) → libcuda.so (CUDA Driver API - low-level, talks to kernel) → nvidia.ko (kernel module) → GPU
Note
CUDA applications often statically link libcudart.so, but KDB‑X applications do not.
Kernel driver module overview
The driver installation provides both the user-mode driver libcuda.so and kernel-mode driver nvidia.ko.
The kernel-mode driver is the core module that is installed as part of other kernel modules:
nvidia.ko- Core driver - talks to the GPU hardwarenvidia_modeset.ko- Display/mode setting supportnvidia_drm.ko- DRM (Direct Rendering Manager) integrationnvidia_uvm.ko- Unified Virtual Memory - needed for CUDA
The kernel loads whichever modules the application needs. For headless CUDA applications, at least nvidia and nvidia_uvm load automatically.
The kernel modules are built during driver installation to the current kernel version, for example:
echo $(uname -r)
6.14.0-1018-aws
Kernel versions and DKMS
If the kernel updates, previously built modules no longer work and require a manual reinstall of the driver. DKMS (Dynamic Kernel Module Support) is a framework that automatically rebuilds kernel modules on kernel updates.
Kernel update installed → DKMS detects new kernel → Rebuilds nvidia.ko against new kernel headers → Module ready after reboot
Most Linux distributions package NVIDIA drivers with DKMS enabled.
Install drivers
Ensure headers are available to build kernel modules:
apt install linux-headers-$(uname -r)
ls -la /usr/src/linux-headers-$(uname -r)
You should see a directory containing header files and a Makefile. If that directory is missing, the headers are not installed.
Install the latest drivers from your OS package manager:
wget https://developer.download.nvidia.com/compute/cuda/repos/ubuntu2204/x86_64/cuda-keyring_1.1-1_all.deb
sudo dpkg -i cuda-keyring_1.1-1_all.deb
sudo apt update
sudo apt install cuda-drivers
Verify installation
Check that DKMS built the kernel modules:
sudo ls -la /lib/modules/$(uname -r)/updates/dkms
drwxr-xr-x 2 root root     4096 Feb 12 11:51 .
drwxr-xr-x 3 root root     4096 Feb 12 11:51 ..
-rw-r--r-- 1 root root    73533 Feb 12 11:51 nvidia-drm.ko.zst
-rw-r--r-- 1 root root   721700 Feb 12 11:51 nvidia-modeset.ko.zst
-rw-r--r-- 1 root root     2192 Feb 12 11:51 nvidia-peermem.ko.zst
-rw-r--r-- 1 root root   817700 Feb 12 11:51 nvidia-uvm.ko.zst
-rw-r--r-- 1 root root 83713125 Feb 12 11:51 nvidia.ko.zst
Tip
If this directory is empty or missing, the drivers did not build successfully.
Check that kernel modules are loaded:
lsmod | grep nvidia
nvidia_uvm           2076672  0
nvidia              99549184  1 nvidia_uvm
If nothing returns, the modules are not loaded and you need to reboot the system.
Confirm user‑mode drivers are installed:
sudo find / -name "libcuda.so*" 2>/dev/null
/usr/lib/x86_64-linux-gnu/libcuda.so.1
/usr/lib/x86_64-linux-gnu/libcuda.so.590.48.01
/usr/lib/x86_64-linux-gnu/libcuda.so
If the command returns nothing, the installation is incomplete. Reboot the system and run the checks again.
Finally, confirm GPU visibility:
nvidia-smi
Container Toolkit install
Add repository and install
curl -fsSL https://nvidia.github.io/libnvidia-container/gpgkey | sudo gpg --dearmor -o /usr/share/keyrings/nvidia-container-toolkit-keyring.gpg
curl -s -L https://nvidia.github.io/libnvidia-container/stable/deb/nvidia-container-toolkit.list | \
  sed 's#deb https://#deb [signed-by=/usr/share/keyrings/nvidia-container-toolkit-keyring.gpg] https://#g' | \
  sudo tee /etc/apt/sources.list.d/nvidia-container-toolkit.list
sudo apt update
sudo apt install nvidia-container-toolkit
Configure Docker:
sudo nvidia-ctk runtime configure --runtime=docker
sudo systemctl restart docker
Run a sample workload
docker run --rm --gpus all nvidia/cuda:13.1.0-runtime-ubuntu24.04 nvidia-smi
If successful, this command displays GPUs as shown in the earlier section.
Inspect container libraries
List CUDA libraries inside the container:
ls -la /usr/local/cuda-13.1/lib64/lib
libOpenCL.so.1                libcufft.so.12                libcurand.so.10.4.1.34        libnppial.so.13               libnppig.so.13.0.2.21         libnpps.so.13                 libnvjpeg.so.13.0.2.28
libOpenCL.so.1.0              libcufft.so.12.1.0.31         libcusolver.so.12             libnppial.so.13.0.2.21        libnppim.so.13                libnpps.so.13.0.2.21          libnvrtc-builtins.so.13.1
libOpenCL.so.1.0.0            libcufftw.so.12               libcusolver.so.12.0.7.41      libnppicc.so.13               libnppim.so.13.0.2.21         libnvJitLink.so.13            libnvrtc-builtins.so.13.1.80
libcublas.so.13               libcufftw.so.12.1.0.31        libcusolverMg.so.12           libnppicc.so.13.0.2.21        libnppist.so.13               libnvJitLink.so.13.1.80       libnvrtc.so.13
libcublas.so.13.2.0.9         libcufile.so.0                libcusolverMg.so.12.0.7.41    libnppidei.so.13              libnppist.so.13.0.2.21        libnvblas.so.13               libnvrtc.so.13.1.80
libcublasLt.so.13             libcufile.so.1.16.0           libcusparse.so.12             libnppidei.so.13.0.2.21       libnppisu.so.13               libnvblas.so.13.2.0.9         libnvtx3interop.so
libcublasLt.so.13.2.0.9       libcufile_rdma.so.1           libcusparse.so.12.7.2.19      libnppif.so.13                libnppisu.so.13.0.2.21        libnvfatbin.so.13             libnvtx3interop.so.1
libcudart.so.13               libcufile_rdma.so.1.16.0      libnppc.so.13                 libnppif.so.13.0.2.21         libnppitc.so.13               libnvfatbin.so.13.1.80        libnvtx3interop.so.1.1.0
libcudart.so.13.1.80          libcurand.so.10               libnppc.so.13.0.2.21          libnppig.so.13                libnppitc.so.13.0.2.21        libnvjpeg.so.13
List driver libraries injected at runtime:
find / -name "libcuda.so*" 2>/dev/null
/usr/lib/x86_64-linux-gnu/libcuda.so.1
/usr/lib/x86_64-linux-gnu/libcuda.so.590.48.01
/usr/lib/x86_64-linux-gnu/libcuda.so
/usr/local/cuda-13.1/compat/libcuda.so.1
/usr/local/cuda-13.1/compat/libcuda.so.590.44.01
/usr/local/cuda-13.1/compat/libcuda.so
Note
The host's libcuda.so always overrides the version shipped with the container image.
Example install and component overview (Red Hat)
This section provides an example installation on a Rocky-Linux 10 operating system which uses L4 data center GPUs. It walks through each step, explains the components installed, and identifies important file locations. Although steps vary by operating system, the required dependencies remain the same.
Driver install
NVIDIA driver components
Refer to the earlier section on NVIDIA driver components for details on required driver modules and DKMS behavior. During installation, the driver builds its kernel modules for the currently running kernel, for example:
echo $(uname -r)
6.12.0-124.8.1.el10_1.x86_64
Install drivers
Ensure the system has the headers and tools needed to build kernel modules:
sudo dnf install dnf-plugins-core -y
sudo dnf install epel-release -y
sudo dnf install -y kernel-devel-$(uname -r) kernel-headers-$(uname -r) dkms gcc make
ls -la /usr/src/kernels/$(uname -r)
You should see a directory with header files and a Makefile. If that directory is missing, the headers are not installed.
Install the latest drivers from your OS package manager:
sudo dnf config-manager --add-repo http://developer.download.nvidia.com/compute/cuda/repos/rhel10/$(uname -m)/cuda-rhel10.repo
sudo dnf clean expire-cache
sudo dnf install cuda-drivers
Verify installation
Check that the kernel modules were built:
sudo ls -la /lib/modules/$(uname -r)/extra/
drwxr-xr-x. 2 root root      130 Feb 16 11:42 .
drwxr-xr-x. 8 root root     4096 Feb 16 12:15 ..
-rw-r--r--. 1 root root    55988 Feb 16 11:42 nvidia-drm.ko.xz
-rw-r--r--. 1 root root 83380788 Feb 16 11:42 nvidia.ko.xz
-rw-r--r--. 1 root root   647376 Feb 16 11:42 nvidia-modeset.ko.xz
-rw-r--r--. 1 root root     2156 Feb 16 11:42 nvidia-peermem.ko.xz
-rw-r--r--. 1 root root   617572 Feb 16 11:42 nvidia-uvm.ko.xz
Tip
If this directory is empty or missing, the drivers were not built successfully.
Verify that the kernel loaded the modules:
lsmod | grep nvidia
nvidia_uvm           2076672  0
nvidia              99549184  1 nvidia_uvm
If the command returns nothing, reboot the system.
Confirm installation of the user‑mode driver:
sudo find / -name "libcuda.so*" 2>/dev/null
/usr/lib64/libcuda.so
/usr/lib64/libcuda.so.1
/usr/lib64/libcuda.so.590.48.01
Verify GPU visibility:
nvidia-smi
If successful, this command displays GPUs as shown in the earlier section.
Container Toolkit install
Add repository and install
curl -s -L https://nvidia.github.io/libnvidia-container/stable/rpm/nvidia-container-toolkit.repo | \
  sudo tee /etc/yum.repos.d/nvidia-container-toolkit.repo

export NVIDIA_CONTAINER_TOOLKIT_VERSION=1.18.2-1
  sudo dnf install -y \
      nvidia-container-toolkit-${NVIDIA_CONTAINER_TOOLKIT_VERSION} \
      nvidia-container-toolkit-base-${NVIDIA_CONTAINER_TOOLKIT_VERSION} \
      libnvidia-container-tools-${NVIDIA_CONTAINER_TOOLKIT_VERSION} \
      libnvidia-container1-${NVIDIA_CONTAINER_TOOLKIT_VERSION}
Configure Docker:
sudo nvidia-ctk runtime configure --runtime=docker
sudo systemctl restart docker
Run a sample workload
docker run --rm --gpus all nvidia/cuda:13.1.0-runtime-rockylinux10 nvidia-smi
If successful, the command displays GPU information as shown in the earlier section.