Upload
This page describes how to set up and configure the Upload component.
The Upload component supports uploading and downloading files to and from the server.
The Upload component gives a view of a directory on the server and supports uploading and downloading files to and from it. Files are stored in ~/delta-data/fileStore.
The following example shows a file upload in progress.

Set Up Upload
To set up an Upload component, click-and-drag the component into the workspace and configure the following:
Refer to the Upload properties section for details on additional properties.
Lite Upload Server
KX Dashboards Direct only
This section applies to KX Dashboards Direct (self-contained kdb+) deployments only.
The component renders an <iframe> pointing to a standalone Node.js HTTP server. The server URL is built from Basics.Server and Basics.Port (default 4200).
The Dashboard Direct server lives in dash/q/data/uploads/. It has no npm dependencies — only Node.js is required.
On Windows, it starts automatically when you run dash.bat.
Start manually
Directly
# Default port 3000
node server.js

# Specific port (e.g. 4200 to match the component default)
node server.js 4200
Open http://localhost:4200 (or whichever port) to access the upload/download UI directly.
Docker
# Build the image (run from dash/q/data/uploads/)
docker build -t fileserver:1.1 .

# Run — files are persisted to $PWD/file-server on the host
docker run -d \
  -v $PWD/file-server:/app/download \
  -p 3000:3000 \
  --restart=always \
  fileserver:1.1
Or use the provided shell script:
chmod +x docker-run.sh
./docker-run.sh
Files uploaded via Docker are stored in $PWD/file-server on the host machine.
Upload Properties
The following sections provides details on how to configure the properties of the Upload component.
Basics
Open the Basics properties on the right and configure the properties described in the following table.
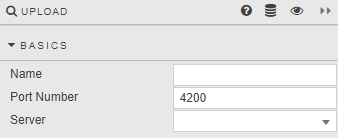
| Field | Description |
|---|---|
| Name | Enter a name for the component. |
| Port Number | The port number used by the server. |
| Server | The Server URL to which the files are uploaded. Uses localhost when no server URL is specified. |
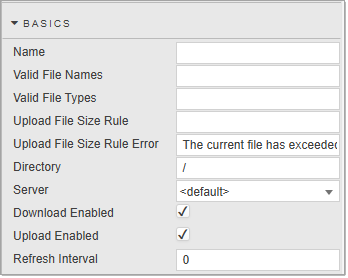
| Field | Description |
|---|---|
| Name | Enter a name for the component. |
| Valid File Names | A regex that determines if a file name is acceptable for upload. If undefined, all file names are accepted. For example, Log_\d{6} matches file names like Log_20200101. |
| Valid File Types | A comma-separated list of acceptable file types for upload. If undefined, all file types are accepted. Types are specified as extensions or MIME types. For example: .csv, .pdf — CSV and PDF files; image/* — any image file; .csv, .pdf, image/* — CSV, PDF and any image type. |
| Upload File Size Rule / Upload File Size Rule Error | Defines the maximum allowed file size for uploads (in MB), or a view state parameter. Files exceeding this size are rejected and the message defined in Upload File Size Rule Error is displayed. By default, this field is empty, meaning no file size limit is enforced. |
| Directory | The subdirectory to use within the fileStore directory on the server. |
| Server | A server connection with Type daemon. If set to <default> then files are uploaded to the DC server (or servers for a clustered deploy). |
| Download Enabled | When checked, downloads are enabled. |
| Upload Enabled | When checked, uploads are enabled. |
| Refresh Interval | Time in seconds after which to fetch an updated list of files from the server. If set to 0 the file list is only fetched when the dashboard is loaded. |
Action
This applies only if you're deploying KX Dashboards on Platform.
Refer to Actions for details.
Style
Refer to Style for common settings.
If deploying KX Dashboards on Platform
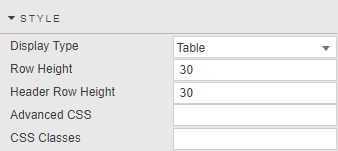
| Field | Description |
|---|---|
| Display Type | Select either Table or Icons. Table is the default.Icons view: 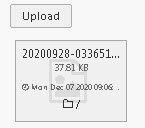 Table view:  |
| Header Row Height / Row Height | Set the row height, applicable in Table view. |
| Advanced CSS | Refer to Advanced CSS for details. |
Margins, Format
Refer to Style for common settings.