Pipelines
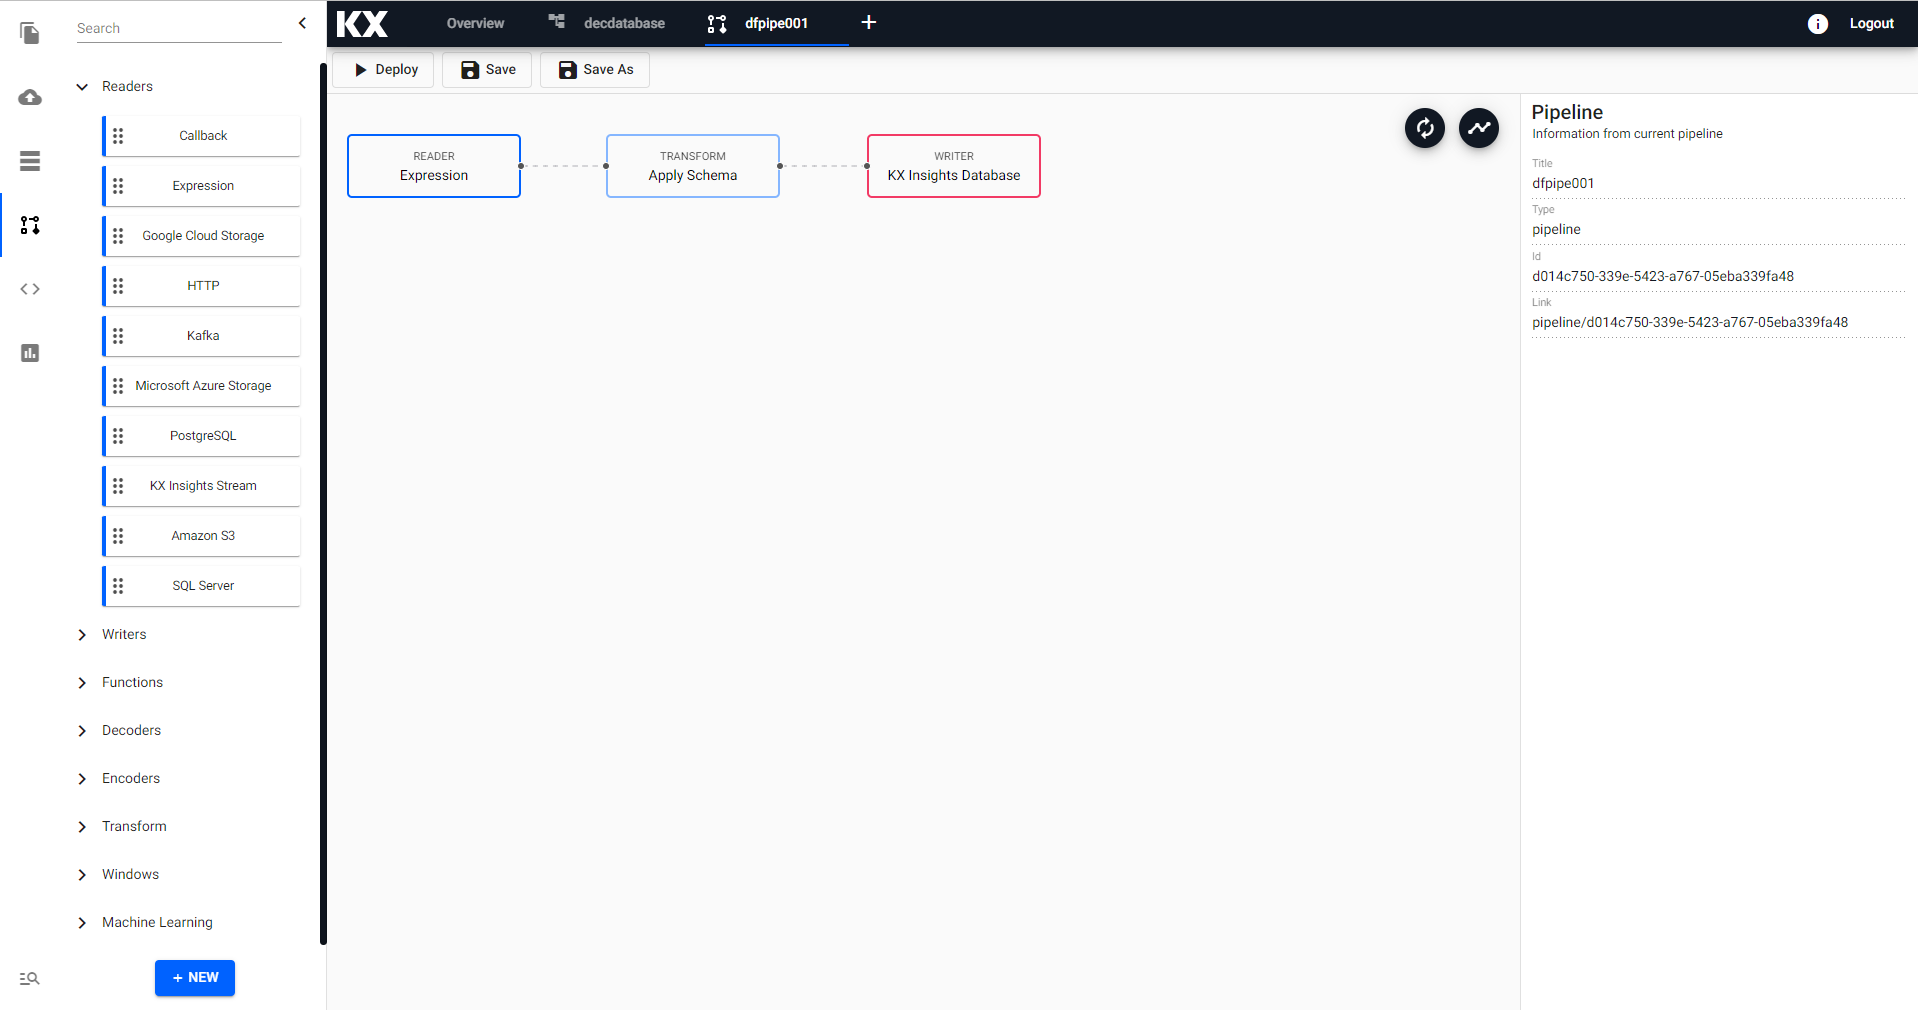
A pipeline is a customizable data ingestion service. Open a pipeline workspace from the Document bar or Perspective menu to define a pipeline.
Nodes
Click-and-drag nodes from the left-hand entity tree into the central workspace.
-
Click a node in the Pipeline workspace to edit.
-
Right-click a node in the Pipeline workspace to remove.
Select from the following types of node:
Connect nodes together and configure each node's parameters to build the pipeline. Create a database using the simple wizard - associate your pipeline to the assembly before deploying. Explore your data with the scratchpad.
Set up
-
From the Document menu bar or Perspective icon menu on the left, create a new Pipeline by clicking

-
Click-and-drag a node listed in the left-hand entity tree into the central workspace; for example, start with a Reader node.
Alternatively, quick start with Import
-
Build the pipeline by adding nodes to the workspace and joining them with the node-anchors. Nodes can be removed on a right-click, or added by click-and-drag from the entity tree, or a right-click in an empty part of the workspace. To change a connection, rollover to display the move icon and drag-connect, remove with a right-click. A successful pipeline requires a reader and writer node as a minimum.
-
Configure each of the pipeline nodes; click-select to display node parameters in the panel on the right.
Example Pipeline
Reader Node: Expression
n:2000;
([] date:n?(reverse .z.d-1+til 10);
instance:n?`inst1`inst2`inst3`inst4;
sym:n?`USD`EUR`GBP`JPY;
cnt:n?10)
Transform Node: Apply Schema
Column Name Column Type Parse Strings date Datetime Checked instance Symbol Unchecked sym Symbol Unchecked cnt Integer Unchecked Alternatively, a table schema should be loaded from a database created using the wizard; select the database and schema table from their respective dropdowns. Use the above schema for the database
table.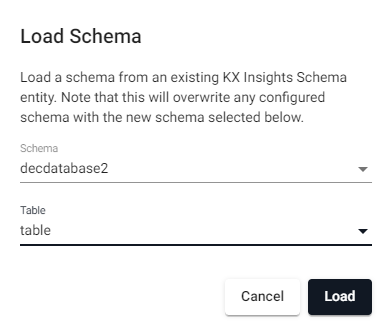
will load
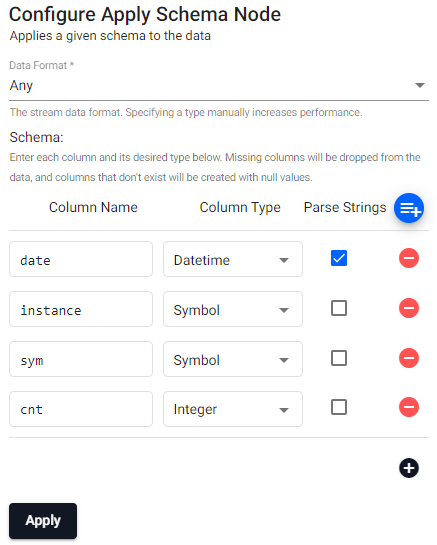
Check the
Parse Stringsfor the Datetime column when loading a schema from a database.Writer Node: Kx Insights Database
Use the existing
tablename to write the data too. If not already done, create a database.- Database: yourdatabasename
- Table: table
Schemas Require a Timestamp Partition Column
Schemas require a timestamp data column. In addition, the table should be partitioned and sorted (interval, historic and/or real-time) by this timestamp column. This can be configured as part of the set up wizard, or with the essential and advanced properties of a schema.
-
Click
Saveto save the pipeline. A pipeline should be associated with an assembly prior to deployment.Database selection
If not previously created, use the wizard to create a database assembly. The initial database will have a default table (and schema); additional tables can be added to the database schema.
-
Deploy the assembly associated with the pipeline. When the assembly is ready to be queried it will show a green circle next to it.
-
Data from a successfully deployed pipeline can then be explored; open an Explore workspace in the Document menu bar from the "+" menu, or from the perspective icon bar on the left. Select the assembly from the dropdown - it may be necessary to refresh the browser to populate the dropdown list. Open the SQL tab, and in the SQL editor add for the aforementioned Expression example:
SQL query
SELECT * FROM table
-
Get Data
Set up
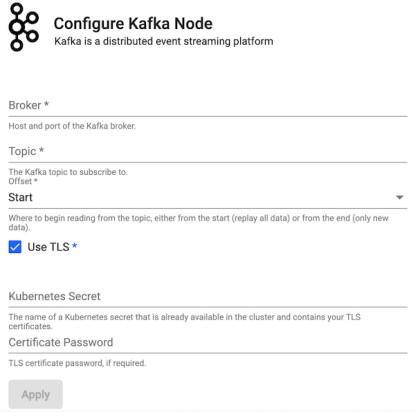
In order to use Kafka and Postgres pipelines, relevant charts must be installed, running, and accessible on the cluster. To install, refer to installation instructions.
Lower Case required
When configuring pipelines, lower case should be used in all instances of names and references.
Free Tier
Free tier users of insights-demo can also create this custom pipeline, decoding data using a Protocol Buffer. This crime dataset is hosted on code.kx.com and stores crime events occurring in NYC with details on what precinct the event was recorded at, location coordinates of the call, dispatch times and description of the crime.
This file is a protocol buffer file and so has an associated crime.proto file-. This is required for the protocol buffer decoder node.
Protocol Buffer
Protocol buffers are Google's language-neutral, platform-neutral, extensible mechanism for serializing structured data. Structured data definition is done once, then using special generated source code, one can easily write and read structured data to and from a variety of data streams using a variety of languages. Further documentation can be found here.
Set Up
Step 1. From the Document menu bar or Perspective icon menu on the left, create a new Pipeline by clicking
Step 2. Add a kdb+ Expression node from the list of Readers nodes. The writer will take advantage of native REST interfacing functionality in KX Insights .kurl.sync. Add to the code editor:
URL:"https://code.kx.com/kxiwalkthrough/data/crime.msg";
resp:.kurl.sync[(URL;`GET;(::))];
if[200 <> first resp; ' last resp];
"\n" vs last resp
Step 3. The output of last resp will resemble a binary format without decoding. Add a Protocol Buffer from the list of Decoders nodes.
Message Name: crime
Message Definition, add to the editor:
syntax = "proto3";

message crime {
    uint64 event_id = 1;
    string incident_time = 2;
    uint64 nypd_precinct = 3;
    string borough = 4;
    string patrol_borough = 5;
    uint64 call_x_geo = 6;
    uint64 call_y_geo = 7;
    string radio_code = 8;
    string description = 9;
    string crime_in_progress = 10;
    string call_timestamp = 11;
    string dispatch_timestamp = 12;
    string arrival_timestamp = 13;
    string closing_timestamp = 14;
    double latitude = 15;
    double longitude = 16;
}
Include Fields: Remains checked
Step 4. Define the Schema, add Apply Schema node from the list of Transform nodes. Load from the insights demo database the schema for the crime table. Check Parse Strings for incident_time and description columns.
Data Format: Table
Database: insights-demo
Table: crime
| column name | column type | parse strings |
|---|---|---|
| event_id | Symbol | Unchecked |
| incident_time | Time | Checked |
| nypd_precinct | Symbol | Unchecked |
| borough | Symbol | Unchecked |
| patrol_borough | Symbol | Unchecked |
| call_x_geo | Long | Unchecked |
| call_y_geo | Long | Unchecked |
| radio_code | Symbol | Unchecked |
| description | String | Checked |
Step 5. Define the Writer, add Kx Inights Database node from the list of Writers nodes.
Database: insights-demo Table: crime
Step 6. Save the pipeline; e.g. crimepipe
Step 7. Open your Insights-Demo assembly from the Data entity tree menu. Add your crimepipe pipeline to the assembly. Save and then deploy your insights-demo assembly. When your assembly is ready to query it will show a green circle next to it.
Step 8. Open an explore tab from the Document bar. From the dropdown menu, select the insights-demo assembly - it may be necessary to refresh your browser to view the assembly in the dropdown. Open the SQL tab and use the SQL query:
SELECT * FROM crimeMenu
Deploy
Execute the pipeline
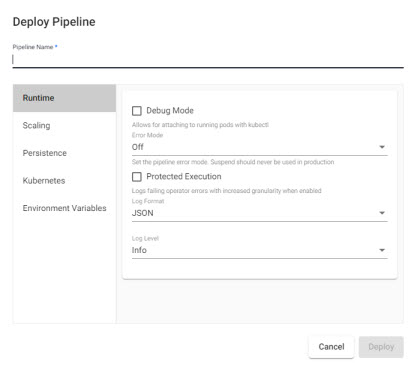
- Pipeline Name
- Name of pipeline. Pipelines names should be lowercase, alphanumeric with hyphens, and less than 40 characters.
Runtime
| item | description |
|---|---|
| Debug Mode | Enable facility to debug pipeline. |
| Error Mode | Select between Off, Suspend or Dump Stack. Don't use Suspend in a Production Environment. |
| Protected Execution | Enabled for greater granularity in error reporting. When enabled, operating performance may be impacted. |
| Log Format | Define debug reporting format; select between JSON or Text formats. |
| Log Level | Select between Info, Trace, Debug, Warning, Error or Fatal. |
Scaling
- Minimum number of Workers
- Maximum number of Workers
- Define the minimum and maximum number of pipeline workers that can be created to run this pipeline. Default Minimum number of Workers as
1, Maximum number of Workers as10. - Maximum number of Worker Threads
- Current maximum limit is 16.
Persistence
Configure a custom image for different SP cluster components.
Controller
Kubernetes persistence configuration.
| item | description |
|---|---|
| Disabled | Enabled by default, click to disable. |
| Storage Class | Kubernetes storage class name; e.g. standard. |
| Storage Size | Size volume allocated to each controller; defaults to 20Gi. |
| Checkpoint Frequency | Check frequency in milliseconds, defaults to 5,000. |
Storage Class
Ensure Storage Class is set to a valid class. This is defined in the cluster and may be different across cloud providers i.e. GCP: standard, AWS: gp2, Azure: default. This information can be retrieved by running:
kubectl get storageclassWorker
Kubernetes persistence configuration.
| item | description |
|---|---|
| Disabled | Enabled by default, click to disable. |
| Storage Class | Kubernetes storage class name; e.g. standard. |
| Storage Size | Size volume allocated to each Worker; defaults to 20Gi. |
| Checkpoint Frequency | Check frequency in milliseconds, defaults to 5,000. |
Kubernetes
- Label
- Add a label and value to created resources.
- Image Pull Secrets
- Add Kubernetes secret reference name; for example,
kx-access
Environment Variables
- Variable
- Value
- Add listed variable and values.
For more information on Kubernetes configuration.
Save
Save the pipeline.
Save As
Creates a copy of the pipeline.
Options
| icon | function |
|---|---|
 |
Reset view |
 |
Automatically layout pipeline |
Configuration
Right-hand-panel contains details of the selected node
Advanced Properties
Every created pipeline has Advanced settings.
Global Code
Global Code is executed before a pipeline is started; this code may be necessary for Stream Processor hooks, globals and named functions.