Import
Import data from cloud and relational data services.

Set up
-
Select a data service. Free tiers users can use the examples found in
insights-demoto get started. -
Complete the workflow, then
Open Pipeline. -
Changes can be made in the pipeline; for example, for Kafka import it is necessary to include a Map function. Save the pipeline when complete.
-
Associate the pipeline with a Data assembly; use the assembly wizard to create a database if one does not already exist. Free tier users can assign pipelines to their
insights-demoassembly once deployed. Save the assembly once the pipeline has been associated with it.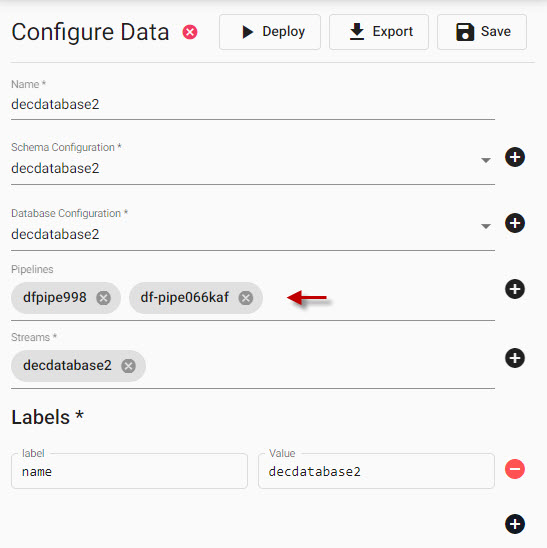
-
Deploy the data assembly along with its associated import pipeline(s). A data assembly ready to query will show a green circle.
-
Open an Explore tab to query the data. It may be necessary to refresh the browser for the assembly dropdown to populate. Opening the SQL tab is the quickest way to get data:
SELECT * FROM tablename
Advanced Settings
Each pipeline created by the Import wizard will have an option for Advanced pipeline settings. It should be noted, no additional code is required for the standard import options described below. The Advanced settings include Global Code which is executed before a pipeline is started; this code may be necessary for Stream Processor hooks, globals and named functions.
Schema Column Parsing
Parsing of input data should be done for all time, timestamp, and string fields unless your input is IPC or RT
Data Service
In the following examples, broker or server fields should include the appropriate Kubernetes namespace substring as required. Further information can be found here. Free tier users have a number of sample data sets available as part of insights-demo; follow the Free Tier examples to get started.
Kafka
Connect to an Apache Kafka distributed event streaming platform.
-
Define the Reader node with the Kafka broker details, port information and topic name.
Sample Kafka Reader Node
- Broker: kafka:9092
- Topic: trades
- Offset: Start
-
Event data on Kafka is of JSON type, so use a JSON decoder node to tansform the data to a kdb+ friendly format. Data will be converted to a kdb+ dictionary.
JSON decode
- Decode Each: false
-
Apply a Schema with the Transform node; this ensures data is of the correct datatype in the destination database. Check
Parse Stringsfor any time, timestamp and string data columns unless your input is IPC or RT.Sample Kafka transform for trades
- Date Format: Any
column name column type parse strings datetime Timestamp Checked ticker Symbol Unchecked price Float Unchecked size Integer Unchecked -
Write the data to a table.
- Database
- Select an database from the dropdown to assign the data, or create a database by clicking
 before returning to the pipeline to add this newly created database.
 - Table
- Select a table from the selected database to write the data too; this is typically the schema table from the previous step. If not already completed, create a table with a schema matching that of the previous step and assign it here. During the database wizard creation process is a step for creating a table (and schema); tables can be added to its schema.
- Deduplicate Stream
- Can remain checked.
-
Open the Pipeline view
-
Include a Map function to convert the data from a kdb+ dictionary to a kdb+ table. This Map function should be inserted between the JSON Decoder of Step 2 and the Transform Schema of Step 3 in the pipeline view; see image below:

Map function
{[data] enlist data } -
Save the Pipeline
-
Add the pipeline to a database; use the wizard to build a database assembly, although one should be created as part of the schema or writer step of the data ingestion. Save the assembly with the pipeline.
-
Deploy the Data assembly with associated Kafka pipeline.
-
Explore the data. Use the trades topic as the
Output variable. This will be the name of the table to query when getting data; for example, SQL query:SQL query
SELECT * FROM trades -
Get Data
The Broker field can be the Kafka broker pod name when the Kafka broker is installed in the same Kubernetes namespace as the KX Insights Platform. If the Kafka cluster has been installed into a different Kubernetes namespace, then the field expects the full service name of the Kafka broker - i.e. kafka.default.svc.cluster.local:9092, where default is the namespace that the Kafka cluster is in. The full-service name is set in the KX_KAFKA_BROKERS environment variable property in the Kafka Producer Kubernetes installation instructions.
Free Tier
Free tier users of insights-demo can use the subway data set as a Kafka import.
-
Define the Reader node
Subway data
- Broker: 34.130.174.118:9091
- Topic: subway
- Offset: End
-
Kafka event data uses a JSON decoder to tansform the data to a kdb+ friendly format.
Subway decoder
- Decode Each: false
-
Apply a schema to ensures data is of the correct datatype in the destination database; this can be loaded from
insights-demo. Check the required Parse Strings for thetimestampandstringcolumns.Subway schema
- Schema: insights-demo
- Table: subway
column name column type parse strings trip_id Symbol Unchecked arrival_time Timestamp Checked stop_id Symbol Unchecked stop_sequence Short Unchecked stop_name Symbol Unchecked stop_lon Float Unchecked stop_lat Float Unchecked route_id Short Unchecked trip_headsign Symbol Unchecked direction_id Symbol Unchecked route_short_name Symbol Unchecked route_long_name Symbol Unchecked route_desc String Checked route_type Short Unchecked route_url Symbol Unchecked route_color Symbol Unchecked -
Define where to write the data too; load the
insights-demodatabase and select thesubwaydata set.Subway writer
- Database: insights-demo
- Table: subway
-
Open pipeline
-
There is one manual step to include before continuing. A Map function is required to convert the kdb+ dictionary to a kdb+ table; insert the Map function between the JSON Decoder node and Transform node.
Subway map function
{[data] enlist data } -
Save the pipeline
-
Add the Pipeline to the
insights-demoassembly. -
Deploy the Data assembly with associated Kafka pipeline.
-
Explore the data. Select the
insights-demoassembly from the dropdown (it may be necessary to refresh the browser to populate the dropdown) and open the SQL tab. Define theOutput variableas "subway".SQL query
SELECT * FROM subway -
Get Data
Kdb Expression
The video below gives an example of a kdb expression import.
-
The Kdb Expression Reader starts with a code editor; add the following kdb+ data generator in the node editor:
kdb+ query
n:2000; ([] date:n?(reverse .z.d-1+til 10); instance:n?`inst1`inst2`inst3`inst4; sym:n?`USD`EUR`GBP`JPY; cnt:n?10) -
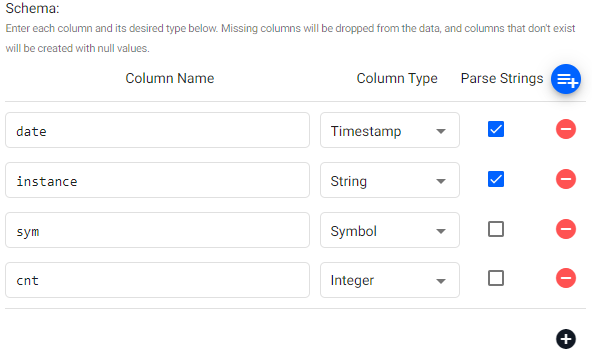
Configure the Schema to use. This can be done manually by adding the columns, or loaded from a database.
- Data Format
Any- Schema
- Use the defined schema for the kdb expression import, created manually or imported from an existing schema.
column name column type parse strings date Timestamp Checked instance Symbol Unchecked symbol Symbol Unchecked cnt Integer Unchecked A schema can also be loaded from a database by clicking
 . Parsing of the data is defined as part of schema creation or in an assembly creation. Free Tier users can add this schema to their existing
 insights-demoschema.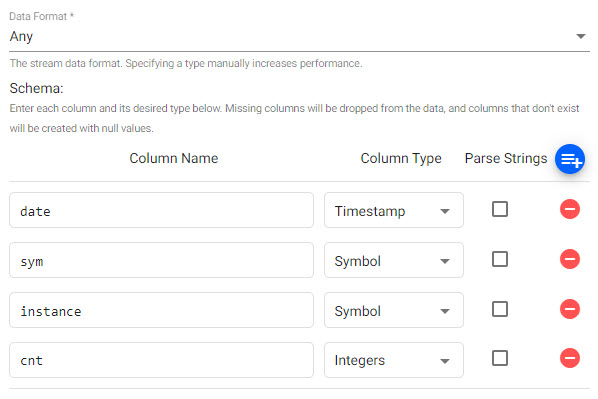
-
Configure the Writer.
- Database
- Select an database from the dropdown to assign the data, or create a database by clicking before returning to the pipeline to add this newly created database. Free tier users can use their
insights-demodatabase. - Table
- Select a table from the selected database to write the data too; this is typically the schema table from the previous step. If not already completed, create a table with a schema matching that of the previous step and assign it here. During the database wizard creation process is a step for creating a table (and schema); tables can be added to its schema.
- Deduplicate Stream
- Can remain checked.
-
Open the Pipeline
-
Save the Pipeline
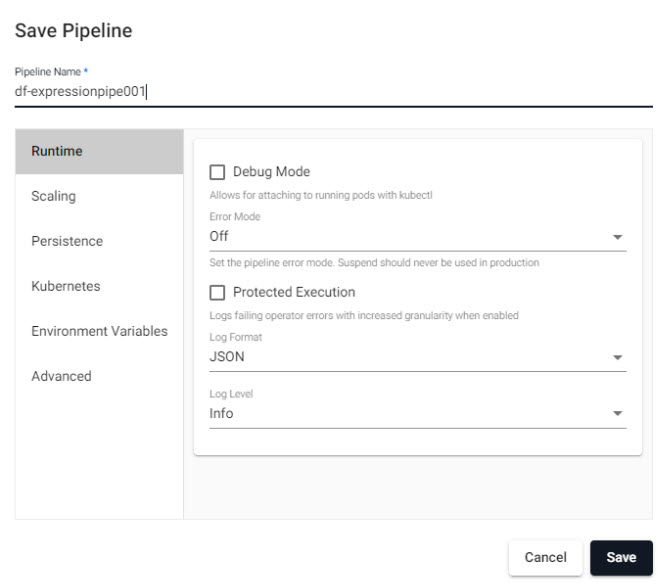
-
Add the Pipeline to the assembly created during the configuration of the Writer node. Free Tier users can add the pipeline to their
insights-demoassembly. Save the assembly with the pipeline. -
Deploy the Data assembly with the associated Expression pipeline.
-
Explore the data. Select the data assembly associated with the Expression pipeline (it may be necessary to refresh the browser to populate the assembly drop down). Repeat the schema table name as the
Output variable. This will be the name of the table to query when getting data; for example, a SQL query in the SQL tab:SQL query
SELECT * FROM tablename -
Get Data
SQL Databases
Applicable to all supported SQL databases, including PostgreSQL and Microsoft SQL Server.
-
Define the Reader node, including any required authentication alongside server and port details.
Sample Postgres Reader Node
- Server: postgresql
- Port: 5432
- Database: testdb
- Username: testdbuser
- Password: testdbuserpassword
- query: select * from cars
Where Server is
postgresql.default.svc, thedefaultis the namespace, e.g.dbwill bepostgresql.db.svccase sensitive
Node properties and queries are case sensitive and should be lower case.
-
Define the Schema.
Sample Postgres Configure Schema
- Data Format: Any
column name column type parse string Year Date Check Name Symbol Unchecked Miles_per_Gallon Float Unchecked Cylinders Float Unchecked Displacement Float Unchecked Horsepower Float Unchecked Acceleration Float Unchecked Origin Symbol Unchecked 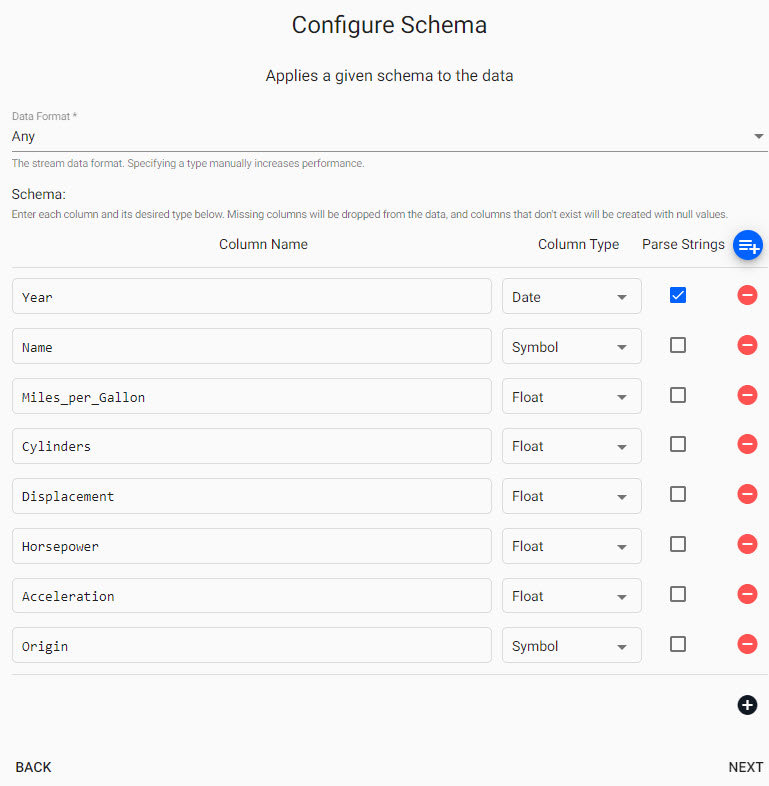
-
Configure the Writer
- Database
- Select an database from the dropdown to assign the data, or create a database by clicking
- Table
- Select a table from the selected database to write the data too; this is typically the schema table. In the Schema used by the database, create a table with a column layout matching the schema used in the previous step. It can be named "cars".
- Deduplicate Stream
- Can remain checked.
-
Open Pipeline
-
Save the Pipeline
-
Add the Pipeline to the assembly created during the configuration of the Writer node. Save the assembly with the pipeline.
-
Deploy the Data assembly with the associated Postgres pipeline.
-
Explore the data. Select the data assembly associated with the PostgresSQL pipeline (it may be necessary to refresh the browser to populate the assembly drop down). Set "cars" as the
Output variablename. This will be the name of the table to query when getting data; for example, SQL query in the SQL tab:SQL query
SELECT * FROM cars -
Get Data
Free Tier
With a PostgreSQL client installed, query the dataset from PostgreSQL using the following method:
$ psql "sslmode=disable dbname=postgres user=postgres hostaddr=34.132.151.134"
Password for user postgres: dxrHvgtjHHvsOH7B
psql (14.1, server 13.4)
Type "help" for help.

postgres=> \connect health
psql (14.1, server 13.4)
You are now connected to database "health" as user "postgres".
health=> \dt
                List of relations
 Schema |        Name         | Type  |  Owner
--------+---------------------+-------+----------
 public | health               | table | postgres
(5 rows)-
Define the PostgreSQL reader node
Health PostgreSQL Reader
- Server: 34.132.151.134
- Port: 5432
- Database: health
- Username: postgres
- Password: dxrHvgtjHHvsOH7B
- Query: select * from health
-
Configure the Schema; this can be loaded from
insights-demo. Check the required Parse Strings for thetimestampandstringcolumns.Health PostgresSQL Schema
- Data Format: Any
column name column type parse string name String Checked lat Float Unchecked long Float Unchecked neighborhood String Checked airquality Float Unchecked trafficcongestion Float Unchecked bikeacccnt Integer Unchecked caracccnt Integer Unchecked timestamp Timestamp Checked -
Write the table to a table called
healthin theinsights-demodatabase. -
Open the Pipeline
-
Save the Pipeline
-
Add the Pipeline to the assembly created during the configuration of the Writer node. Save the assembly with the pipeline.
-
Deploy the Data assembly with associated PostgresSQL pipeline.
-
Explore the data. Select the
insights-demoassembly from the dropdown (it may be necessary to refresh the browser to populate the dropdown) and open the SQL tab. Define theOutput variableas "health".SQL query
SELECT * FROM health -
Get Data
Cloud Storage Services
Organizations require data services which balance performance, control, security and compliance - while reducing the cost of storing and managing such vast amounts of data. Limitless scale is the reason object storage is the primary storage of cloud service providers, Amazon, Google and Microsoft. Kx Insights allows users take advantage of object storage natively and a sample demo weather data hosted on Google Cloud Storage is available for Free Tier users to explore for themselves.
-
Define the Reader node with the S3 path details for how the file will be read and optionally, the Kubernetes secret for authentication. Default values can be used for all but
PathandRegion.Sample Amazon 3 Reader Node
- Path: s3://bucket/pricedata.csv
- Region: us-east-1
-
Define a CSV decoder node. Your imported data source requires a timestamp column to parse the data.
A sample CSV for a time column, category column and two value columns; float and integer
- Delimiter: ","
- Header: First Row
- Schema = ZSFI
-
Define the Transform Schema application
A sample Schema for a time column, category column and two value columns
- Data Format: Any
- Schema: Load a schema from a database by clicking ; create a database and schema with the wizard if needed, or manually add the columns and column type for each of the source data columns in the Transform Node. When doing the latter, check
Parse Stringsfor the Timestamp column.
column name column type parse strings time Timestamp Checked sym Symbol Unchecked price Float Unchecked volume Integer Unchecked -
Define the table name to upsert the data too. Select the database and table to write the data too from the dropdown menu; this will be the same database and table from the schema creation step - create a database and table using the wizard at this stage if not already done.
Writer Node
- Database: databasename
- Table: pricedata
-
Open the Pipeline
-
Save the Pipeline
-
Add the Pipeline to the assembly created by the wizard when defining the schema or writer from before.
-
Deploy the Data assembly with associated Amazon S3 pipeline.
-
Explore the data. Select the assembly from the dropdown (it may be necessary to refresh the browser to view) and open the SQL tab. Define the
Output variableas "pricedata".SQL query
SELECT * FROM pricedata -
Get Data
Note that a Kubernetes secret is required if authenticating with Amazon S3. See the section on Amazon S3 Authentication for more details.
-
Define the Reader node with GCS details. Default values can be used for all but
PathandProject ID.Project IDmay not always have a customizable name, so its name will be contingent on what's assigned when creating your GCS account.Sample GCS Reader Node
- Path: gs://mybucket/pricedata.csv
- Project ID: ascendant-epoch-999999
-
Define a CSV decoder node. Your imported data source requires a timestamp column to parse the data.
A sample CSV for a time column, category column and two value columns; float and integer
- Delimiter: ","
- Header: First Row
- Schema = ZSFI
-
Define the Transform Schema application
A sample Schema for a time column, category column and two value columns
- Data Format: Any
- Schema: Load a schema from a database by clicking ; create a database and schema with the wizard if needed, or manually add the columns and column type for each of the source data columns in the Transform Node. When doing the latter, check
Parse Stringsfor the Timestamp column.
column name column type parse strings time Timestamp Checked sym Symbol Unchecked price Float Unchecked volume Integer Unchecked -
Define the table name to upsert the data too. Select the database and table to write the data too from the dropdown menu; this will typically be the same database and table from the schema creation step - create a database and table using the wizard at this stage if not already done.
Writer Node
- Database: databasename
- Table: pricedata
-
Open the Pipeline
-
Save the Pipeline
-
Add the Pipeline to the assembly created by the wizard when defining the schema transformation or writer destination from before.
-
Deploy the Data assembly with associated GCP pipeline.
-
Explore the data. Select the assembly from the dropdown (it may be necessary to refresh the browser to view) and open the SQL tab. Define the
Output variableas "pricedata".SQL query
SELECT * FROM pricedata -
Get Data
-
Define the ACP Reader node with ACS details. Default values can be used for all but
PathandProject ID. A customizable account name is supported for ACS.Sample ACP Reader Node
- Path: ms://mybucket/pricedata.csv
- Account: myaccountname
-
Define a CSV decoder node. Your imported data source requires a timestamp column to parse the data.
A sample CSV for a time column, category column and two value columns; float and integer
- Delimiter: ","
- Header: First Row
- Schema = ZSFI
-
Define the Transform Schema application
A sample Schema for a time column, category column and two value columns
- Data Format: Any
- Schema: Load a schema from a database by clicking ; create a database and schema with the wizard if needed, or manually add the columns and column type for each of the source data columns in the Transform Node. When doing the latter, check
Parse Stringsfor the Timestamp column.
column name column type parse strings time Timestamp Checked sym Symbol Unchecked price Float Unchecked volume Integer Unchecked -
Define the table name to upsert the data too. Select the database and table to write the data too from the dropdown menu; this will be the same database and table from the schema creation step - create a database and table using the wizard at this stage if not already done.
Writer Node
- Database: databasename
- Table: pricedata
-
Open the Pipeline
-
Save the Pipeline
-
Add the Pipeline to the assembly created by the wizard when defining the schema or writer from before.
-
Deploy the Data assembly with associated ACS pipeline.
-
Explore the data. Select the assembly from the dropdown (it may be necessary to refresh the browser to view) and open the SQL tab. Define the
Output variableas "pricedata".SQL query
SELECT * FROM pricedata -
Get Data
Free Tier
Free Tier users can use the weather data set hosted on Google Cloud Storage (GCS). A video outlining this setup is available here:
-
Define the Google Cloud Storage reader node
Weather Google Cloud Storage Reader
- Path: gs://kxevg/weather/temp.csv
- Project ID: kx-evangelism
- File Mode: Binary/Text
- Offset: 0
- Chunking: Auto
- Chunk Size: 1048576
No need to use authentication.
-
This will use a CSV Decoder.
Weather CSV Decoder
- Delimiter: ,
- Header: First Row
- Schema: PSFSSFFS
- Type: String
-
There is no requirement for a Schema transformation, so
Apply a Schemacan be unchecked before going to Next
-
Write the table to a table called
weatherin theinsights-demodatabase. -
Open the Pipeline
-
Save the Pipeline
-
Add the Pipeline to the
insights-demoData assembly. -
Deploy the Data assembly with associated Google Cloud Storage pipeline.
-
Explore the data. Select the
insights-demodatabase from the dropdown and open the SQL tab. Define theOutput variableas "weather".SQL query
SELECT * FROM weather -
Get Data