Getting started
Running with Docker
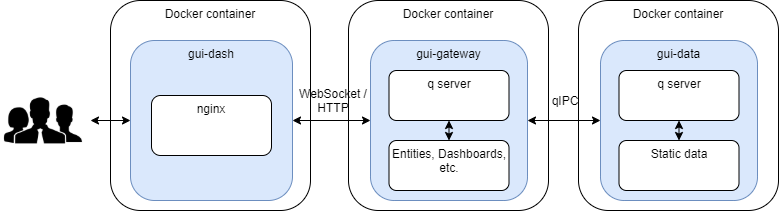
Architecture
There are three images in total each perform it's own function.
-
gui-dash - core static Dashboard Direct web app files served by the web server
-
gui-gateway - q server handles dashboards queries and manages list of dashboards and connection
-
gui-data - q data server manages demo datasets requested from the gui-gateway
Containers structure constrains
There are certain limitations in terms of container names especially for the gui-gateway that is referenced under this name in the gui-dash nginx config.
The gui-dash image has an Nginx server running that is responsible for redirecting API calls from the web app to the gui-gateway app server. In its core is the nginx.config file that provides configuration to the Nginx and tells it redirects API calls to the gui-gateway image container. The container name is static and is baked in the docker image file.
Prerequisites
To run the images one would require one of the following operating systems Mac, Windows or Linux, capable of running following software:
Running steps
1) Make sure that Docker is running on the host system.
Note: Depending on the user operating system a different command prompt will need to be used. On Windows, we recommend using the
Powershell.
2) Login to KX Docker registry with the login credentials provided to you to pull images
docker login registry.dl.kx.com -u username -p passwordContact your Kx representative for further information on your username and password setup required for this step.
3) Create docker-compose.yml file to pull and execute docker images
An example Docker Compose file is provided here:
# docker-compose.yml
version: "3.7"
networks:
    kx:
        name: kx
        driver: bridge
volumes:
    gw-data:
services:
    gui-dash:
        image: "registry.dl.kx.com/kxi-gui-dash:1.1.2"
        ports:
            - 9090:8080
        networks:
            - kx
        depends_on:
            - gui-gateway
    gui-gateway:
        image: "registry.dl.kx.com/kxi-gui-gateway:1.1.2"
        ports:
            - 10001:10001
        networks:
            - kx
        # enable relative
        volumes:
            # Store app state in the gw-data volume
            - gw-data:/opt/kx/app/data
            ## Windows - create lic directory with valid kc.lic file
            #- ./lic:/opt/kx/lic
            ## Linux - make sure kc.lic file is present in ${HOME}/.qp.licenses
            #- ${HOME}/.qp.licenses:/opt/kx/lic
        depends_on:
            - gui-data
    gui-data:
        image: "registry.dl.kx.com/kxi-gui-data:1.1.2"
        ports:
            - 6812:6812
        volumes:
            - .:/opt/kx/app/sample/hdb/date
            ## Windows - create lic directory with valid kc.lic file
            #- ./lic:/opt/kx/lic
            ## Linux - make sure kc.lic file is present in ${HOME}/.qp.licenses
            #- ${HOME}/.qp.licenses:/opt/kx/lic
        networks:
            - kx
Note: This step requires that an appropriate kdb+ license file is present on the host computer file system. The license file is then mounted as a volume to the
gui-gatewayandqui-data. The recommended path to license file on the host system vary between Linux and Windows; for example, in Windows your docker-compose.yml file could be in C:\Users\yourname\Desktop\Kx-Docker folder and your license file in C:\Users\yourname\Desktop\Kx-Docker\lic folder.
To enable licence volume mounting uncomment appropriate line in the volumes property of the docker-compose.yml file above.
Make sure to enable the volumes: block in the gui-gateway section of docker-compose.yml; uncomment one of the following lines:
Linux
Make sure that kc.lic is present in the ${HOME}/.qp.licenses directory.
- ${HOME}/.qp.licenses:/opt/kx/licWindows
In the same directory as the docker-compose.yml create the lic folder and add your kc.lic license.
- ./lic:/opt/kx/licInfo: For more information on kdb+ licenses refer to licensing.
3) To start the app, from the directory with the docker-compose.yml script file run:
docker-compose upOpen in the web browser http://localhost:9090 to view running Dashboards app.
4) To stop the app Press ctl-c to exit running process in terminal and execute:
docker-compose downGateway State persistence
The gui-gateway container is responsible for managing Dashboards’ states, including connections, dashboards and URLs. These states are saved in a data file within the container. To preserve the state in case of failure, a volume, gw-data, is used to preserve static data.
To view all available volumes run:
docker volume lsTo obtain information about a container, run:
docker volume inspect [volume name]where [volume name] is the name generated by [directory-name]_gw.data. For example, direct-dash_gw_data
To remove the volume, stop all running gui-gateway containers with:
docker-compose downThen run:
docker volume rm [volume name]Running with Kubernetes
A Helm chart has been provided for installing the Dashboards service into a Kubernetes cluster.
Prerequisites
To run within Kubernetes there are a number of pre-requisites:
- helm should be installed
- kubectl should be installed
- Cloud vendor CLI installed and authorized to the appropriate Kubernetes cluster
Kdb+ License
To start the Dashboards service within Kubernetes, a license Secret should be installed into the Kubernetes cluster.
First, create a Kubernetes license secret form the kx.lic file:
export QLIC=$(pwd)
kubectl create secret generic kxi-license --from-file=license=$QLIC/kx.lic
Helm
Add the KX Helm chart repository to your helm install:
$ helm repo add --username <username> --password <password> \
    kxi-repo https://nexus.dl.kx.com/repository/kx-insights-charts/
"kxi-repo" has been added to your repositories
Update your helm repo local chart cache:
$ helm repo update
Hang tight while we grab the latest from your chart repositories...
...Successfully got an update from the "internal-insights" chart repository
Update Complete. ⎈Happy Helming!⎈
Add a Secret to your cluster to allow access to the images:
$ kubectl create secret docker-registry kx-repo-access \
    --docker-username=<username> \
    --docker-password=<password> \
    --docker-server=registry.dl.kx.com
Note
In the case above the secret kx_repo_access has been created. When deploying the charts it will be necessary to reference this Secret in the imagePullSecrets within the configuration file.
Configuration file
A configuration file is required to run Dashboards with applied license and repo access Secret. This will enable LoadBalancer, which will automatically assign an IP address to each pod so that Dashboards can be accessed externally.
Note: it is possible to remove LoadBalancing by removing service: type: LoadBalancer lines from the configuration (see below). In this case, to access Dashboards you must use port forwarding for local access; see Accessing the Dashboards Locally
Example of dash.yaml
global:
  imagePullSecrets:
    - name: kx-repo-access
  license:
    secretName: kxi-license
    asFile: true

service:
  type: LoadBalancer
Installing Dashboards
$ helm install gui-dash kxi-repo/gui-dash --version="1.1.2" -f path/to/dash.yamlAccessing Dashboards
Accessing Dashboards is possible using the EXTERNAL-IP address and port 8080, separated by a colon; i.e. EXTERNAL-IP:8080
To get the IP address use Kubernetes command:
kubectl get services/gui-dashAccessing Dashboards Locally
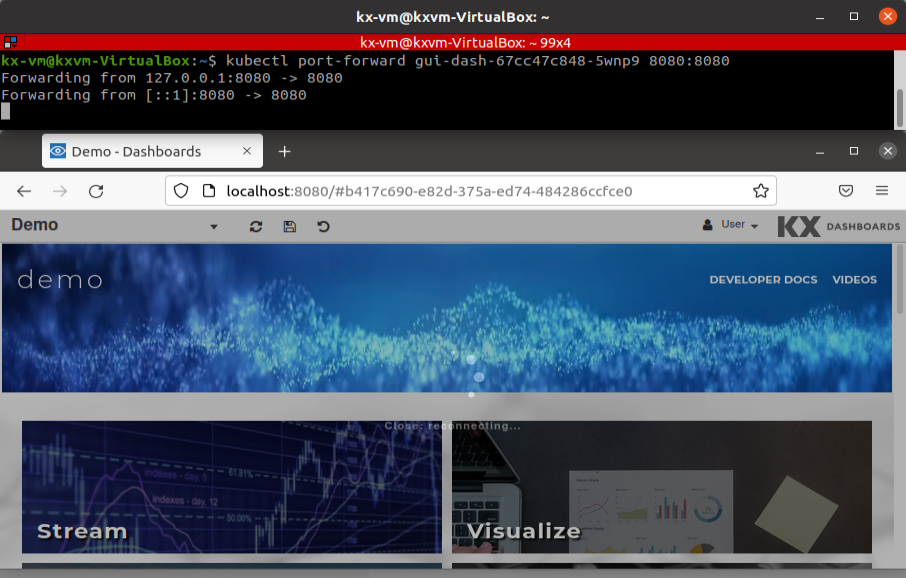
To access Dashboards locally, use port forwarding of the pod running Dashboards.
Get pod names:
kubectl get poThis will return a list of pods. The required pod uses a name beginning with gui-dash, followed by some random ID number e.g. gui-dash-1234567890-12345
Then expose the pod port, run the command using the aforementioned gui-dash id unique to your pod:
kubectl port-forward gui-dash-1234567890-12345 8080:8080Then go tho the localhost:8080 to view Dashboards.
Open Dashboards
- Dashboard starts with a Demo page in Viewer mode by default. To enable the dashboard editor, insert
/edit/between the URL and#dashboardreference. This will enable menu options to create your own dashboard. -
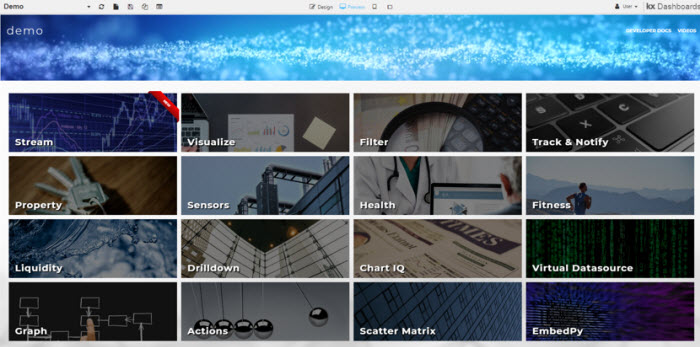
- Drag a component from the left and arrange on the central canvas, e.g. Data Grid
- Configure properties on the right, e.g. set a new Data Source to view data
- Add a form component and link it using View States
Continue adding components and setting properties to build, style and share interactive visualisations