Import
This page describes the Import Wizard, a guided process for creating a pipeline to import data from a number of different sources, including cloud and relational data services.
Using the Import Wizard
This section describes the workflow for creating a pipeline using the Import Wizard and contains links to further details about the elements of the pipeline.
-
Open the Import Wizard by either:
-
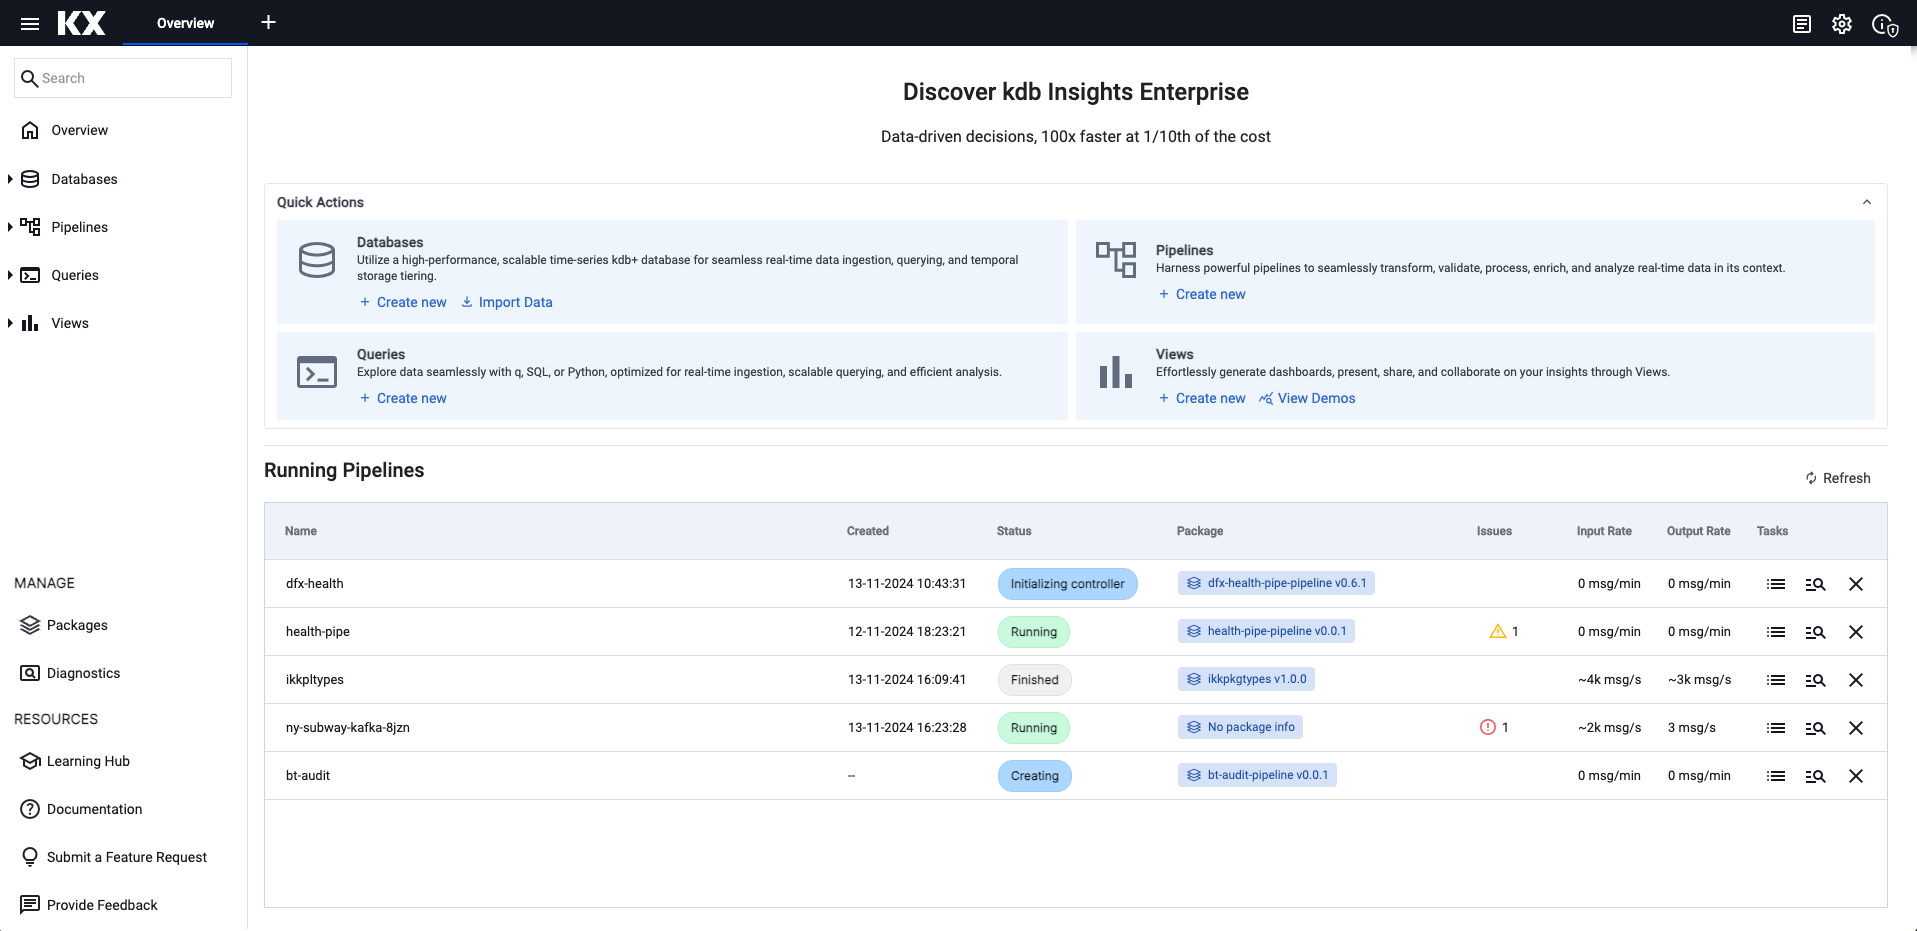
Clicking Import Data under Databases on the Overview page of the kdb Insights Enterprise user interface.
-
Opening a database and clicking on the Other Actions menu, then selecting Import Data.
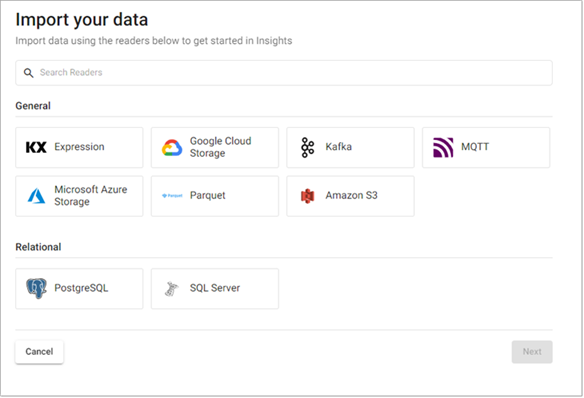
The Import Wizard contains options to import data using the following methods.
- KX Expression
- Google Cloud Storage
- Kafka
- MQTT
- Microsoft Azure Storage
- Parquet
- Amazon S3
- SQL Databases; PostgreSQL and SQL Server
The wizard guides you through the following workflow to create the pipeline.
- Select and configure a reader: Begin by selecting a reader. See readers for more details on the parameters for each type of reader.
- Select and configure a decoder: Next, select a decoder so that the data can be converted to a format that can be processed. See decoders for details about the available options.
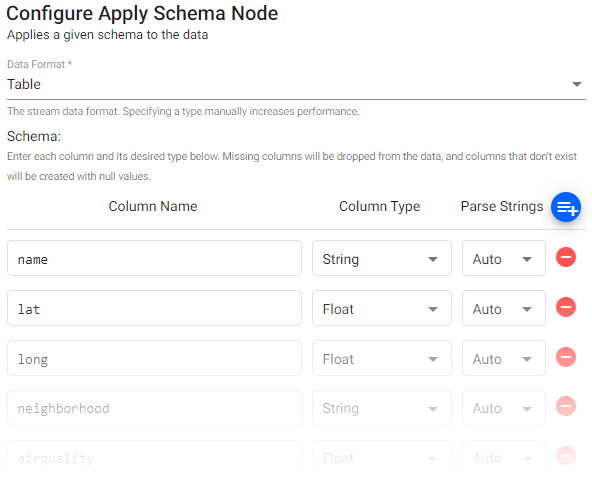
- Configure the schema: Next, configure the schema, which converts data to a type compatible with a kdb+ database. Every imported data table requires a schema; and every data table must have a timestamp key to be compatible with kdb's time series columnar database. See apply schema for details on the configuration options.
- Configure the writer: Finally, configure the writer, which writes transformed data to the kdb Insights Enterprise database. See kdb Insites database writers for details.
-
-
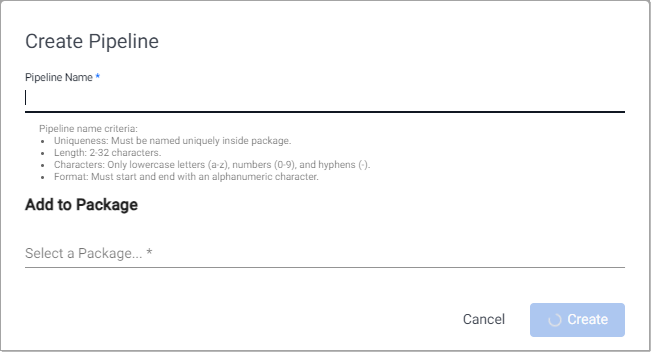
When the workflow is complete, click Open Pipeline to open the Create Pipeline dialog.
-
Enter a unique Pipeline Name that is 2-32 characters long, uses lowercase letters, numbers, and hyphens, and starts and ends with an alphanumeric character.
-
Click Select a package under Add to Package, to display the list of packages this pipeline can be added to added to.
Click Create new package if you want to add the pipeline to a new package. Enter a unique package name that is 2-32 characters long, uses lowercase letters, numbers, and hyphens, and starts and ends with an alphanumeric character.
See packages for further details about packages.
Note that once a pipeline has been created using the Import Wizard, it can be modified using the Pipeline editor.
Guided walkthroughs
Guided walkthroughs for Object Storage, Kafka or SQL database imports using the Import Wizard are available to try.
Advanced Settings
Each pipeline created by the Import wizard has an option for Advanced pipeline settings. Note that no additional code is required for the standard import options described below. The Advanced settings include Global Code which is executed before a pipeline is started; this code may be necessary for Stream Processor hooks, global variables and named functions.
Schema Column Parsing
Parsing is done automatically as part of the import process. If defining a manual parse, ensure parsing is enabled for all time, timestamp, and string fields unless your input is IPC or RT.
Importing Kafka data
This option enables you to connect to an Apache Kafka distributed event streaming platform.
-
Define the Reader node with the Kafka broker details, port information and topic name.
Sample Kafka Reader Node
- Broker: kafka:9092 (note:not a working example)
- Topic: trades
- Offset: Start
- Use TLS: No
-
Event data on Kafka is of JSON type, so use a JSON decoder node to transform the data to a kdb+ friendly format. Data will be converted to a kdb+ dictionary. There is no need to change the default setting for this.
JSON decode
- Decode Each: false
-
Apply a Schema with the Transform node; this ensures data is of the correct datatype in the destination database. A schema can be loaded from a database; use the Build a Database wizard available from the Overview page to create a database and schema if required.
Parse Stringscan be left asAuto; but ensure any time, timestamp and string data columns is set toOnorAuto.Sample Kafka transform for trades
- Date Format: Any
column name column type parse strings datetime Timestamp Auto ticker Symbol Auto price Float Auto size Integer Auto -
Write the data to a table.
item description Database Select an database from the dropdown to assign the data, or create a database by clicking  , before returning to the import wizard to add the database.
Table Select a table from the selected database to write the data to; this is typically the schema table from the previous step. If not completed during the schema step, create a database with a schema matching the data. Write Direct to HDB Unchecked Deduplicate Stream Can remain checked. -
Open the Pipeline view
-
Include a Map function to convert the data from a kdb+ dictionary to a kdb+ table. This Map function should be inserted between the JSON Decoder of Step 2 and the Transform Schema of Step 3 in the pipeline view; see image below:

A completed Kafka pipeline.Map function
{[data] enlist data } -
Save the Pipeline
-
Deploy the database and Kafka pipeline.
-
Query the data. Open the SQL tab. Use the topic name as the
Output variable. This is the name of the table to query when getting data; for example, SQL query:SQL query
SELECT * FROM topicname -
Get Data
The Broker field can be the Kafka broker pod name when the Kafka broker is installed in the same Kubernetes namespace as kdb Insights Enterprise. If the Kafka cluster has been installed into a different Kubernetes namespace, then the field expects the full service name of the Kafka broker - i.e. kafka:9092, where default is the namespace that the Kafka cluster is in. The full-service name is set in the KX_KAFKA_BROKERS environment variable property in the Kafka Producer Kubernetes installation instructions.
See the guided walkthrough Kafka import example.
Import using a Kdb Expression
This option enables you to import data directly using a kdb+ expression.
-
The Kdb Expression Reader starts with a code editor. Add the following kdb+ data generator in the node editor:
kdb+ query
n:2000; ([] date:n?(reverse .z.d-1+til 10); instance:n?`inst1`inst2`inst3`inst4; sym:n?`USD`EUR`GBP`JPY; num:n?10) -
Configure the Schema to use. This can be done manually within the node, or preferably, loaded from a database.
- Data Format
Any- Schema
- Use the defined schema for the kdb expression import, created manually or imported from an existing schema.
Parse Stringscan be set toAutofor all columns; but ensure any time, timestamp and string data columns is set toOnorAuto.
column name column type parse strings date Timestamp Auto instance Symbol Auto symbol Symbol Auto num Integer Auto A schema can also be loaded from a database by clicking
 . The data parse is defined in the schema tab of the database.
An expression pipeline schema. -
Configure the Writer.
item description Database Select an database from the dropdown to assign the data, or create a database by clicking before returning to the wizard to add the database.Table Select a table from the selected database to write the data to; this is typically the schema table from the previous step. If not completed during the schema step, create a database with a schema matching the data. Write Direct to HDB Unchecked Deduplicate Stream Can remain checked. -
Open the Pipeline
-
Rename the Pipeline
-
Save the Pipeline
-
Add the pipeline to the database. Free Trial users can add the pipeline to their
insights-demodatabase. Save the database with the pipeline.
-
Deploy the database and associated Expression pipeline.
-
Query the data. Open the SQL tab. Repeat the schema table name as the
Output variable. This is the name of the table to query when getting data; for example:SQL query
SELECT * FROM tablename -
Get Data
Import data from SQL Databases
This option is applicable to all supported SQL databases, including PostgreSQL and Microsoft SQL Server.
-
Define the Reader node, including any required authentication, alongside server and port details.
Sample Postgres Reader Node
- Server: postgresql
- Port: 5432
- Database: testdb
- Username: testdbuser
- Password: testdbuserpassword
- query: select * from cars
Where Server is
postgresql.default.svc, thedefaultis the namespace, e.g.dbwill bepostgresql.db.svccase sensitive
Node properties and queries are case sensitive and should be lower case.
-
Define the Schema.
Parse Stringscan be set toAutofor all columns; but ensure any time, timestamp and string data columns is set toOnorAuto.Sample Postgres Configure Schema
- Data Format: Any
column name column type parse string Year Date Auto Name Symbol Auto Miles_per_Gallon Float Auto Cylinders Float Auto Displacement Float Auto Horsepower Float Auto Acceleration Float Auto Origin Symbol Auto 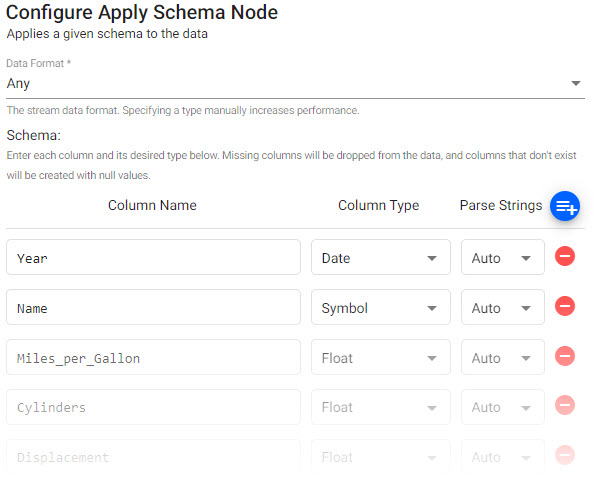
A schema for a sample pipeline. -
Configure the Writer
item description Database Select an database from the dropdown to assign the data, or create a database by clicking , before returning to the import wizard to add the database.Table Select a table from the selected database to write the data to; this is typically the schema table from the previous step. If not completed during the schema step, create a database with a schema matching the data. Write Direct to HDB Unchecked Deduplicate Stream Can remain checked. -
Open Pipeline
-
Save the Pipeline
-
Deploy the database and Postgres pipeline.
-
Query the data. Open the SQL tab. Define an
Output variable, such as "cars". This is the name of the table to query when usingkdb+/qorpythonin the scratchpad.For querying in the SQL tab:
SQL query
SELECT * FROM cars -
Get Data
See the guided walkthrough SQL database import example.
Import data from Cloud Storage Services
Organizations require data services that balance performance, control, security, and compliance while reducing the cost of storing and managing such vast amounts of data. Limitless scale is the reason object storage is the primary storage of cloud service providers, Amazon, Google and Microsoft. You can take advantage of object storage by importing data directly into kdb Insights Enterprise using this option. An example is available as part of a guided walkthrough.
-
Define the Reader node with the S3 path details for how the file will be read and optionally, the Kubernetes secret for authentication. Default values can be used for all but
PathandRegion.Sample Amazon 3 Reader Node
- Path: s3://bucket/pricedata.csv
- Region: us-east-1
-
Define a CSV decoder node. Your imported data source requires a timestamp column to parse the data.
Typical CSV decoder Node
- Delimiter: ","
- Header: First Row
- Encoding Format: UTF8
Other required properties can be left at default values.
-
Define the Transform Schema application
A sample Schema for a time column, category column and two value columns
- Data Format: Any
- Schema: Load a schema from a database by clicking ; create a database and schema if needed, or manually add the columns and column type for each of the source data columns in the Transform Node.
Parse Stringscan be set toAutofor all columns; but ensure any time, timestamp and string data columns is set toOnorAuto.
column name column type parse strings time Timestamp Auto sym Symbol Auto price Float Auto volume Integer Auto -
Define the table name to insert the data to. Select the database and table to write the data too from the dropdown menu. This is the same database and table from the schema creation step.
Writer Node
- Database: databasename
- Table: pricedata
- Write Direct to HDB: unchecked
- Deduplicate stream: checked
-
Open the Pipeline
-
Save the Pipeline
-
Deploy the database with associated Amazon S3 pipeline.
-
Query the data. Open the SQL tab. Define the
Output variableas "pricedata".SQL query
SELECT * FROM pricedata -
Get Data
Note that a Kubernetes secret is required if authenticating with Amazon S3. See the section on Amazon S3 Authentication for more details.
-
Define the Reader node with GCS details. Default values can be used for all but
PathandProject ID.Project IDmay not always have a customizable name, so its name will be contingent on what's assigned when creating your GCS account.Sample GCS Reader Node
- Path: gs://mybucket/pricedata.csv
- Project ID: ascendant-epoch-999999
Other required properties can be left at default values.
-
Define a CSV decoder node. Your imported data source requires a timestamp column to parse the data.
Typical CSV decoder Node
- Delimiter: ","
- Header: First Row
- Encoding Format: UTF8
-
Define the Transform Schema application
A sample Schema for a time column, category column and two value columns
- Data Format: Any
- Schema: Load a schema from a database by clicking ; create a database and schema if needed, or manually add the columns and column type for each of the source data columns in the Transform Node.
Parse Stringscan be set toAutofor all columns; but ensure any time, timestamp and string data columns is set toOnorAuto.
column name column type parse strings time Timestamp Auto sym Symbol Auto price Float Auto volume Integer Auto -
Define the table name to insert the data to. Select the database and table to write the data to from the dropdown menu. This is usually the same database and table from the schema creation step.
Writer Node
- Database: databasename
- Table: pricedata
- Write Direct to HDB: unchecked
- Deduplicate stream: checked
-
Open the Pipeline
-
Save the Pipeline
-
Deploy the database and associated GCP pipeline.
-
Query the data. Open the SQL tab. Define the
Output variableas "pricedata".SQL query
SELECT * FROM pricedata -
Get Data
For further information about Google Cloud Storage Authentication
-
Define the ACP Reader node with ACS details. Default values can be used for all but
PathandProject ID. A customizable account name is supported for ACS.Sample ACP Reader Node
- Path: ms://mybucket/pricedata.csv
- Account: myaccountname
Other required properties can be left at default values.
-
Define a CSV decoder node. Your imported data source requires a timestamp column to parse the data.
Typical CSV decoder Node.
- Delimiter: ","
- Header: First Row
- Encoding Format: UTF8
-
Define the Transform Schema application
A sample Schema for a time column, category column and two value columns
- Data Format: Any
- Schema: Load a schema from a database by clicking ; create a database and schema if needed, or manually add the columns and column type for each of the source data columns in the Transform Node.
Parse Stringscan be set toAutofor all columns; but ensure any time, timestamp and string data columns is set toOnorAuto.
column name column type parse strings time Timestamp Auto sym Symbol Auto price Float Auto volume Integer Auto -
Define the table name to insert the data to. Select the database and table to write the data to from the dropdown menu. This is the same database and table from the schema creation step.
Writer Node
- Database: databasename
- Table: pricedata
- Write Direct to HDB: unchecked
- Deduplicate stream: checked
-
Open the Pipeline
-
Save the Pipeline
-
Deploy the database and associated ACS pipeline.
-
Query the data. Open the SQL tab. Define the
Output variableas "pricedata".SQL query
SELECT * FROM pricedata -
Get Data
For further information about Microsoft Azure Authentication