Database configuration
The kdb Insights Database is a distributed time-series database built upon kdb+. kdb Insights databases allow users to store and access data from tiered data access using faster access mechanisms for the most recent data as may be used in real-time, and slower, cheaper access for older, historic data.
Configuration in YAML
This guide discusses how to configure a database using the kdb Insights Enterprise user interface. Databases can also be configured using a YAML configuration file. YAML configured databases can be deployed using the kdb Insights CLI.
Create a database
A database can be created by clicking [+] next to Database name in the entity tree, or by using the Build a Database wizard available from the Overview page.

kdb Insights databases are designed to scale independently for data write-down and querying. Depending on the intended workloads, compute settings can be tuned for each component. If your workload has a large amount of data being ingested, consider increasing the Writedown compute settings. If your workload has high frequency, or complex queries, consider increasing the Query Setting compute settings.
Every database includes a stream and set of schema tables, and must be deployed to be activated. An active database will show a green circle with a tick next to its name in the left-hand entity tree listed under Database.
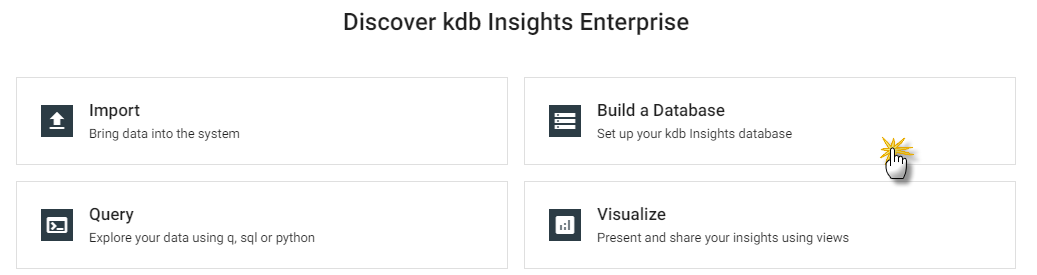
Build a Database
A database wizard is available from the Overview home page. The database wizard will set up a pre-configured database with a schema and stream.
Database settings
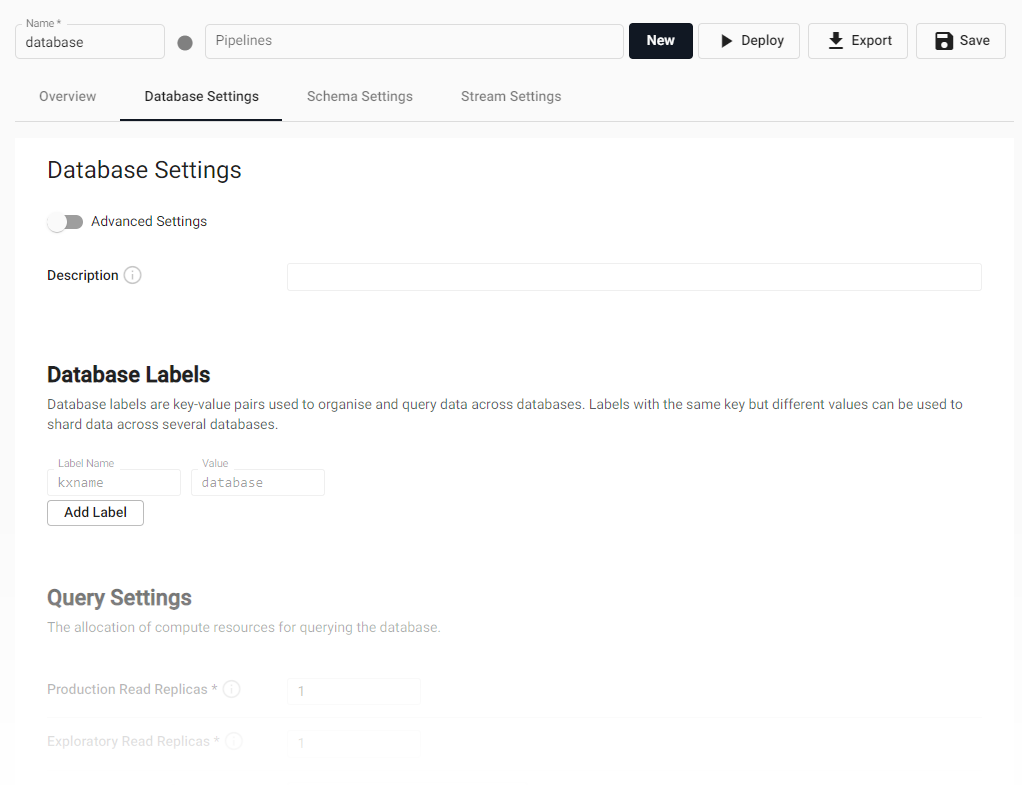
Database resourcing, labels and description are set from the Database Settings tab of the database. The database name can be set from the page header above the tab selection. Save any change to the settings.
Labels
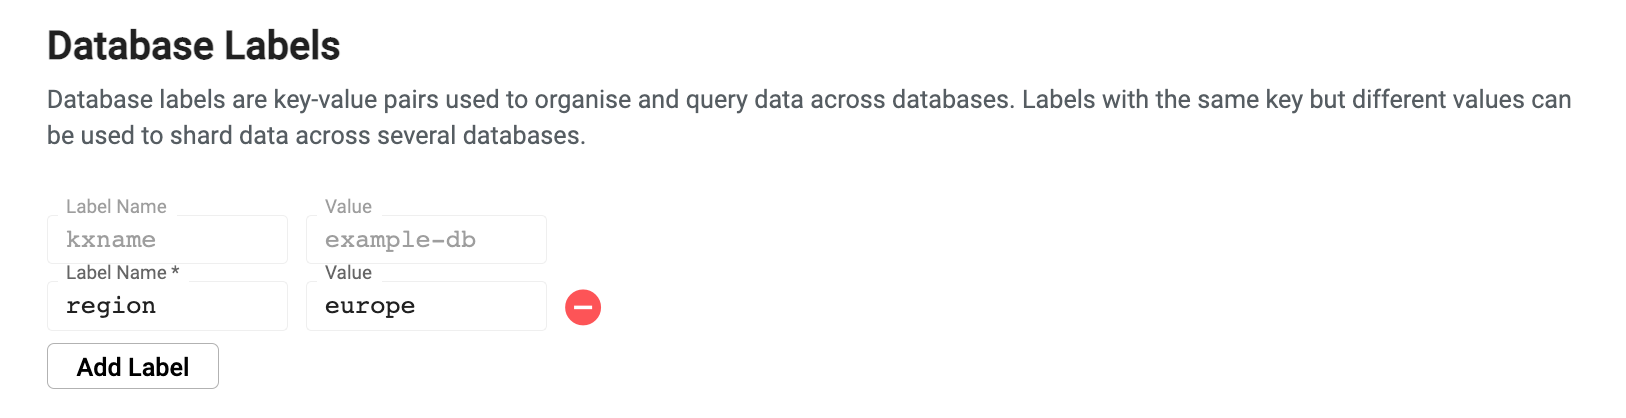
Database labels are metadata that are used to define correlations between different data split across multiple assemblies (shards). Labels are used during query routing to select specific subsets of a logical database. Labels appear in database tables as virtual columns
A database must have at least one label associated with it. Additionally, the combination of all assigned labels must be a unique set of values. Individual label values can be repeated, but the combination of all of them must be unique to the particular assembly.
Default label
When creating an assembly in the user interface, a default label named kxname is provided which maps to the database name.
Labels in SQL
When issuing an SQL query, labels should be referenced with a label_ prefix. For example, the label region would be referenced as label_region in the query.
To add labels, click "Add Label".
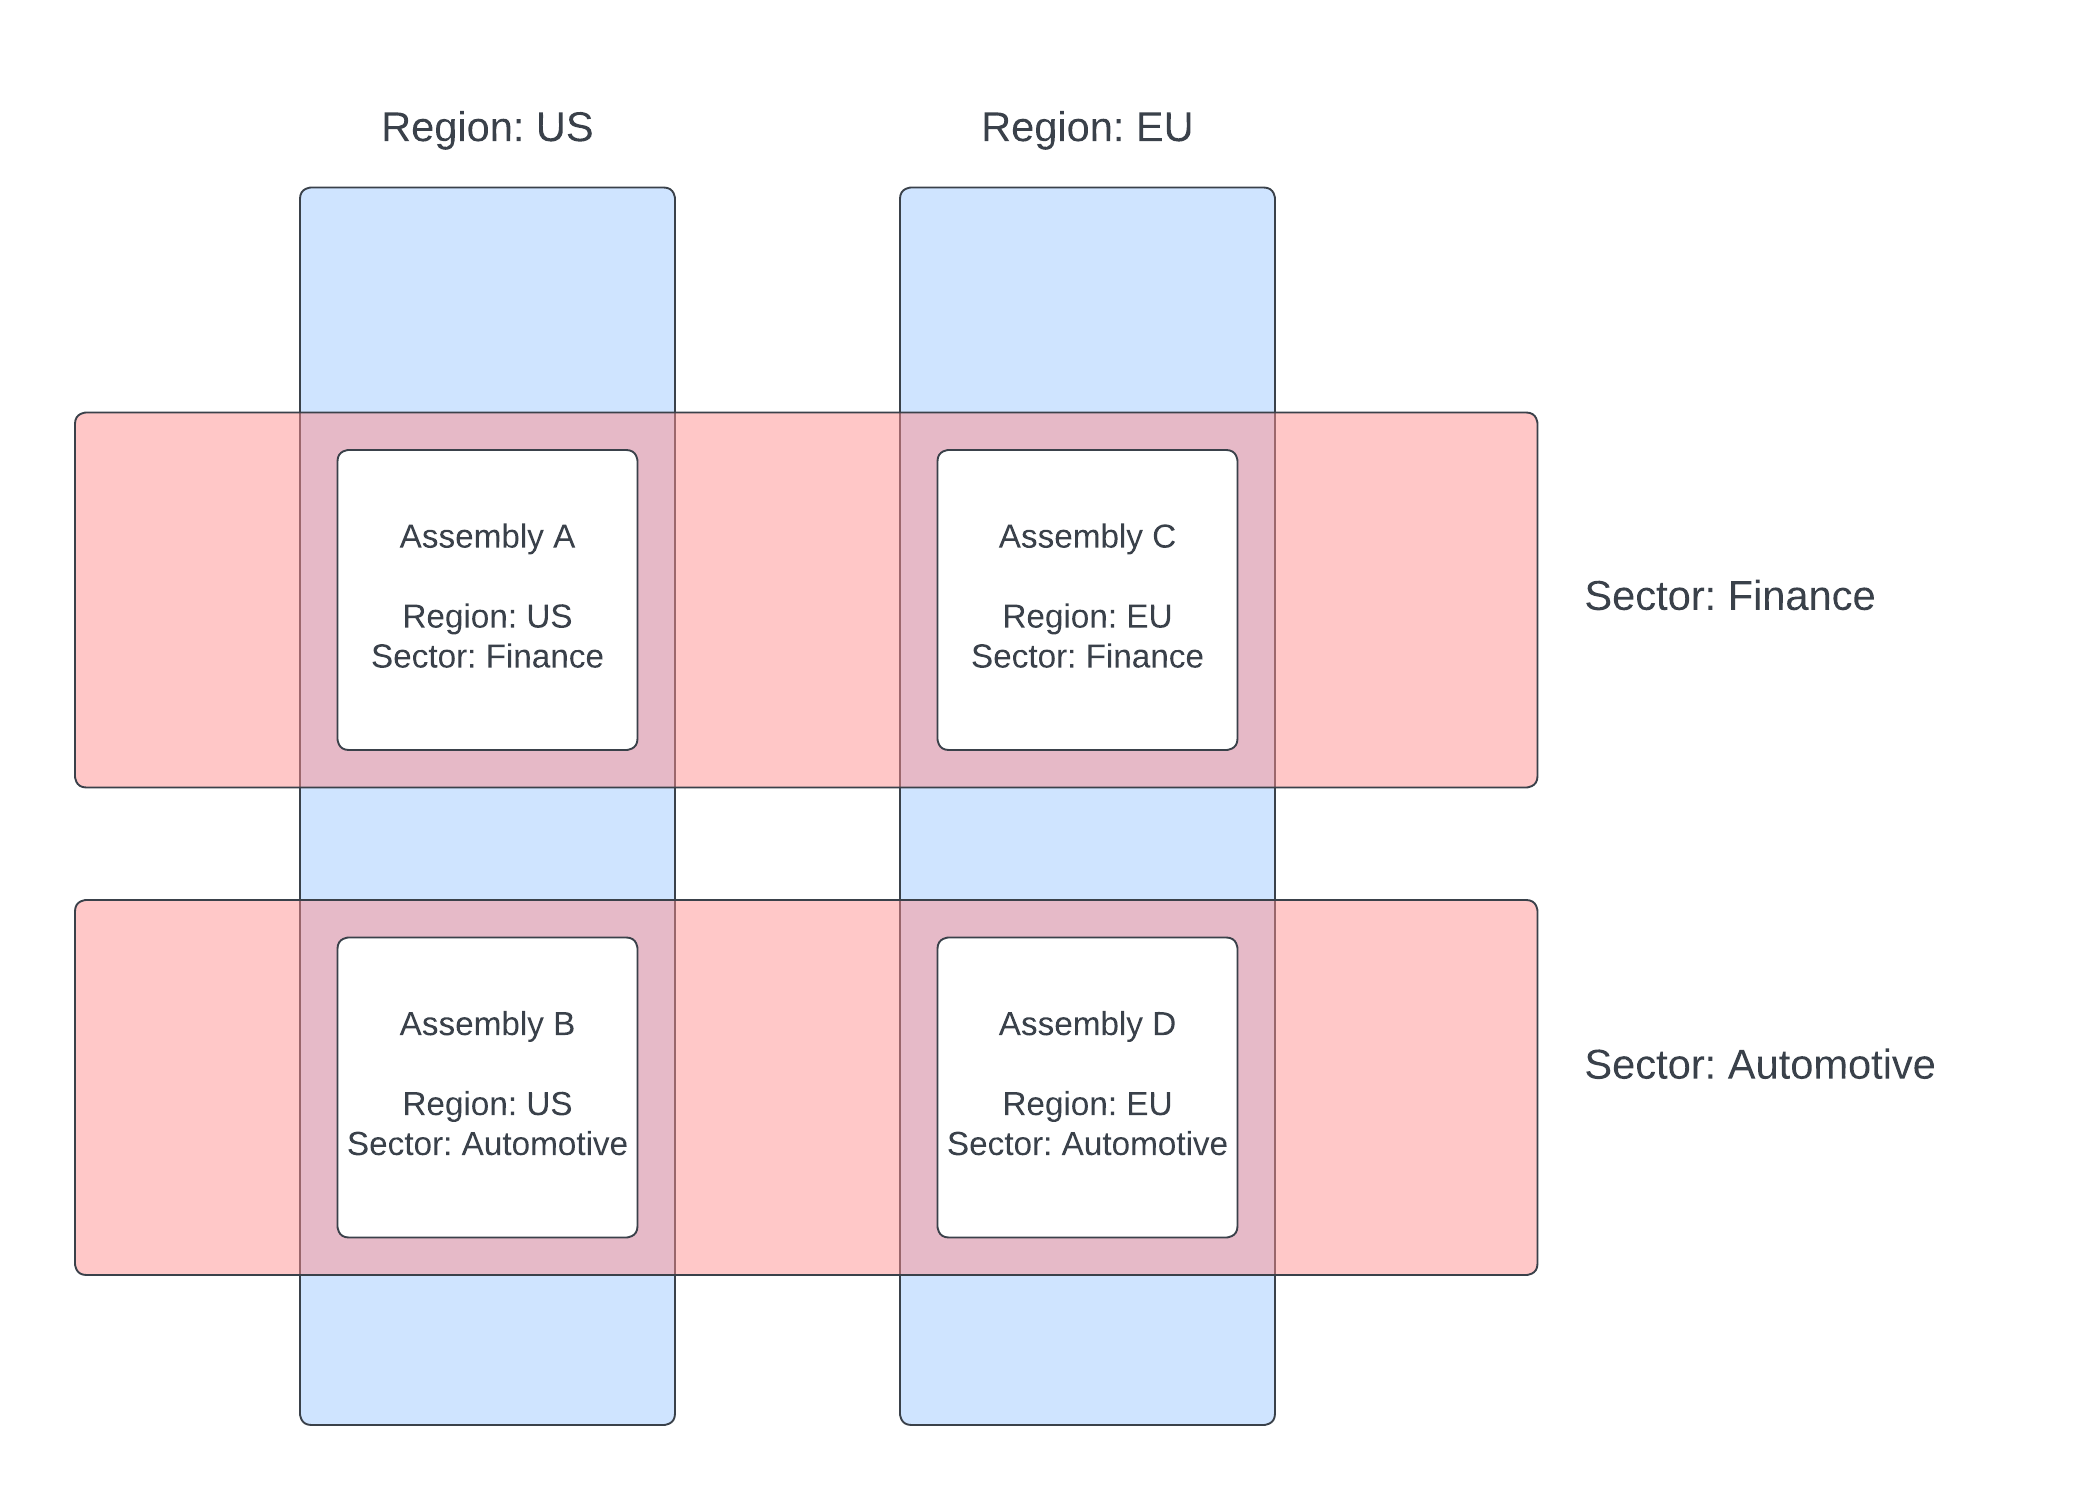
Labels example
This example illustrates the power of labels by splitting data across four assemblies, paring a region and a sector criteria across them.
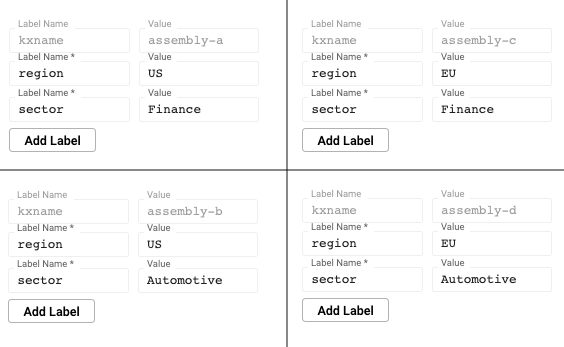
These four assemblies make up one logical database. Queries can be issued across the assemblies using the sector or region label. An individual assembly can also be directly queried using a combination of labels. You can query across all assemblies by omitting labels from the query.
Query settings
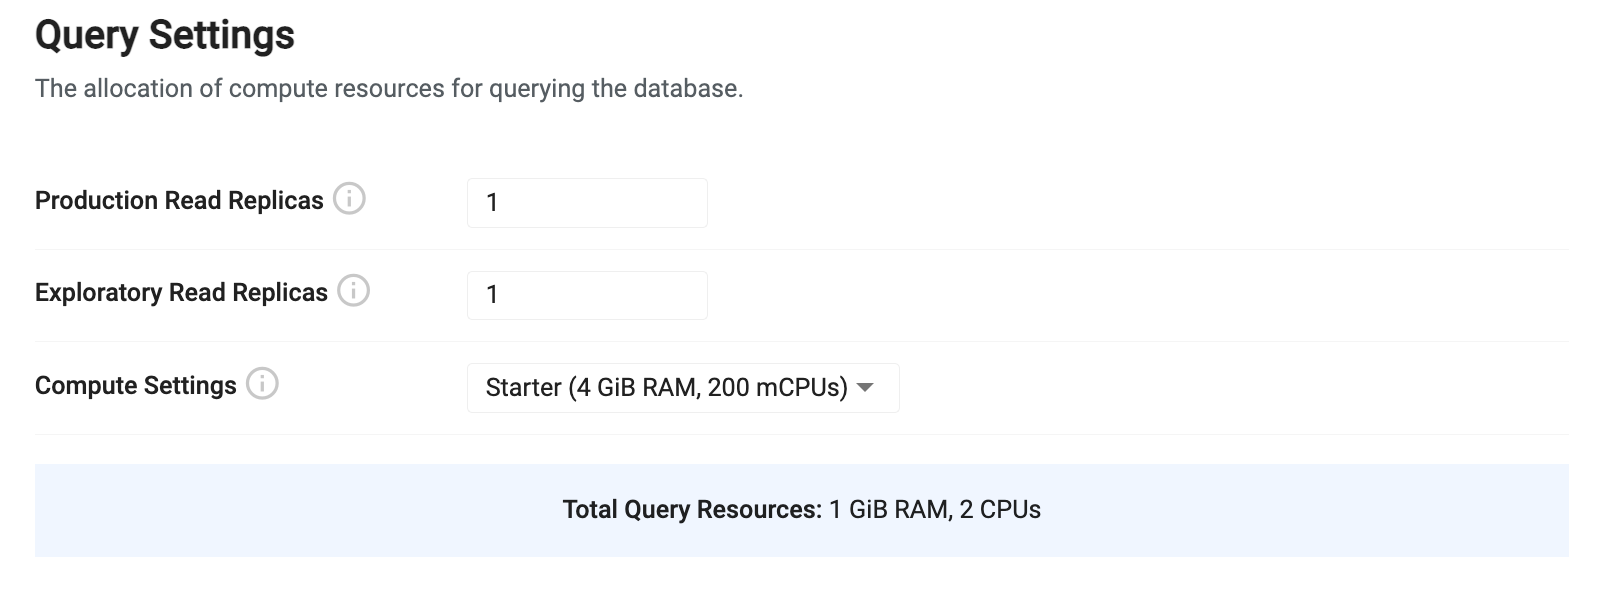
Query settings configure how data will be queried from the system. This configuration determines how much compute and redundancy is provided to query environments in the system.
| name | description |
|---|---|
| Production Read Replicas | This is the total number of production data access instances that will be launched. For testing purposes, a count of 1 will be sufficient. When running in a production cluster, the number of replicas should be increased to match the desired amount of availability. Use a minimum of 3 replicas when running in a production configuration to achieve redundant replication. By default, production replicas only serve the getData API. To enable SQL queries, see the SQL support guide. |
| Exploratory Read Replicas | This is the number of available query instances for running experimental queries from an explore session. By default, these read replicas have SQL support enabled and allow a high degree of freedom of queries. This value should be configured to reflect the desired availability for exploratory queries in the system. |
| Compute Settings | This is the amount of compute to allocate to each of the production and exploratory query instances. Both types of instances will use the same compute profile. A number of preconfigured sizes are provided. Depending on the desired query profile, pick a profile that provides a sufficient amount of RAM but balance it with the number of read replicas for more concurrency. • Starter: sufficient for basic query loads and for testing a database. • Small: sufficient for a small number of tables with simple queries. • Medium: sufficient for moderate workloads with queries using a moderate amount of RAM. • Large: sufficient for most workloads with queries requiring a lot of RAM. See query compute for custom configurations. |
Query compute
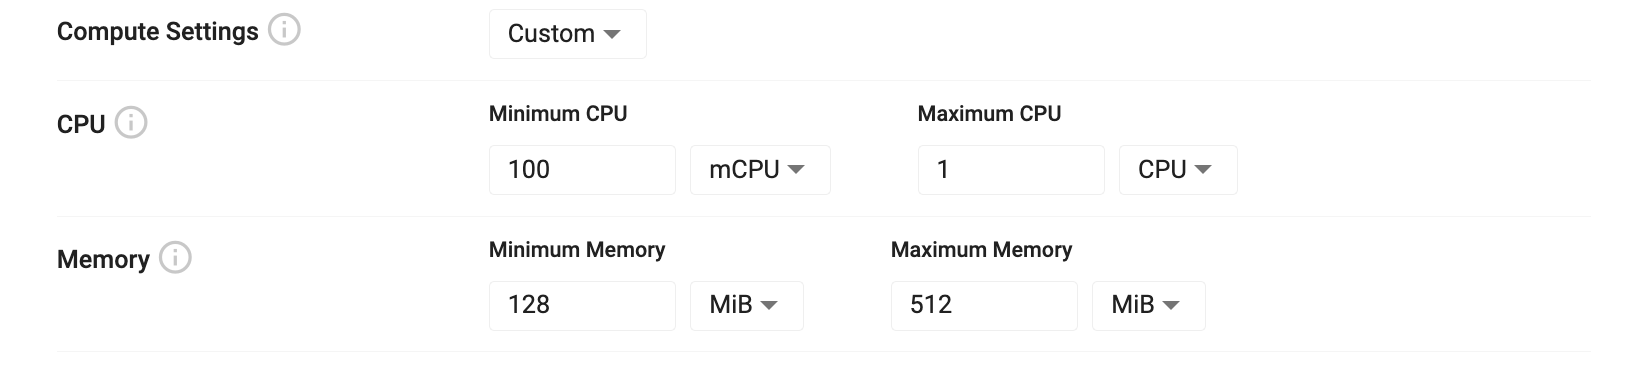
Custom query compute settings allow you to tailor your settings to optimize query performance. Query compute settings are split into CPU and memory allocations that can be assigned to the query instances. The minimum values represent the amount of a resource that is required for compute. If there are not enough resources available to satisfy the minimum ask, Kubernetes will trigger a scale up event to acquire more resources. Maximum values are best effort limits that are applied to query processes. If the maximum amount is reached, the query instance is evicted and forced to restart, releasing any resources back to the pool of available resources.
| name | description |
|---|---|
| Minimum CPU | The minimum amount of virtual CPU cycles to allocate to this instance. This value is measured in fractions of CPU cores which is either represented as mCPU for millicpu or just simply CPU for whole cores. You can express a half CPU as either 0.5 or as 500mCPU. |
| Maximum CPU | The limit of CPU available to for this instance to consume. During burst operations, this process may consume more than the limit for a short period of time. This is a best effort governance of the amount of compute used. |
| Minimum Memory | The minimum amount of RAM to reserve for this process. RAM is measured in either bytes using multiples of 1024 (the iB suffix is used to denote 1024 byte multiples). If not enough memory is available on the current infrastructure, Kubernetes will trigger a scale up event on the install. |
| Maximum Memory | The maximum amount of RAM to reserve for this process. If the maximum RAM is consumed by this instance, it will be evicted and restarted to free up resources. |
Query environment variables

Enabling environment variables
To enable the environment variable input, enable the 'Advanced' toggle at the top of the database document.
Environment variables allow you to further customize the behavior of the database. These are an advanced option that are available when the 'Advanced' toggle is set at the top of the configuration page. Each variable is a key-value pair where the key is the name of a variable and the value is the desired setting. See the Data access process environment variable list for the complete list of options.
Query size limitations
Queries routing through the Service Gateway using the SQL, custom APIs, or getData APIs have no limitations on size, except those of version 6 of the IPC Protocol (messages can exceed 2Gb).
Queries are streamed through the gateway if the response back to the UI, or client, would exceed KXI_SG_STREAM_THRESHOLD bytes.
RESTful queries are never streamed. The results will be uncompressed, and limited to 2Gb.
QSQL queries
QSQL queries that directly target a database are limited to 2Gb. Use SQL or getData if you wish to pull out more than 2Gb.
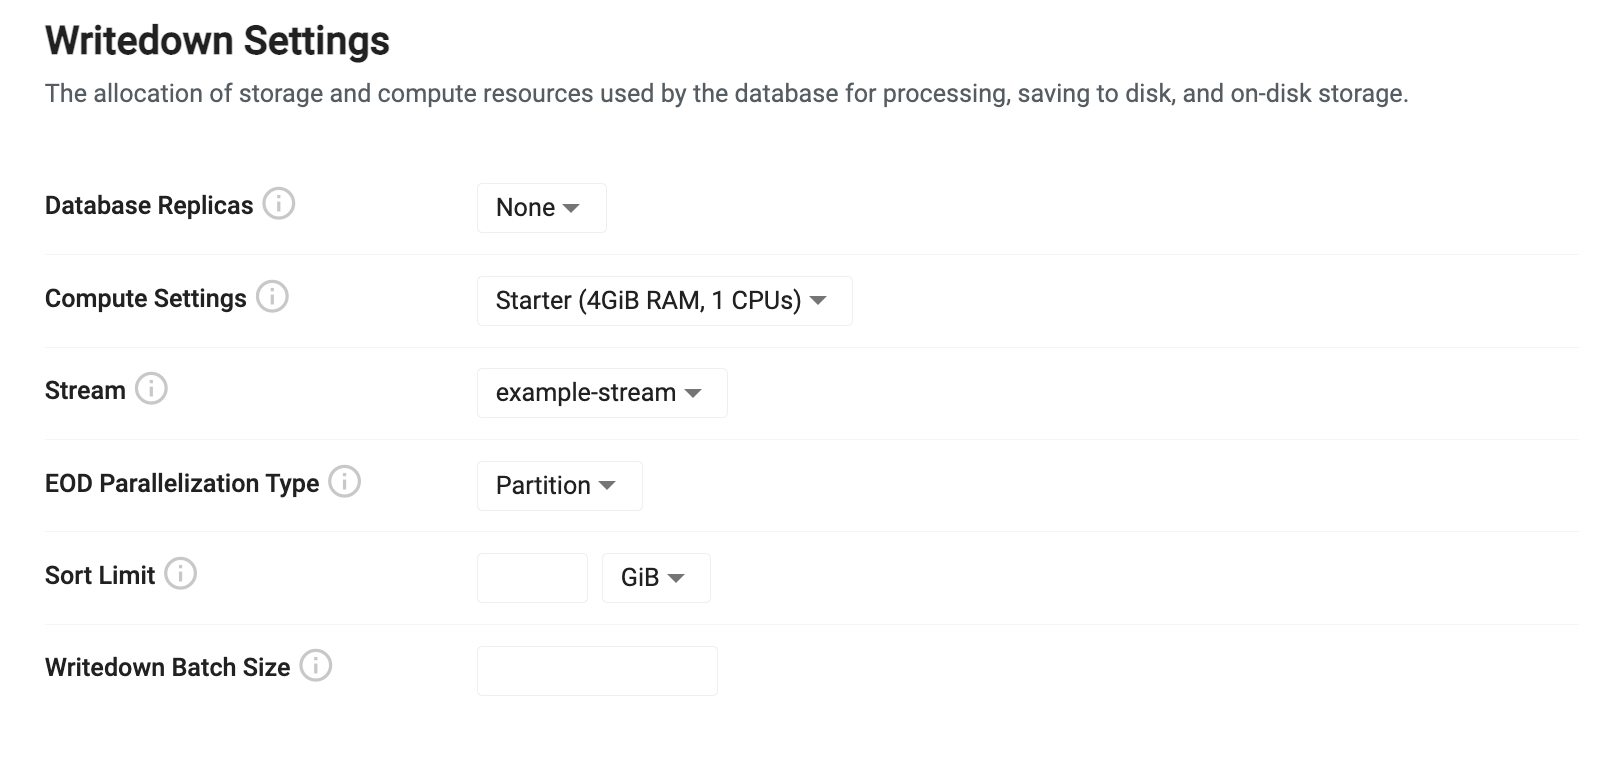
Writedown settings

Writedown settings configure how data will be stored in the system. Database writedown receives data from an incoming stream and stores it in a tier. For high availability, replicas can be used for redundant writedown processes. The compute settings for writedown govern how much data can be ingested into the database.
| name | description |
|---|---|
| Compute Settings | This is the amount of compute allocated to each database writedown process. The writedown process must have enough RAM to hold an entire day's worth of any column in the database that has the 'parted' attribute during an end of day writedown. • Starter: sufficient for testing and example databases. • Small: sufficient for small tables with minimal attribute usage. • Medium: sufficient for moderate table sizes. • Large: sufficient for most workload requiring a sorting and attribute application. See writedown compute for custom configurations. |
Writedown compute

Custom writedown compute settings allow you to tailor your settings to optimize query performance. Writedown compute settings are split into CPU and memory allocations that can be assigned to writedown instances. The minimum values represent the amount of a resource that is required for compute. If there are not enough resources available to satisfy the minimum ask, Kubernetes will trigger a scale up event to acquire more resources. Maximum values are best effort limits that are applied to query processes. If the maximum amount is reached, the writedown instance is evicted and forced to restart, releasing any resources back to the pool of available resources.
| name | description |
|---|---|
| Minimum CPU | The minimum amount of virtual CPU cycles to allocate to this instance. This value is measured in fractions of CPU cores which is either represented as mCPU for millicpu or just simply CPU for whole cores. You can express a half CPU as either 0.5 or as 500mCPU. |
| Maximum CPU | The limit of CPU available to for this instance to consume. During burst operations, this process may consume more than the limit for a short period of time. This is a best effort governance of the amount of compute used. |
| Minimum Memory | The minimum amount of RAM to reserve for this process. RAM is measured in either bytes using multiples of 1024 (the iB suffix is used to denote 1024 byte multiples). If not enough memory is available on the current infrastructure, Kubernetes will trigger a scale up event on the install. |
| Maximum Memory | The maximum amount of RAM to reserve for this process. If the maximum RAM is consumed by this instance, it will be evicted and restarted to free up resources. |
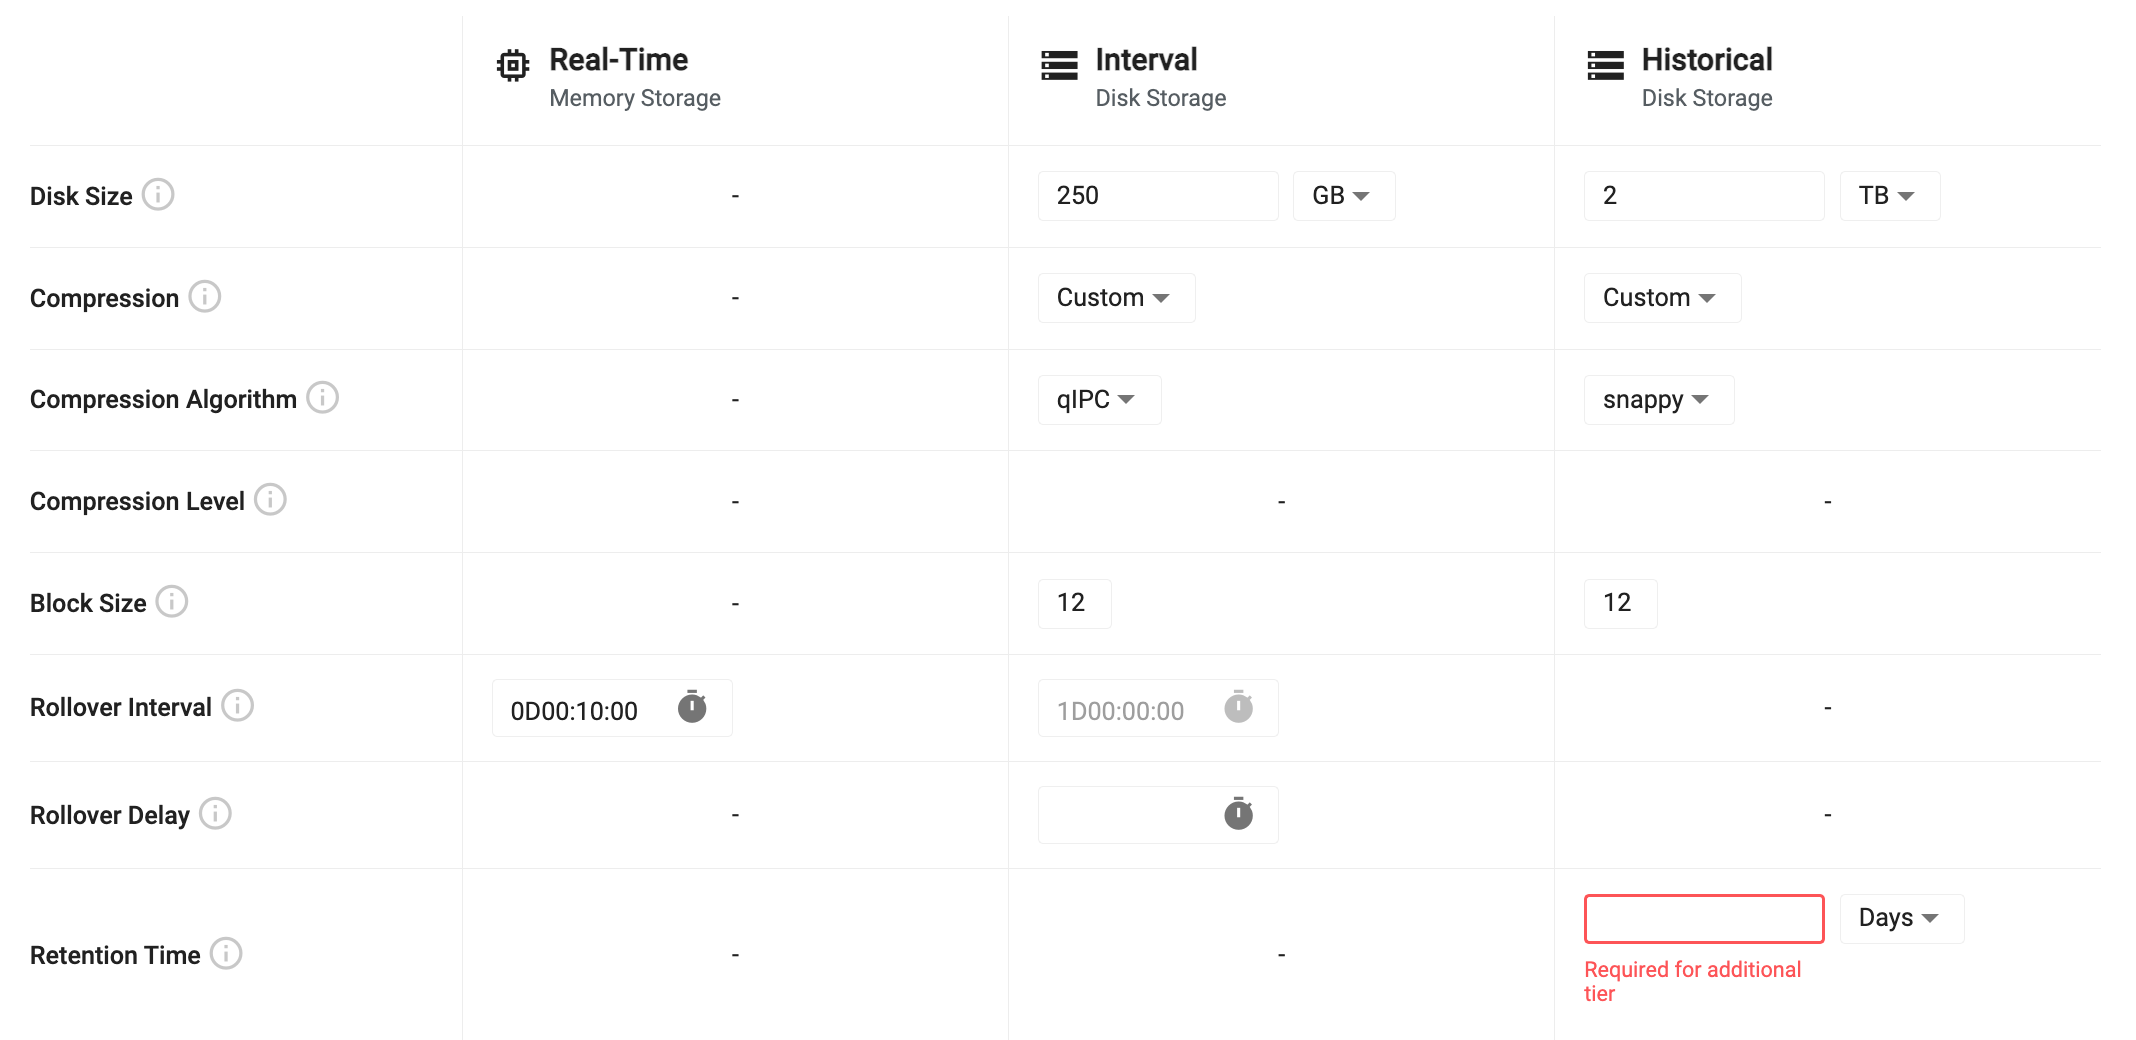
Tier settings
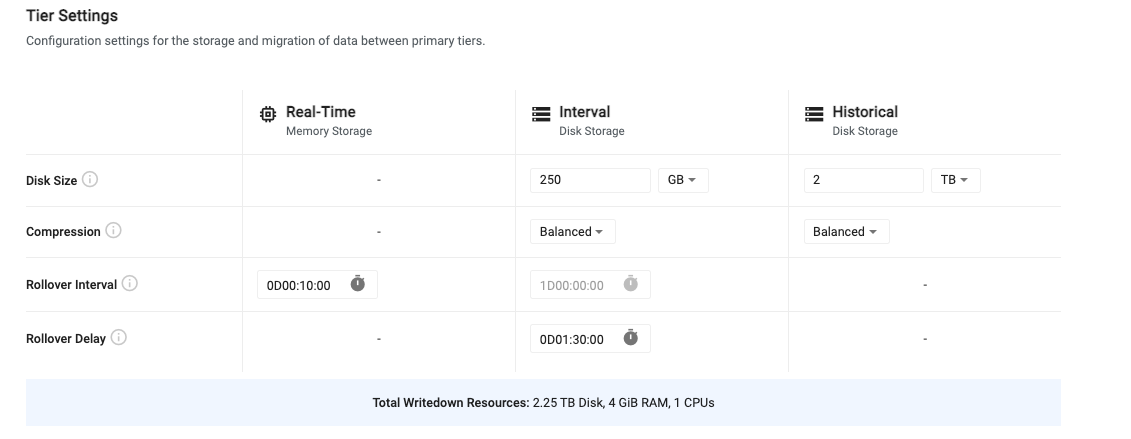
Tiers are used for accessing data with different levels of compute depending on the age of the data. Recent data is stored in a real-time tier that provides fast access at a high resource cost. Recent, but slightly older data is stored in an interval tier. This data is written to disk but is quickly accessible as it remains mapped to memory for quick access. Data that is older than a day is moved to a historical tier for longer term storage. This tier uses less resources but still allows for fast access to historical data. For older, less relevant data, additional historical tiers can be configured to migrate data to object storage. Here, data is very cheap to store for long periods of time, but it is also much slower to access.
Tier settings allow you to configure the lifecycle of data as it propagates across the three primary tiers. Below is a table outlining the default tier settings. For advanced tier settings, turn on the "Advanced Settings" toggle at the top of the page.
| name | description |
|---|---|
| Disk Size | For interval and historical tiers, this is the amount of disk space allocated for storing data on disk. The interval tier only needs to store enough data to hold a single day, while the historical tier must hold all data that isn't migrated out of the system. |
| Compression | For data that is written to disk, the compression setting compresses data on disk to reduce space consumption. Compression can be disabled by setting this value to 'Custom' and choosing 'None'. There are three preconfigured compression settings or custom. See tier compression settings for more details. |
| Rollover Interval | This value is the frequency at which data will migrate between tiers. By default, data will move from the real-time tier to the interval tier every 10 minutes. Data will then move from the interval tier to the historical tier once per day. This value is currently not configurable. |
| Rollover Delay | The rollover delay is available for data migrating from the interval to the historical tier. This is used to ensure that late data that is intended to be written into the historical tier is included in the migration for the given day. |
Tier compression settings

Tier compression configures how data is compressed when written to disk on the interval and historical data tiers. The compression settings uses the compression options provided with kdb+. Compression settings can be set to one of the provided presets or can be tuned with custom settings.
Presets
| name | description |
|---|---|
| Fast | Uses Snappy compression with a block size of 12. This provides the fastest writedown and retrieval of data but only provides minimal compression. |
| Balanced | Uses QIPC compression with a block size of 14. This provides a moderately fast writedown and retrieval rate while offering moderate compression. |
| High Compression | Uses LZ4HC compression set at a maximum compression level of 12 with a block size of 20. This provides the highest rate of compression, but the slowest writedown and retrieval. |
Custom Settings
When 'Custom' is selected as the compression type, some additional custom settings are provided. This allows you to tune your compression settings specifically for your use case.
| name | description |
|---|---|
| Compression Algorithm | This is the algorithm to use for data compression. Different algorithms provide different levels of flexibility to tune the level of compression and the block size used for compressing. See the compression algorithms table below for details on what values are available. |
| Compression Level | Available for some algorithms, this is the ratio of compression to apply to the data. A higher level provides more compression, but requires more passes of the data and can be slower for writedown and retrieval. See the compression algorithms table below for what options are available. |
| Block Size | When applying compression, data is split into logical blocks for chunking compression. The block size is is a power of 2 between 12 and 20 indicating the number of bytes to include in each block. For example, a block size of 20 means 2 to the power of 20, or 1 MB block size. |
Compression Algorithms
Setting the compression algorithm changes the settings that are available for configuration. All compression algorithms have an option to configure their block size between 12 and 20 but only select algorithms can change the compression level. To disable compression, select 'None' as the compression algorithm. The table below details what compression level settings are available for each algorithm. For algorithms that offer levels, the higher the level, the smaller the data will be on disk at the expense of more time and resources to perform the compression.
| name | levels | description |
|---|---|---|
| None | - | Disable compression. |
| QIPC | - | Uses native QIPC compression to reduce file sizes on disk. |
| GZIP | 0-9 | Uses GZIP to compress data offering, where the level is the number of passes of each block of data to make to reduce data size. |
| Snappy | - | Snappy provides a fast compression algorithm focused on speed over compression ratios. |
| LZ4HC | 1-12 | LZ4HC offers very fast compression while also allowing tuning of the compression level to reduce footprint. |
Additional historical tiers
By default, historical data migrates to the final historical tier and remains there until all available disk space is consumed. If you have data that you query infrequently, but you want to maintain for extended periods of time, you can migrate that data to an object storage tier using an additional historical tier. Data that is migrated to an object storage tier can be persisted for an unlimited duration but will be significantly slower to access. Object storage offers inexpensive elastic storage allowing you to hold massive volumes of data at a fraction of the cost of holding it on a persistent disk.
To add an additional historical tier, click the 'Add Historical Sub Tier' button.

Next, set the tier name and chose the storage type. The historical tier requires you to have an existing bucket in either Amazon S3, Azure Blob Storage or Google Cloud Storage. Select the vendor type for the desired bucket and drop in a location within that bucket to act as the root of the database.
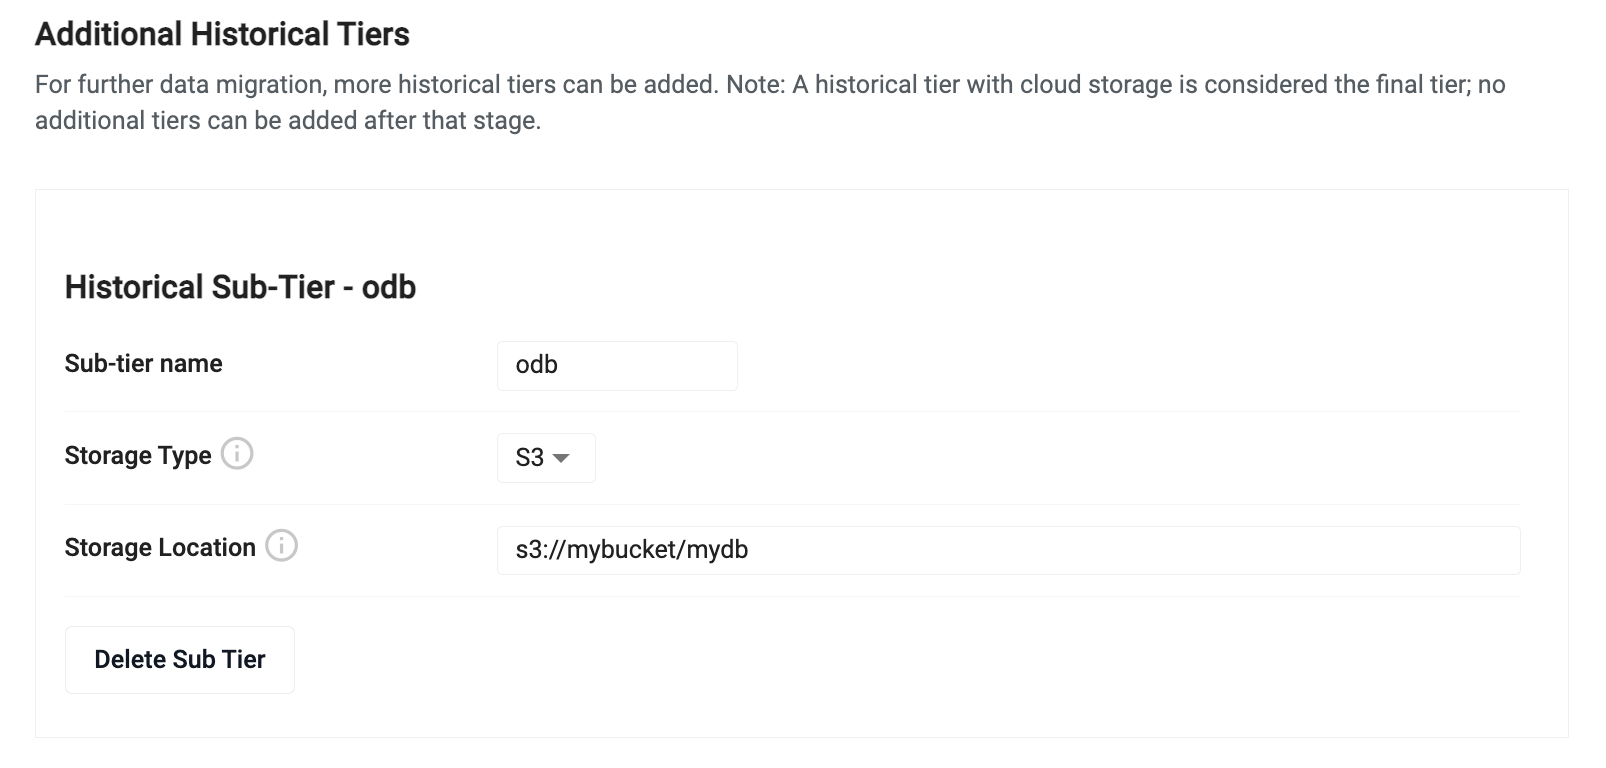
When an additional historical tier is added, the historical tier will have a new 'Retention Time' input field that needs to be configured. This value indicate the amount of time that the historical tier will hold data before migrating it to the additional historical tier.
Writedown advanced settings
To further tune the behavior of database writedown, use the 'Advanced' toggle at the top of the database document. Enabling advanced options will give you finer grain control over the settings used during writedown.
| name | description |
|---|---|
| EOD Parallelization Type | When data is written to disk, parallelization is used to maximize throughput. Data can either be split by partition or by table when writing in parallel. For most cases, using "Partitioned" will provide the best throughput. For cases where you have a significant number of tables, it may be more efficient to write each table in parallel. |
| Sort Limit | When performing a sort at the end of day write down, this limit is used to chunk the sorting of the table. This value must be set less than the allocated writedown compute. Setting a sort limit will reduce writedown throughput but it is useful to set this value when wide tables are being used to reduce the amount of required memory. |
| Writedown Batch Size | During writedown, data can be split into chunks to reduce memory footprint. This value lets you set a row limit to split data on during writedown. |
Writedown environment variables

Enabling environment variables
To enable the environment variable input, enable the 'Advanced' toggle at the top of the database document.
Environment variables allow you to further customize the behavior of the database. These are an advanced option that are available when the 'Advanced' toggle is set at the top of the configuration page. Each variable is a key-value pair where the key is the name of a variable and the value is the desired setting. See the Storage Manager environment variable list for the complete list of options.
Packages
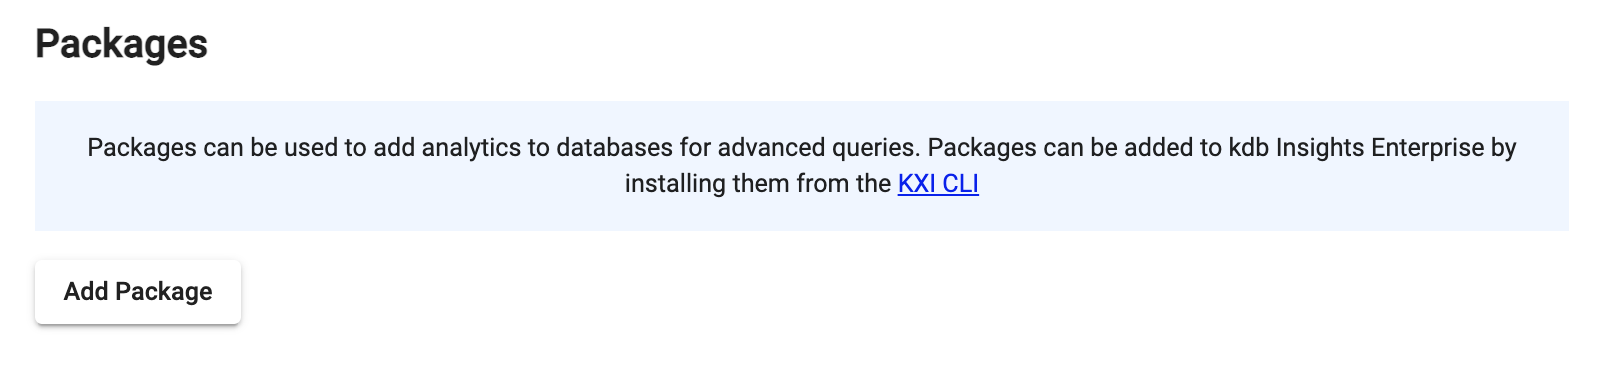
Enabling packages
To enable packages, enable the 'Advanced' toggle at the top of the database document.
Packages allow you to add custom code to a database. This allows you to install custom APIs and extend the databases functionality.
Export
Export converts databases created in the UI to the underlying YAML configuration. Click Export from the database menu.

An exported database can be deployed using the kdb Insights CLI.