Get Data - Kafka (Subway)
Apache Kafka is an event streaming platform supported by kdb Insights Enterprise. The subway Kafka feed generates live alerts for NYC Subway trains - tracking arrival time, station location coordinates, direction and route details.
No kdb+ knowledge required
This example assumes no prior experience with q/kdb+ and you can replace the endpoints provided with other Kafka brokers to gain similar results.
1. Create and deploy a database
A database stores data on kdb Insights Enterprise. Available databases are listed under Databases of the Overview home page. If not available, create a database, insights-demo, to store your data.
To use a pipeline, your database must be deployed and active.
2. Import Data
Open the import wizard by clicking [+] in the ribbon menu or  from the left-hand icon menu or Overview page. Then click Start Import. The import process creates a pipeline; a pipeline is a connection of nodes to read data from source, transform to a kdb+ compatible format, then write to a kdb Insights Enterprise database.

Click Start Import to begin the data import process.
I want to learn more about the import wizard.
3. Select a Reader
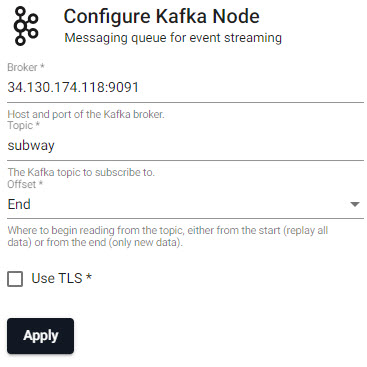
A reader stores details of data to import, including any required authentication. Select the Kafka reader and complete connection details; required properties are marked with an *.
Choose the Kafka reader.
| setting | value |
|---|---|
| Broker* | 34.130.174.118:9091 |
| Topic* | subway |
| Offset* | End |
| Use TLS | No |
Click Next when done.
I want to learn more about reader nodes.
4. Select a Decoder
Kafka event data is in JSON and has to be decoded to a kdb+ friendly format (a kdb+ dictionary).
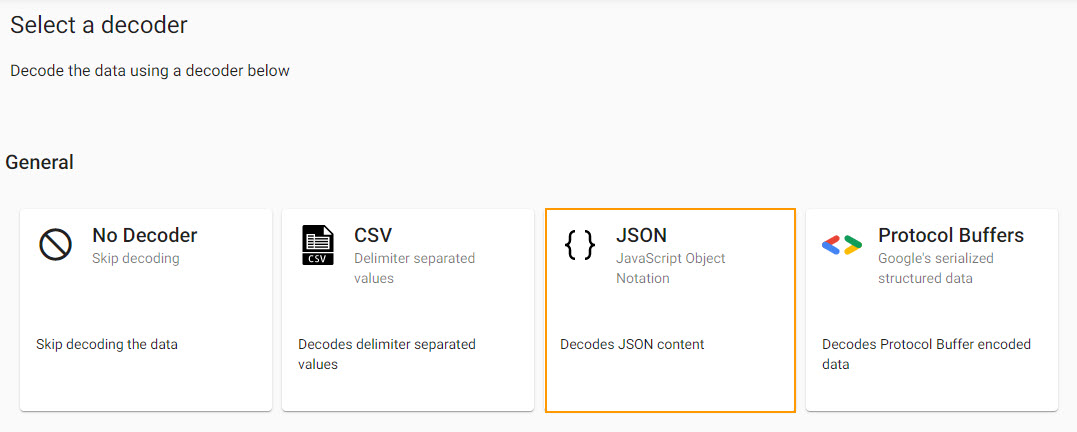
Select a JSON decoder.
Keep default JSON decoder settings:
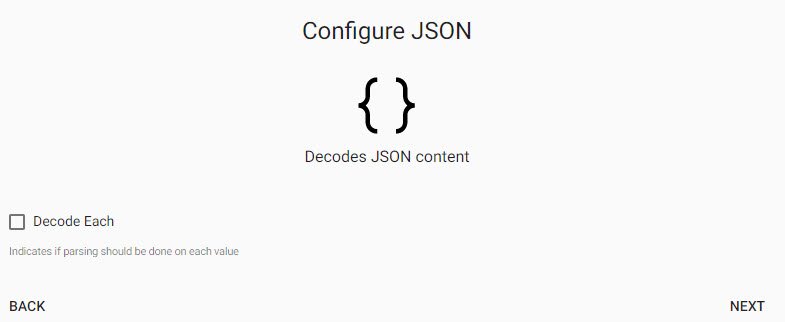
Keep default JSON decoder settings; Decode Each is left unchecked.
Click Next when done.
I want to learn more about decoder nodes.
5. Define the Schema
The schema converts data to a type compatible with a kdb+ database. Every imported data table requires a schema; and every data table must have a timestamp key to be compatible with kdb's time series columnar database. insights-demo has a predefined schema for subway data.
| setting | value |
|---|---|
| Apply a Schema | Checked |
| Data Format | Any |
- Click

-
Select
insights-demoschema from the dropdown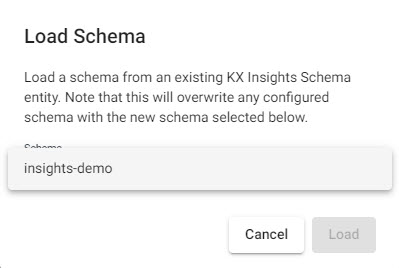
Selectinsghts-demoschema. -
Select the
subwaytable
Select thesubwaytable from theinsights-demodatabase.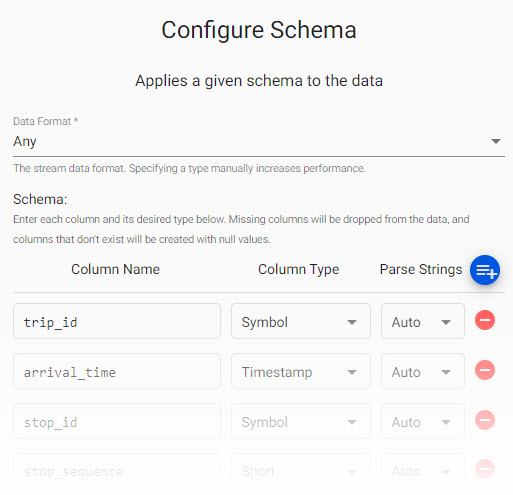
Review thesubwayschema. Parse Strings is set toautofor all fields.
Parse Strings
Determines the requirement to parse input string data to other datatypes. Generally, parse strings is enabled for all time, timestamp, string fields unless your input is IPC or RT; retain the Auto default if unsure.
Manual entry subway schema
If not adding a schema with a table from a database, add the following columns with the  button instead. Column descriptions are optional and not required here:
| column | type |
|---|---|
| trip_id | symbol |
| arrival_time | timestamp |
| stop_id | symbol |
| stop_sequence | short |
| stop_name | symbol |
| stop_lat | float |
| stop_lon | float |
| route_id | short |
| trip_headsign | symbol |
| direction_id | symbol |
| route_short_name | symbol |
| route_long_name | symbol |
| route_desc | string |
| route_type | short |
| route_url | symbol |
| route_color | symbol |
Click Next when done.
I want to learn more about transform nodes.
6. Configure Writer
Write transformed data to the kdb Insights Enterprise database.
| setting | value |
|---|---|
| Database | insights-demo |
| Table | subway |
| Write Direct to HDB | No |
| Deduplicate Stream | Yes |
Click  to review the pipeline in the pipeline viewer
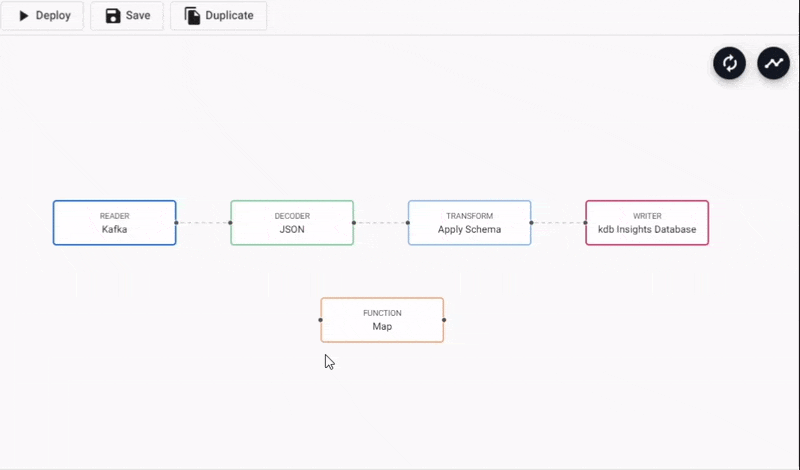
A pipeline created by the import wizard, reads data from its source, transforms to a kdb+ compatible format, and writes it to a kdb Insights Enterprise database.
Writer Node
The Writer - KX Insights Database node is essential for exploring data in a pipeline. The node defines the database to write too that must be active to receive data. Stream data uses its own writer node, Writer - KX Insights Stream.
7. Review Pipeline
The pipeline is a linked set of nodes derived from each step of the import process.

A Kafka pipeline built using the import wizard.
8. Modify Pipeline
The Kafka pipeline requires an additional piece of functionality to convert the decoded data to a kdb+ table prior to deployment. This is done with an enlist of the data.
- In the pipeline template view, click-and-drag into the workspace a Map node from the list of Functions.
- Connect the Map node between the Decoder and Transform node. Remove the existing connection between Decoder and Transform nodes by right-clicking the link and selecting
Remove Edge.
Adding a Function Map node to a Kafka data pipeline. Connect edges with click-and-drag, right-click a conncetion to remove.
- Edit the Map node properties.
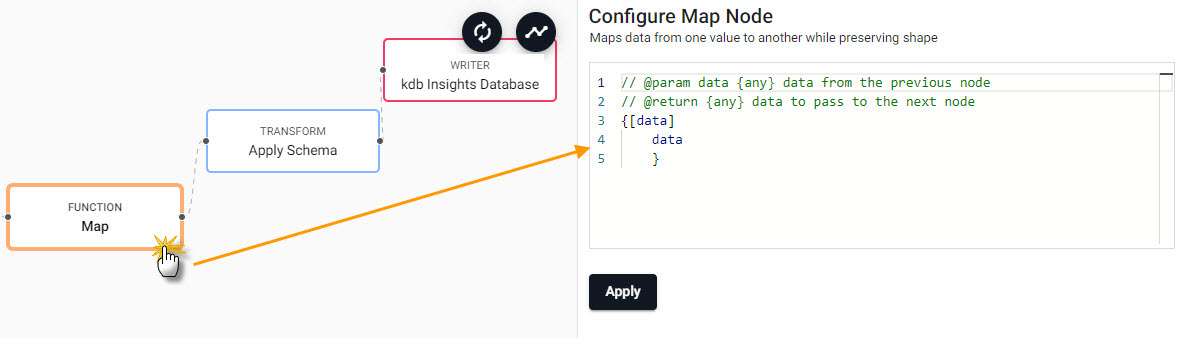
Select the Function Map node to edit its properties.
{[data]
    enlist data
 }
9. Save the Pipeline
Save and name the pipeline. This name should be unique to the pipeline; for example, subway-1.

Save the pipeline as subway-1.
The subway-1 pipeline is available in the left-hand pipeline menu.
10. Deploy the Pipeline
Deploy a pipeline to access it's data.

Deploy the pipeline.
Check the progress of pipeline under Running Pipelines of the Overview panel. The data is ready to query when Status=Running.

A running subway pipeline available for querying.
Database Deployment: If not already active, ensure insights-demo, or the database created with the subway schema table, is deployed from Databases in the left-hand menu for it to receive data from the pipeline.
11. Query the Data
Deploy the insights-demo database and subway-1 pipeline if not active or running.
Query data on a successful deploy to the database.
12. Visualize the Data
Build a visualization from the data.