Get Data - Protocol Buffers (Crime)
Protocol buffers are Google's language-neutral, platform-neutral, extensible mechanism for serializing structured data. The crime data set is a record of events from March 31st 2022 in NYC, organized by precinct, including location coordinates of the call, dispatch times and a description of the crime.
I want to learn more about encoders and protocol buffers.
I want to learn more about decoders and protocol buffers.
I want to learn more about protocol buffers.
No kdb+ knowledge required
This example assumes no prior experience with q/kdb+; replace provided Protocol Buffer endpoints with another endpoint to generate similar results.
1. Create and deploy a database
A database stores data on kdb Insights Enterprise. Available databases are listed under Databases of the Overview home page. If not available, create a database, insights-demo, to store your data.
To use a pipeline, your database must be deployed and active.
2. Open Pipeline Editor
Open the pipeline editor from the ribbon menu [+] or by clicking New button from the left-hand Pipeline menu. A pipeline is a connection of nodes to read data from source, transform to a kdb+ compatible format, then write to a kdb Insights Enterprise database.
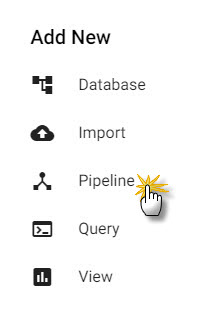
Click pipeline from the ribbon dropdown menu to open the pipeline editor.
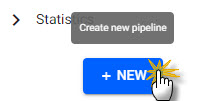
Click New pipeline button from the pipeline menu.
The pipeline editor has a list of nodes on the left, a central workspace, a test environment in the lower panel, and a node properties panel on the right; click-and-drag an Expression node from the list of reader nodes into the central workspace.
I want to learn more about pipelines.
3. Configure Expression Node
Select the Expression node. Add to the right-hand property panel the following q code:
URL:"https://code.kx.com/kxiwalkthrough/data/crime.msg";
resp:.kurl.sync[(URL;`GET;(::))];
if[200 <> first resp; ' last resp];
"\n" vs last resp
Click  to apply changes to the node.
Native REST interfacing functionality
Take advantage of native REST interfacing functionality (an API supporting interaction with RESTful web services) in kdb Insights Enterprise with .kurl.sync.
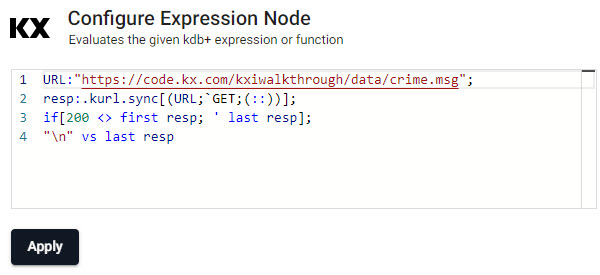
Crime data set code.
I want to learn more about reader nodes.
4. Add a Decoder Node
The output from the Expression node resembles a binary format. The data has to be read in a format compatible with kdb+.
Under the list of Decoders, click-and-drag the Protocol Buffers decoder node into the central workspace and connect it to the Expression node; do this with a click-and-drag of a connection from the dot-circle of the from-node, to the dot-cirle of the receiving-node.
Define the properties of the decoder node:
| setting | value |
|---|---|
| Message Name | crime |
| Message Definition | see JSON code block |
| As List | disabled |
syntax = "proto3";

message crime {
    uint64 event_id = 1;
    string incident_time = 2;
    uint64 nypd_precinct = 3;
    string borough = 4;
    string patrol_borough = 5;
    uint64 call_x_geo = 6;
    uint64 call_y_geo = 7;
    string radio_code = 8;
    string description = 9;
    string crime_in_progress = 10;
    string call_timestamp = 11;
    string dispatch_timestamp = 12;
    string arrival_timestamp = 13;
    string closing_timestamp = 14;
    double latitude = 15;
    double longitude = 16;
 }
Click to apply changes to the node.
I want to learn more about decoder nodes.
5. Add a Transform Node
The next step transforms the crime data fields to kdb+ types compatible with kdb Insights Enterprise database.
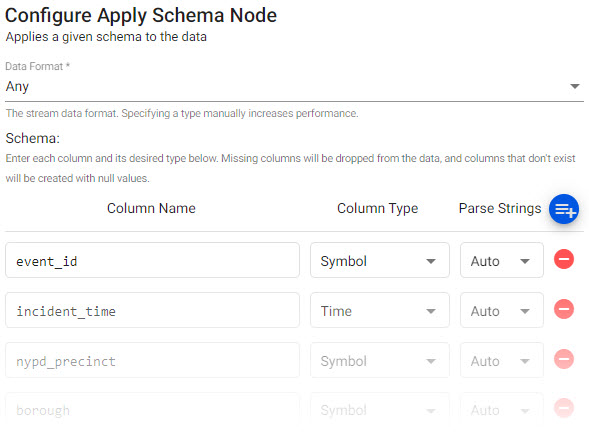
Click-and-drag into the workspace the Apply a Schema node from the list of Transform nodes and connect it to the Decoder node. The schema transforms the data to a kdb+/q format. insights-demo has a predefined schema for subway data.
To add a schema, click 
Select insights-demo schema from the dropdown.
Select the crime table from the list.
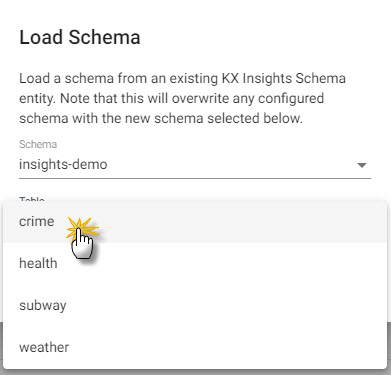
Loading the crime schema from insights-demo.
| setting | value |
|---|---|
| Data Format | Any |
| Schema | insights-demo |
| Table | crime |
The crime schema in the transform node.
Click to apply changes to the node.
Manual entry crime schema
If not adding a schema with a table from a database, add the following columns with the  button instead. Column descriptions are optional and not required here:
| column | type |
|---|---|
| event_id | symbol |
| incident_time | time |
| nypd_precinct | symbol |
| borough | symbol |
| patrol_borough | symbol |
| call_x_geo | long |
| call_y_geo | long |
| radio_code | symbol |
| description | string |
| crime_in_progress | string |
| call_timestamp | timestamp |
| dispatch_timestamp | timestamp |
| arrival_timestamp | timestamp |
| closing_timestamp | timestamp |
| latitude | float |
| longitude | float |
Parse Strings
Determines the requirement to parse input string data to other datatypes. Generally, parse strings is enabled for all time, timestamp, string fields unless your input is IPC or RT; retain the Auto default if unsure.
I want to learn more about transform nodes.
6. Add a Writer Node
Write transformed crime data to the kdb Insights Enterprise database.
Click-and-drag from the Writer node the kdb Insights Database into the pipeline workspace and connect it to the Transform node.
| setting | value |
|---|---|
| Database | insights-demo |
| Table | crime |
| Write Direct to HDB | No |
| Deduplicate Stream | Yes |
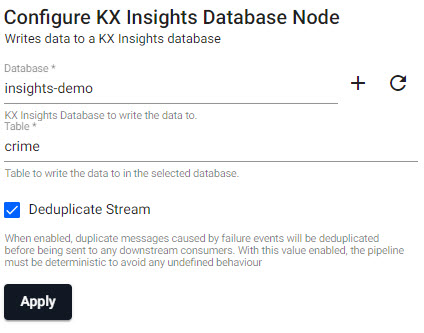
The crime writer node writes the data to the kdb Insights Enterprise database.
Click to apply changes to the node.
To query the data on the database, ensure the insights-demo database is active.
Writer - kdb Insights Database
The Writer - kdb Insights Database node is essential for exploring data in a pipeline. This node defines the database and table to write data too. To query the data in a database it must be deployed.
I want to learn more about writer nodes.
7. Review the Pipeline
The final pipeline looks like this:

A completed crime pipeline.
I want to learn more about pipelines.
8. Save the Pipeline
Save and name the pipeline.

Save the pipeline.
The name should be unique to the pipeline; for example, crime-1.
Pipeline crime-1 is listed under Pipelines in the left-hand menu.
9. Deploy the Pipeline.
Deploy the pipeline to an active database.

Deploy the pipeline.
Check the progress of pipeline under Running Pipelines of the Overview panel. The data is ready to query when Status=Running.

A running crime pipeline available for querying.
Database Deployment: If not already active, ensure insights-demo, or the database created with the crime schema table, is deployed from Databases in the left-hand menu for it to receive data from the pipeline.
10. Query the Data
Deploy the insights-demo database and crime-1 pipeline if not active or running.
Query data on a successful deploy to the database.
11. Visualize the Data
Build a visualization from the data.