Troubleshooting pipelines
Cloud Readers
To debug errors reading files, try downloading the file using the cloud provider's CLI to verify your credentials and the path.
Install the Azure CLI, then download the file
az storage blob download --account-name myAccount --account-key myAccountKey --container-name myContainer --name fileToDownload.csv --file downloadedName.csv
The error messages can be interpretted as follows
"...Failed to establish a new connection: [Errno -2] Name or service not known..." The account name is incorrect
"...Authentication failure. This may be caused by either invalid account key, connection string or sas token..." The account key is incorrect
"...The specified container does not exist..." The container name is wrong
"...The specified blob does not exist..." The file name is incorrect
If any of these appear, log into the Azure portal and ensure you have the correct information.
Install the AWS CLI and log in, then download the file
aws s3api get-object --bucket myBucket --key myFilePath/myFile.csv desiredDownloadedFileName.csv
The error messages can be interpretted as follows
"...Unable to locate credentials..." No credentials are set
"...AWS Access Key Id you provided does not exist..." The AWS Access Key ID is incorrect
"... An error occurred (SignatureDoesNotMatch)..." The AWS Secret Access Key is incorrect
"... Could not connect to the endpoint URL..." The region is incorrect
"_...The specified key does not exist." The filepath is incorrect
To resolve any of these except the incorrect file path, run aws configure then retry.
If you are using an access token, first export it to ACCESS_TOKEN.
If you are instead using a service account, you'll need to install the gcloud CLI, then populate ACCESS_TOKEN with
gcloud auth activate-service-account --key-file=path/to/service-account-key.json
export ACCESS_TOKEN=$(gcloud auth print-access-token)
you can then check the path and permissions by attempting to download the first 100 bytes
curl --range 0-100 -H "Authorization: Bearer $ACCESS_TOKEN" "https://storage.googleapis.com/my-bucket/path/to/file.txt"
The
Authentication required Confirm the access token is correct or service account key are correct
The specified bucket does not exist Access denied The project to be billed is associated with an absent billing account The project to be billed is associated with a closed billing account For the above errors, first confirm the bucket name before assuming a literal interpretation
The specified key does not exist. The path is incorrect
Cloud Writers
Writing to S3 uses multi-part upload, and requires these permissions
s3:PutObject s3:ListMultipartUploadParts s3:AbortMultipartUpload
You can use the AWS CLI to test that you have these permissions, and the correct credentials, region, and bucket.
Download and install the AWS CLI, then enter your credentials and region with
aws configure
To do a multipart upload, you'll need a file over 5MB. 5MB is the minimum chunk size for multipart uploads (excluding the last chunk). Split a file up into numbered parts by running the following. This will create files named part00, part01, etc.
split -b 5M -d myFile.csv part
Create a multipart upload, and replace <myUploadID> in subsequent commands with the upload ID returned by this command.
aws s3api create-multipart-upload --bucket my-bucket --key myFile.csv
Upload the first part, saving the ETag returned. Note that the part-number flag starts counting from 1
aws s3api upload-part --bucket my-bucket --key myFile.csv --part-number 1 --upload-id <myUploadID> --body part00
aws s3api upload-part --bucket my-bucket --key myFile.csv --part-number 2 --upload-id <myUploadID> --body part01
Confirm that you can list the parts
aws s3api list-parts --bucket my-bucket --key largefile.txt --upload-id <myUploadID>
Create a file fileparts.json with the ETags from the previous step
{
  "Parts": [
    {
      "ETag": "bca9f8a501948fa8eeb446f006c7cb4b",
      "PartNumber": 1
    },
    {
      "ETag": "9107cdcdfa39d6e3347cdd462c182be1",
      "PartNumber": 2
    }
  ]
}
And complete the upload
aws s3api complete-multipart-upload --bucket my-bucket --key largefile.txt --upload-id <myUploadID> --multipart-upload file://fileparts.json
If successful, this will return an object containing the file's URL on S3.
Next, test that you can abort an upload, replacing <myUploadID> in the second line with the ID returned by the first line.
aws s3api create-multipart-upload --bucket my-bucket --key myFile.csv
aws s3api abort-multipart-upload --bucket my-bucket --key largefile2.txt --upload-id <myUploadID>
If successful, nothing will be printed to the console.
Pipeline Status Unresponsive
An unresponsive status indicates that the Pipeline SP Controller is not responding to HTTP requests. If you are seeing this status in your pipeline, click the View Diagnostics button on the pipeline to investigate. Some common causes of this status include:
Secret Not Found
For readers such as .qsp.read.fromAmazonS3, there is an option to specify a Kubernetes secret when "Use Authentication" is set to true.
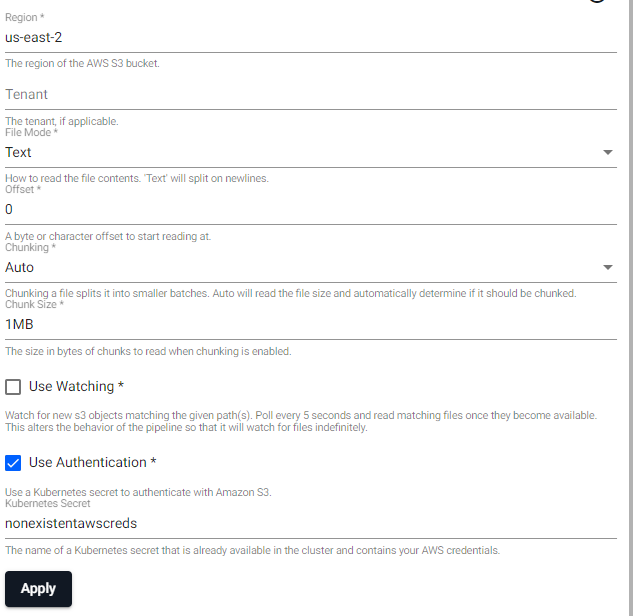
If the secret specified doesn't exist, the pipeline will go into an "Unresponsive" status. In such cases, if you click on "View Diagnostics" and go to the "Diagnostic Events" tab, you will see the following error:
MountVolume.SetUp failed for volume "nonexistentawscreds" : secret "nonexistentawscreds" not found
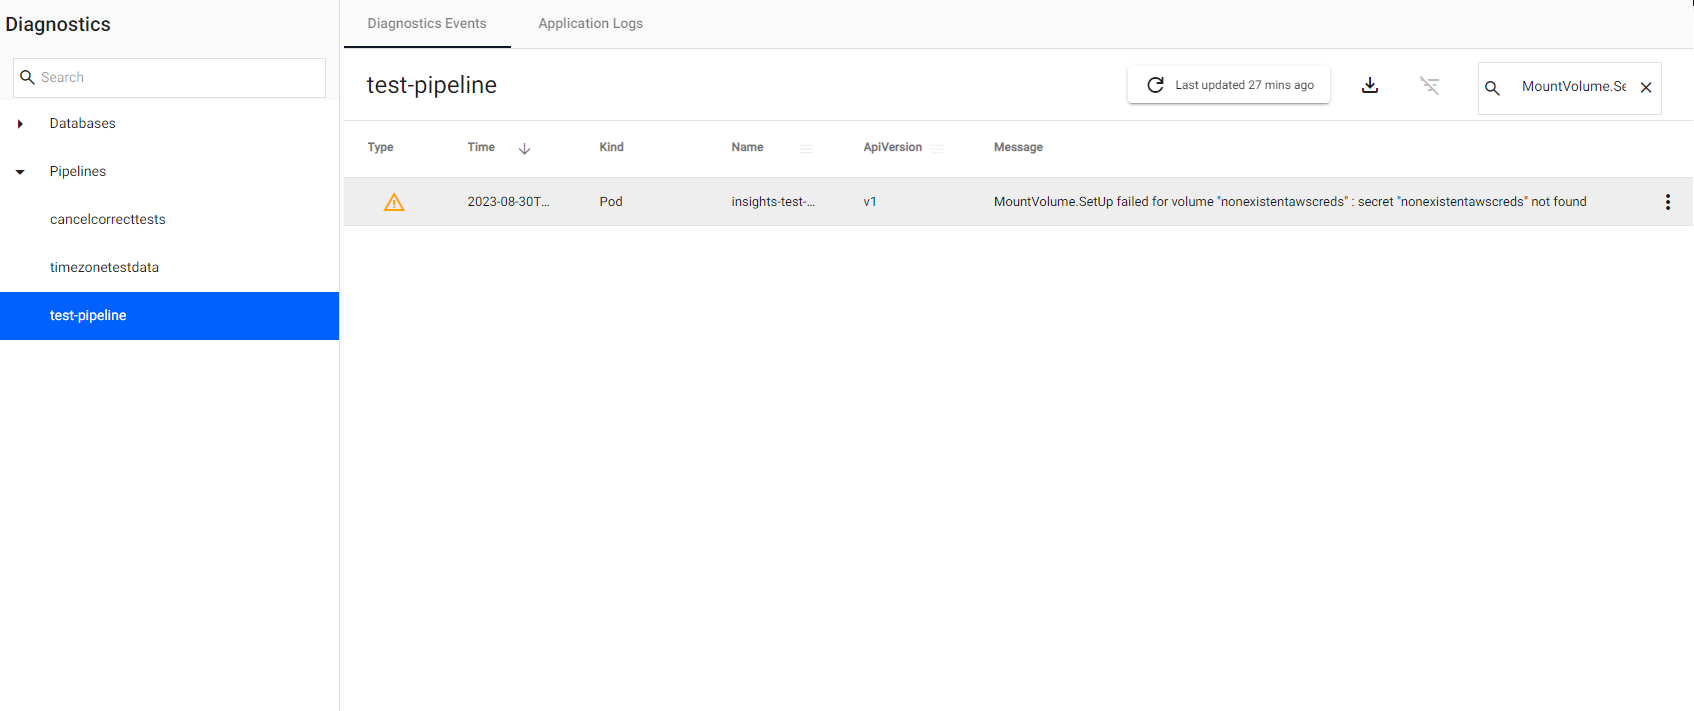
The error can be resolved by creating the missing secret.
user@A-LPTP-5VuBgQiX:~$ kubectl create secret generic --from-file ~/.aws/credentials nonexistentawscreds
secret/nonexistentawscreds created
user@A-LPTP-5VuBgQiX:~$
Once the missing secret has been created, the pipeline will pick it up, move out of the "Unresponsive" status, and progress as normal.
Secret Name
The secret name nonexistentawscreds is just an example to highlight that the secret didn't exist.
Please choose a more appropriate name when naming your secrets! E.g. awscreds.