Transformer
The Transformer is a high-level data preparation and visual query environment. It provides a set of data refinement functionality for creating a data workflow in a visual environment. Workflows take source data and perform a series of operations to transform data and produce one or more outputs. Once a workflow has been perfected it can be compiled into a q function that will run its operations on a set of input tables that have matching schemas to the original input tables.
Opening the Transformer
Pick Tools > Table Transformer from the Explorer main menu.
The transformer will appear in a new tab. When the transformer opens, the Table Importer will be presented to add your first data source.
Getting started
Adding sources
A workflow is started from a Source node. A source node can be added by picking New > Source from the Node menu. Adding a source will launch the Table Importer to configure a data source. When the transformer loads, the Table Importer will open to create the first data source for the workflow. Follow the steps in the importer to create the data source and click Finish to add the source node to the workflow. For more information about configuring a data source in the importer, see the importer section
Nodes
Source nodes
Source nodes add data to a transformation. They are configured using the Table Importer. The Transformer will read a subset of the data from a given source for the purposes of creating a transformation workflow. Theses sources can be combined or transformed into one or many output nodes. When the transformation is run, all source data in the transformation will be read, transformed and written to output nodes.
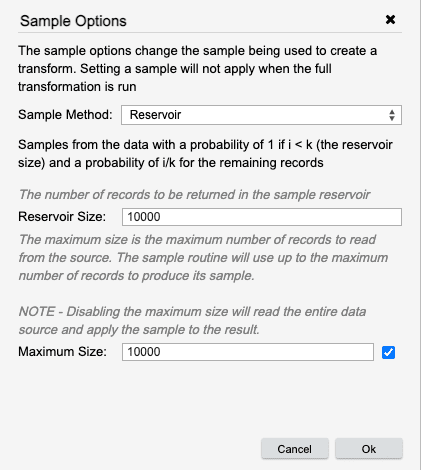
Source node sampling options
In the UI, the transformer operates on a sample of the data from sources. In the toolbar for the sample node is a Sample Options button. Clicking this will open the sampling options for the given input.

The sample options dialog lets you pick a sample routine to apply to the given data source to select different data from the input. This can be useful when dealing with a large dataset where a sample of the first 10,000 rows might skew your transformation. The sample method of First will read only from the head of the data set the desired number of records. All of the other sample routines must read up to some amount of data and then apply a sampling algorithm on that set of data to produce the sample.
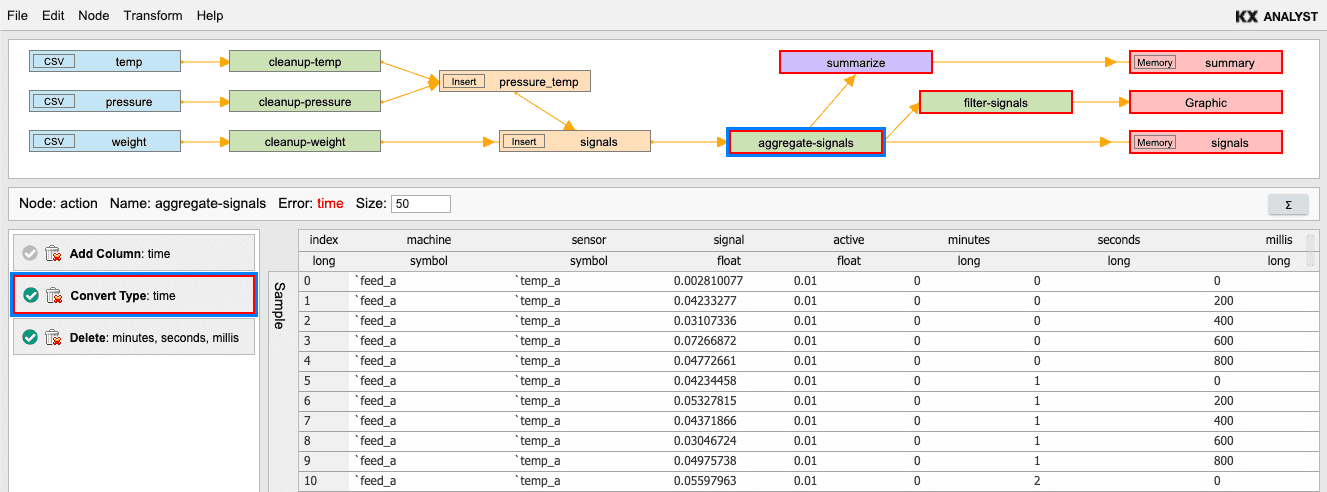
Action nodes
Action nodes are a core component of transforming data in the Transformer. Action nodes provide a number of high-level operations that can be combined into a sequence of data transformation steps.
Adding transformation actions
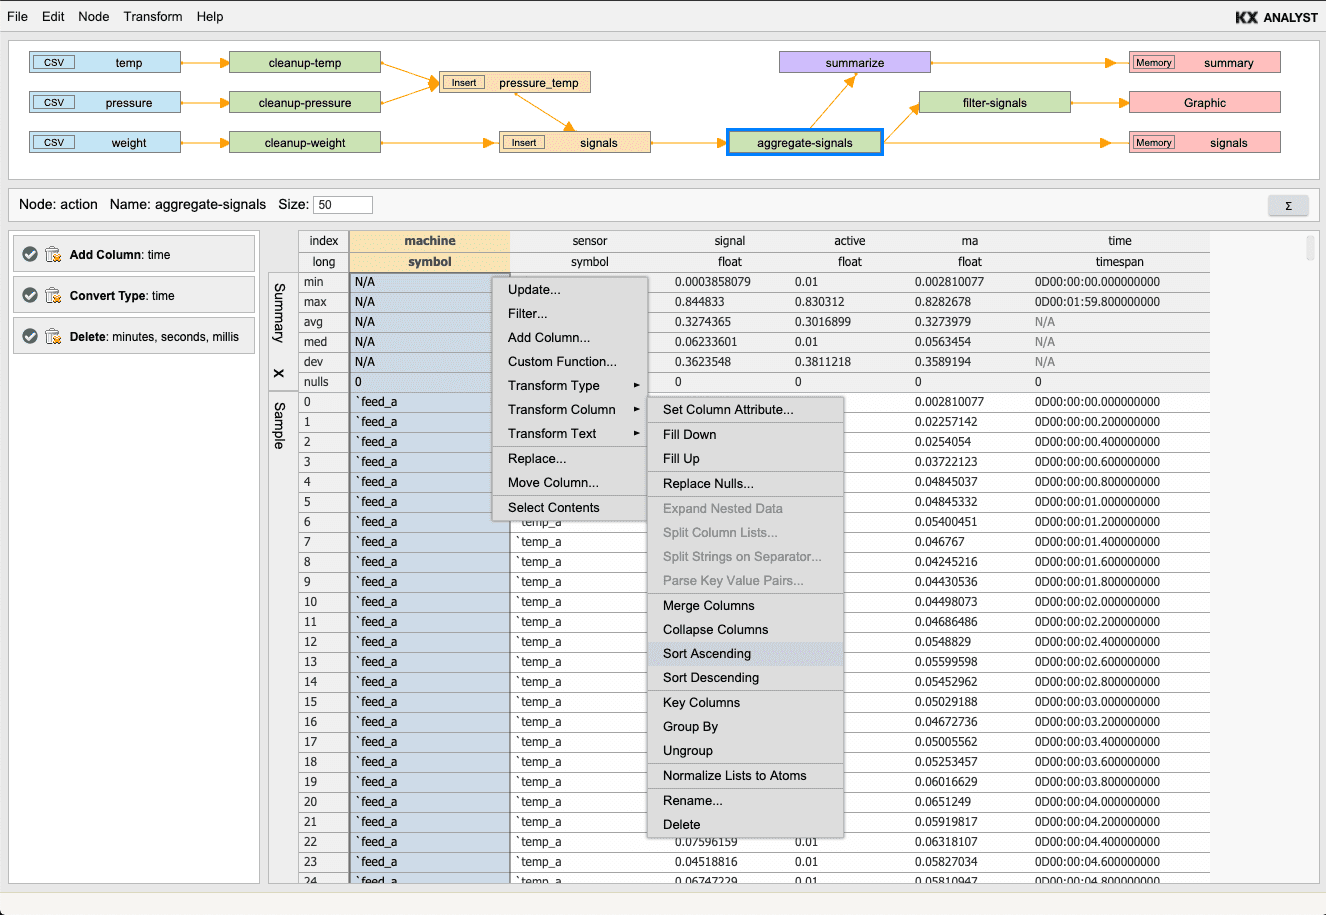
Action nodes in a workflow can be transformed using transformation actions. Actions perform update operations on columns in a table. Actions can be picked from the context menu of a column in the target table.

or, from the Actions menu.
Action types
Transformation actions you can perform:
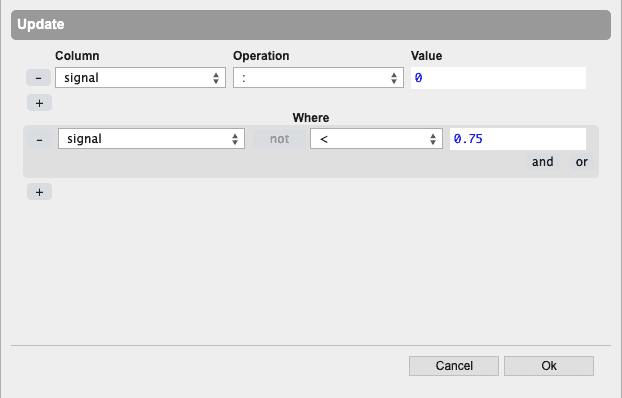
- Update
-
Update a column’s data value based on simple or complex and/or query operations. For example, here the analyst uses the point-and-click interface to add an action that sets the duration column to zero if the source column is equal to 300. Multiple columns can be updated at the same time and complex nested and/or qualifications can be expressed in the interface.
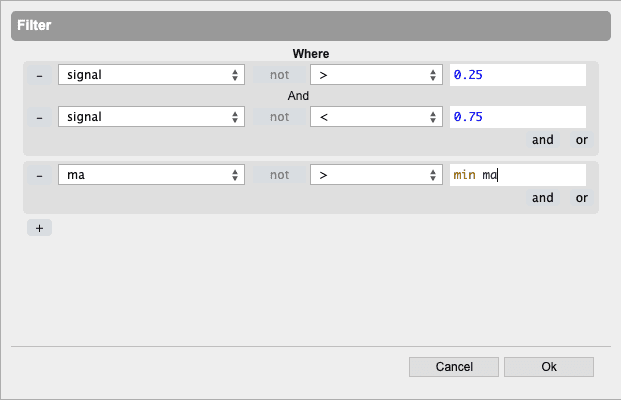
- Filter
-
Create filtered queries against the dataset based on simple or complex AND/OR operations using a point-and-click interface.
- Add Columns
-
Add new columns. The value of the column can be any valid q statement (e.g. a custom function, a column name, a variety of standard aggregation operations).

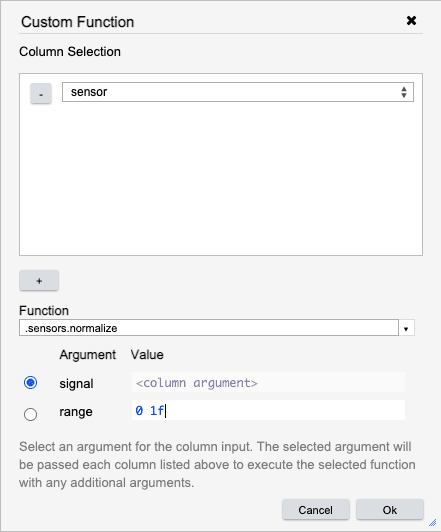
- Custom Function
-
Apply a user defined function to a specified column. First, select the columns to run the custom function on. Each column selected will be run through the custom function one at a time.

Once a function is selected, the arguments to the function will be presented. Using the radio button, indicate which argument should receive the column data. For any other arguments, add a q expression to populate its value.
- Transform Type
-
Change the type of any column to any standard q type. The context menu also contains some commonly used shortcuts. As Symbol, As String, As Long, and As Float convert the currently selected column to the respective type.
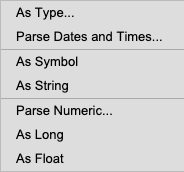
As Type… presents options to covert columns to any other kdb type.
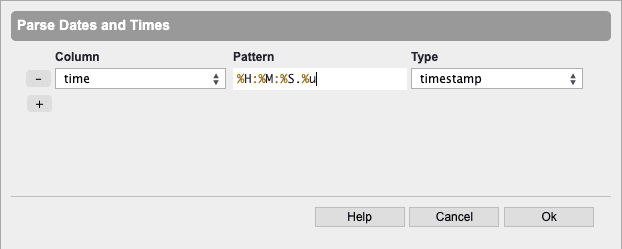
Parse Date and Times… allows you to parse almost any numeric value into dates.
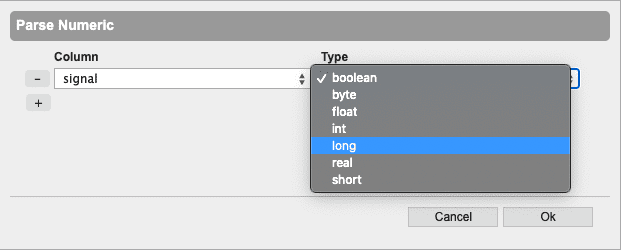
Parse Numeric… allows you to parse strings or symbols into number formats.
- Transform Column
-
Perform a wide range of column operations as shown in the context sub-menu below. Column attributes (e.g. sorted, keyed) can dramatically improve query performance. Expansion of column dictionaries and splitting columns on value separators are particularly useful for JSON, URL and Log File data.
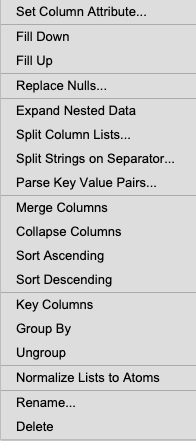
Set Column Attribute… applies attempts to apply the given attribute to the selected column. This can greatly improve the performance of some aggregations and searching operations. For more information on the types of attributes, refer to
attr.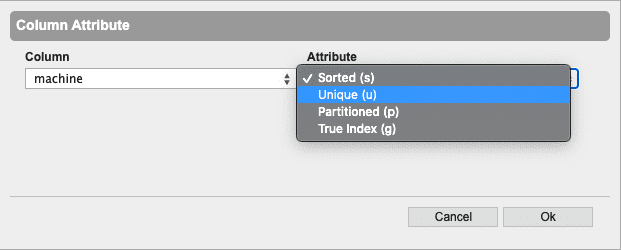
Fill Down fills null values in the column using the previous non-null value.
Fill Up fills null values in the column using the next non-null value.
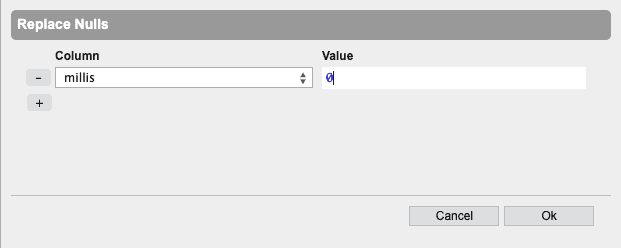
Replace Nulls… replaces all null values in the column with a specific value.
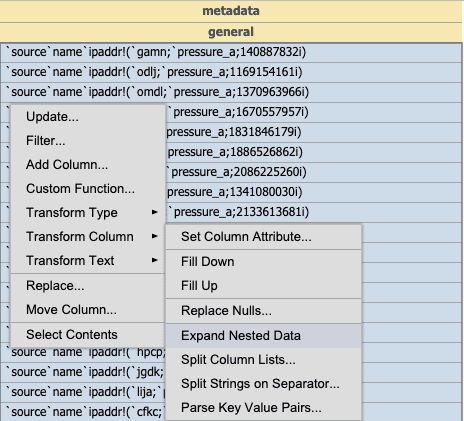
Expand Nested Data takes a column of nested dictionaries and expands them into first class columns in the table. This can be very useful for expanding nested dictionaries from JSON data into columns in the table. The image below shows the column before expanding it.
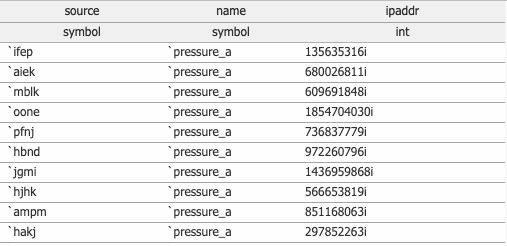
After it is expanded, the columns from the nested dictionary are now part of the initial table.
Split Column Lists… splits nested lists in a column into their own columns up to a given maximum number of columns.
Split Strings on Separator… splits a column of strings into multiple columns using a separator character to indicate the different values. The result of the split is turned into individual columns up to a maximum number of columns.

Parse Key Value Pairs… parses string values in columns into nested dictionaries of key value pairs using an assignment and separator token. This is equivalent to parsing with
0:. For more information, see key-value pairs.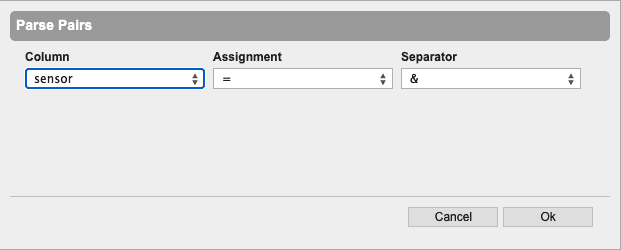
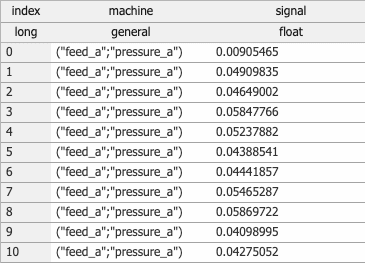
Merge Columns combines two or more columns into one where each value of the column will become a tuple of merged columns elements.
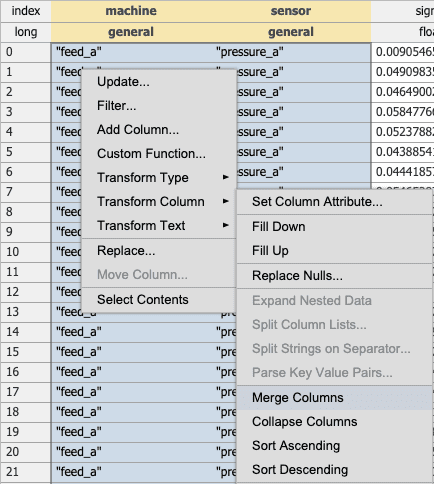
After merging the two columns, the data is in tuples in a single column.
Collapse Columns collapsing multiple columns is similar to merge but effectively performs a
razeon the resulting merged data. This can be useful when combining strings from two columns.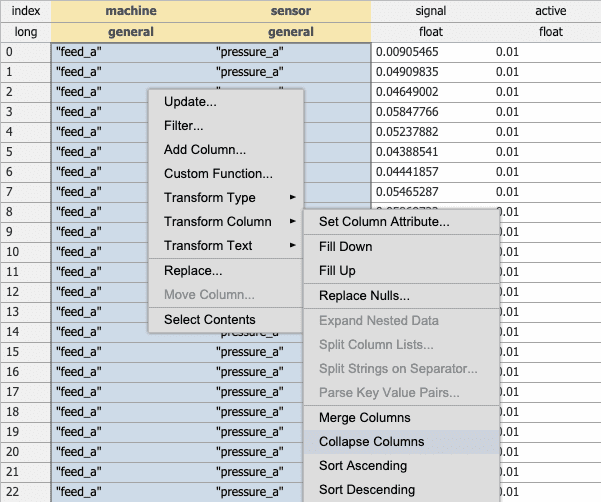
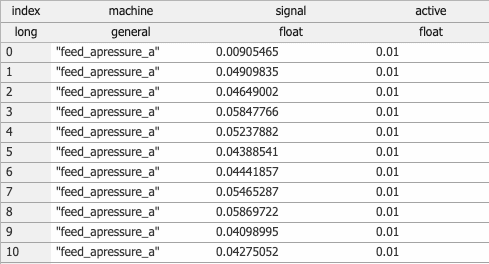
After collapsing the two columns, the first column contains a single string which is the concatenation of both columns.
Sort Ascending sorts the entire table by the selected column in ascending order.
Sort Descending sorts the entire table by the selected column in descending order.
Key Columns keys the the table on the selected columns.
Group By groups all other columns in the table by the columns selected.
Ungroup applies an ungroup on an entire table. This will undo a group by operation.
Normalize Lists to Atoms takes a column of lists and flattens it into a column of atoms creating a copy for the other values in the row.
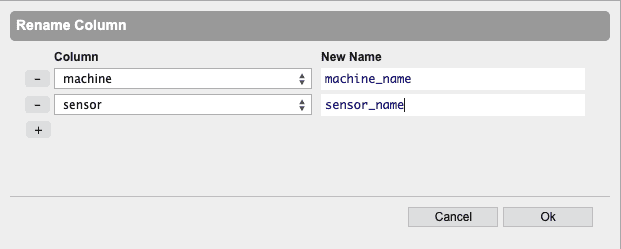
Rename… gives a column a new name
Delete delete the selected column from the table.
- Transform Text
-
Perform basic text operations.
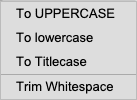
To UPPERCASE capitalizes all string or symbol contents in a column.
To lowercase will lower the casing of all text data in a column.
To Titlecase capitalizes the first letter of every word separated by a space in a column.
Trim Whitespace will remove all leading and trailing whitespace from text data in a column.
Editing actions
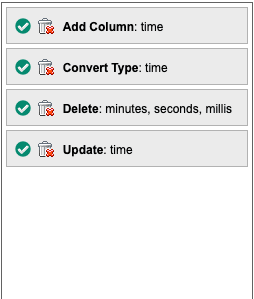
Actions can be edited by double-clicking an action or picking Edit from the context menu. Editing an action will open a dialog for that action and allow for properties of the action to be changed. Once editing is complete, pressing OK will update the current action and re-compute the current table.
Modifying action execution
Actions can be enabled or disabled by clicking the green check box on the action node.

Disabling an action shows the state of the table before the target action has been applied. This can be used to determine how an individual action is changing the table.
Clicking the trashcan deletes the action:

A red border indicates an error in the action:

Right-clicking opens the context menu in the action list:

Error reporting in the action list and display
Actions that encounter an error will be highlighted in red (either the action List or display area or both) and will lock the current table.
All errors must be fixed before more actions can be added to a table. Workflows that contain errors cannot be saved into a transformation function until all errors are fixed.
Join nodes
Join nodes can be used to merge data from multiple sources using a table join. Joins take two table sources and can be configured with one of many joins as listed below:
| join | description |
|---|---|
| Left | Result is the left table with any matching keys from the right table joined to it |
| Inner | Result has one combined record for each row in the left table that matches a row in the right table |
| Equi | Same behavior as Inner join |
| Plus | Result is the arithmetic sum of matching records. Common columns are left unchanged and new columns are zero |
| Union | Matching records from the right table will update the left table. Unmatched records from both tables are inserted into the result |
| Asof (aj) | Result is a table with records from the left-join of the tables. In the join, the last value (most recent time) is taken. For each record in the right table, the result has one record with the items in the right table, and if there are matching records in the left table, the items of the last (in row order) matching record are appended to those of the right table; otherwise the remaining columns are null |
| Upsert | Same behavior as union except columns must be aligned to perform join |
| Insert | Records from the right table are appended to the left table. Columns must be aligned |
| Zip | Result matches records based on row index |
Function nodes
Function nodes allow arbitrary functions to be executed on a table within a workflow. A function name can be specified in the input field and will be invoked when the transform is executed. This function must the incoming table as a parameter and should return an updated version of the same table.
Code Graphic nodes
Code Graphic nodes allow adding visualization to a transform run. These visualizations can be used as a reporting mechanism by saving completed images to disk during the transformation. The graphics exploit the power of the Grammar of Graphics using a standalone visualization language, see Grammar of Graphics for more information. Code Graphics can also be used for mapping other nodes to visual geometries as well as global tables in the process.
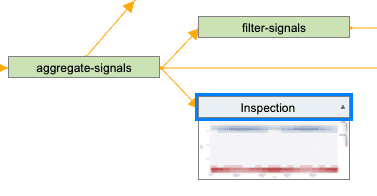
Inspection nodes
Inspection nodes allow the use of the Visual Inspection within the Transformer. The inspection node only displays the data from the previous node which is typically a sample of the data. Similar to the Code Graphic, if a visual is produced from the inspection node, the visual can be saved as part of the transform, given a file name, location and size. The visual that is exported will represent the whole dataset if the data is not being chunked.
Output nodes
Output nodes are the final step in a transformation workflow. These nodes accept a single table and store it in an external format to be used later.
Output nodes can be configured using the Table Exporter, which provides the ability to configure a destination for a number of different formats. The configuration that is set up in the Output node will not be touched until the transformation is run. For more information on the exporter, see Table Exporter
Chunking a transformation
When data volumes are sufficiently large and cannot fit into the memory of a process, the transform can cut the data into smaller "chunks" and repeat the transformation over the chunks appending to each output. Chunking can be very effective in a memory constrained environment. However, since the transformation must be run multiple times, chunking has fairly significant overhead as compared to simply running a transform.
Chunking can be configured by right clicking a source node that is to be chunked and selecting Chunking. This will open the chunking configuration dialog.

Selecting the "Enabled" checkbox will turn chunking on for the transformation. When enabled, all child nodes of the selected source will be evaluated in the chunking cycle.
Nodes in a chunked transform are run multiple times
Since the transform is being repeated in smaller sizes, the nodes will be re-evaluated. This may have an impact on joins and some aggregations that operate on the whole dataset.
Once the transform has chunking enabled, the nodes that are affected will be connected with green lines.

Only one source per group of nodes can be set to "chunking" mode. All other source nodes will be read in full and applied through the workflow for each chunk of the chunked source.
There are two algorithms provided for chunking. Currently the Partitioned algorithm can only be applied to kdb+ partitioned sources. It uses logical partitions for chunk boundaries. It runs the transform sequence over each partition in the input source. Indexed chunking uses the index of the input source as the chunk boundary. The number of records per chunk is determined by the specified size of the chunk. Chunking by index is advisable for sequential data formats, such as CSV files, ODBC tables and kdb+ tables.
Summary statistics
Summary statistics gives a brief summary of helpful statistics for each column in a table. For each node type that contains a table, there is a summary button (∑) that prepends a summary statistics table to the sample data table. Depending on the type of the column, certain statistics are applicable while others are not. To close the summary statistics table, the summary button or the 'x' in the vertical tab can be clicked.

Change propagation
When a change is made to a node in a workflow it will affect all of the tables that depend on it. Keep this in mind when adding actions to a table that has dependants. Changes to the parent table in a workflow may cause errors in other tables.
Compiling transforms
Once a workflow has been created it can be compiled into a transformation function.
Since only a single table can be returned from a function, the desired output table in the workflow must be selected. Once the expected output table is selected, from the File menu pick Save. This will compile and save a transformation function. When executed, the function will output the selected table. The compiled transformation function takes two arguments, the output and any inputs.
Transformation configurations store a table mutation sequence along with pre-defined inputs. These inputs can be overridden by passing new input configurations to this transform function.
| parameter | description |
|---|---|
| output | Output configuration. Pass generic null (::) to have the transformed table returned from this transform function. To have the transformed table stored on disk or in any external location, pass a source configuration in this field. |
| inputs | Inputs are stored within the transformation but can be overridden by supplying new sources. To use the pre-defined inputs, pass generic null (::). When specifying the new inputs, the count of inputs specified must match the number of required inputs. |
Example:
Using the transform below as an example, the inputs and outputs of the transform can be changed by passing a dictionary parameters of the configurations. Only the nodes that should be changed need to passed in. Any unspecified nodes will use the settings configured within the Transformer UI.
q) srcs: `temp`pressure!(`:A.Tutorial.Data/temp.csv; `:A.Tutorial.Data/pressure.csv)
q) outs: enlist[`signals]!enlist .im.io.with.target[`:signals_out.csv] .im.io.create `csv
q) ImportSensors[srcs; outs]

name              type  | error message
------------------------| -------------
Graphic           gg    | 0     ""
aggregate-signals action| 0     ""
cleanup-pressure  action| 0     ""
cleanup-temp      action| 0     ""
cleanup-weight    action| 0     ""
filter-signals    action| 0     ""
pressure          source| 0     ""
pressure_temp     join  | 0     ""
signals           join  | 0     ""
signals           output| 0     ""
summarize         op    | 0     ""
summary           output| 0     ""
temp              source| 0     ""
weight            source| 0     ""
Running transforms as scripts
Compiled transforms can be run outside of Analyst by loading them into a q process
along with the Transformer's runtime dependencies axruntime.q_. There are two ways to export
a saved transform to be used outside of Analyst depending on the desired setup.
Transforms can be exported to KX Control as an Instruction and loaded into a process along with
the required dependencies. Transforms can also be exported directly to a .q script and run
in a process outside of the KX Platform by loading the axruntime.q_ dependencies. For more
information about AxRuntime, refer to the libraries section.
Running transforms in KX Control
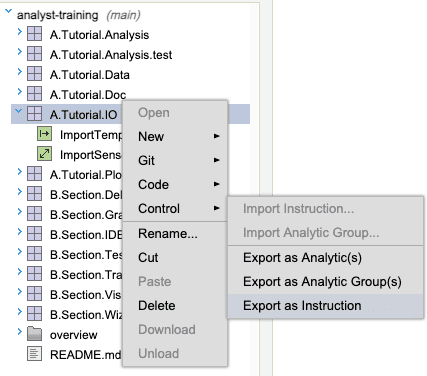
To run a transform in a Control process, first export the module containing the saved transform to Control. Right click the module and select Control > Export as Instruction. This will create an instruction in Control containing everything in the exported module including the saved transform.
To load this instruction into a process, create a process template that loads axruntime.q_
and the exported instruction. In the example, the module exported was A.Tutorial.IO which
will be the name of the instruction created in Control. To load this in a template, the
following template code would be used.
// Use the module loader to import axruntime and all of its dependencies
.aximport.import `axruntime

// Load the instruction into the process
.al.loadinstruction `A.Tutorial.IO

// The saved transform is now defined and can be used to import data. The input
// and output values can accept a dictionary to change the behaviour of the transform
// at runtime.
ImportSensors[::;::]
Transforms that are exported as instructions can no longer be modified beyond the input and output parameters of the compiled transform. Changes can be made within the Transformer UI on the saved artifact and can be re-exported when desired.
Running transforms in q
To run a transform in a q process, the transform must first be exported from Analyst.
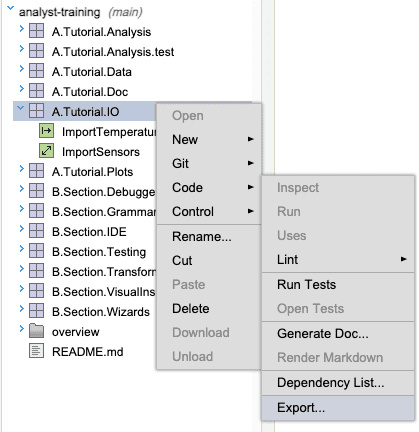
This can be done by right clicking the module that contains the transform and selecting
Code > Export. This will export everything inside of the module including the transform to a
.q script at the specified location using the name of the module as the name of the script.
To load this script into a process, axruntime.q_ must first be loaded. To load this script, the
environment variable ANALYST_HOME must be defined and point to a valid
Analyst install. For more information please refer to loading libraries.
Next, load the exported .q script that contains the compiled transform. The transform
will be available within the script in a serialized executable format. It is not possible
to modify the transform beyond the input and output parameters in the script source. If changes
are required, they can be made within the Transformer UI on the saved artifact and can be
re-exported when desired.