Import/Export Connection Configuration
This page explains how to import and export connection configurations in the kdb Visual Studio Code Extension.
The Import/Export Connection configuration allows you to import and export connection configuration details from the VS Code IDE without having to create them manually.
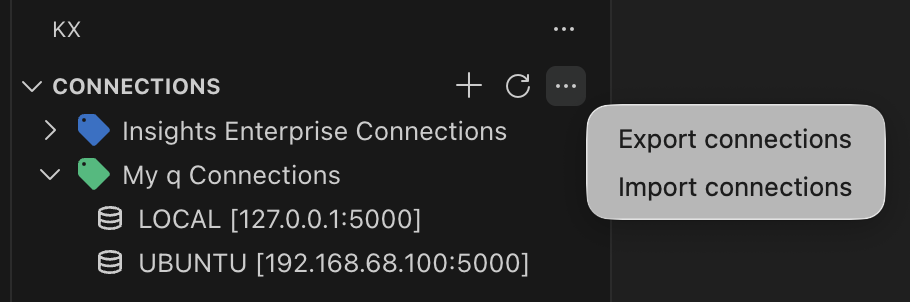
This is useful when:
- Sharing common connection settings across team members
- Moving your setup between machines
- Backing up your configuration
- Maintaining standardized environments across development, staging, and production
Connections are imported and exported as JSON files.
Important
For My q connections, you are prompted whether to include the username and password in the export. See security considerations.
Import connections
The import workflow lets you load existing connection definitions into the extension without recreating them manually.
To import a connection:
- Open the Command Palette and search for KX: Import Connections. Alternatively, click the three dots (…) next to the Refresh button in the Connections view on the left-hand side and select Import Connections.
- Navigate to the location of the configuration file, such as a JSON file that contains the connection details, and select it.
- Review the imported connection settings for accuracy.
- Confirm the import.
After the import completes, the connection appears in the Connections list.
If the exported file did not include credentials, you must supply any required username and password before you can use the connection. Once you add the missing authentication details, you can initiate the connection and run a simple query to verify that it works as expected.
Import file format
The import file must be a JSON object with a top-level connections object. It must contain both a KDB array (My q connections) and an Insights array (kdb Insights Enterprise connections). Use an empty array ([]) for a type you don't need. If either array is missing, the import fails. The easiest way to get a valid file is to export an existing connection and edit it.
The following example defines two My q connections and one Insights Enterprise connection:
{
  "connections": {
    "KDB": [
      {
        "serverName": "127.0.0.1",
        "serverPort": "5001",
        "serverAlias": "local-5001",
        "auth": false,
        "tls": false
      },
      {
        "serverName": "tp.example.com",
        "serverPort": "5010",
        "serverAlias": "tickerplant",
        "auth": true,
        "tls": true,
        "username": "myuser",
        "password": "mypassword"
      }
    ],
    "Insights": [
      {
        "alias": "my-insights",
        "server": "https://insights.example.com",
        "auth": true,
        "realm": "insights",
        "insecure": false
      }
    ]
  }
}
My q (KDB) entry fields
| Field | Type | Description |
|---|---|---|
serverName |
string | Hostname or IP address of the q process. |
serverPort |
string | Port of the q process, as a string. |
serverAlias |
string | Unique connection name shown in the Connections view. |
auth |
boolean | Set to true if the connection uses a username and password. |
tls |
boolean | Set to true to connect using TLS. |
username |
string | Optional. Included only if you exported credentials. |
password |
string | Optional. Included only if you exported credentials. |
managed |
boolean | Optional. Set by the extension on connections it manages. You can omit it. |
If you export without credentials, auth is set to false in the exported file. Set it back to true if the connection requires a username and password.
Insights Enterprise (Insights) entry fields
| Field | Type | Description |
|---|---|---|
alias |
string | Unique connection name shown in the Connections view. |
server |
string | URL of the kdb Insights Enterprise deployment. |
auth |
boolean | Set to true if the connection requires authentication. |
realm |
string | Optional. Authentication realm. |
insecure |
boolean | Optional. Set to true to skip TLS certificate verification. |
If you have a list of q processes in another format, such as a CSV, create one KDB entry for each process, mapping its host, port, and name to serverName, serverPort, and serverAlias.
The extension reports an error if the file isn't valid JSON (Invalid JSON format), if it doesn't have the structure above (JSON does not match the required format), or if both arrays are empty.
Handling name conflicts
If a connection in the import file has the same name as an existing connection, VS Code displays a notification in the bottom right corner prompting you to either duplicate, overwrite, or cancel the import.
- Duplicate — keep both versions (new one with a modified name)
- Overwrite — replace the existing configuration
- Cancel — ignore the imported entry
Export connections
You can export one or multiple connection configurations to a file. This is useful for sharing or backing up your setup.
To export a connection:
- Open the Command Palette and search for KX: Export Connections. Alternatively, click the three dots (…) next to the Refresh button in the Connections view on the left-hand side and select Export Connections.
- Select the connection(s) you want to export.
- Select the destination folder for the exported configuration file.
- For My q connections, choose whether to include the username and password when prompted.
- Confirm the export action.
To verify the export is successful, navigate to the saved location and open the configuration file to check its contents.
Security considerations
Important
For My q connections, you can choose to include the username and password in the exported file. If you include them, they are written in plaintext.
When exporting a connection:
- If you decline to export credentials, or the connection is an Insights connection, the username and password are omitted from the export file.
- If you choose to export credentials, they are stored in plaintext in the exported JSON file. Handle exported files that contain credentials the same way you would handle any other file containing plaintext secrets.
- When you import a connection that did not include credentials, you are prompted to re-enter required authentication details (if applicable) to re-establish the connection.
Next steps
- Learn about connection labels