Deploy a Kubernetes cluster on ACS
This procedure provides instructions for setting up and configuring a Kubernetes (AKS) cluster on ACS (Azure Cloud Services) using Terraform-based deployment scripts.
The goal is to prepare the infrastructure required to install kdb Insights Enterprise, ensuring that:
-
Key components such as the Virtual Network (VNET), bastion host, security groups, node groups, and associated services are provisioned automatically.
-
Both new VNET creation and integration with existing VNETs are supported.
-
Configuration is managed through environment variables and architectural profiles, offering flexibility for various deployment scenarios.
All scripts are packaged in the kxi-terraform bundle and executed within a pre-configured Docker container to ensure a consistent and repeatable setup across environments.
The configuration and deployment of your Infrastructure to support kdb Insights Enterprise should take approx 20 minutes to complete.
Terraform artifacts
If you have a full commercial license, kdb Insights Enterprise provides default Terraform modules packaged as a TGZ artifact available through the KX Downloads Portal.
You need to download the artifact and extract it as explained in the following sections.
Prerequisites
For this tutorial you will need:
-
An Azure Account.
-
An Azure Service Principal.
-
Access to an Authoritative DNS Service (for example, Azure DNS) to create a DNS record for your kdb Insights Enterprise external URL exposed through the clusters Ingress Controller.
-
CA-signed certificate (
cert.pemandcert.keyfiles) for your clusters desired Hostname or a wildcard certificate for your DNS sub-domain, for example,*.foo.kx.com -
Sufficient Quotas to deploy the cluster.
-
A client machine with Azure CLI.
-
A client machine with Docker.
Important
When running the scripts from a bastion host, ensure ports 1174 and 443 are open for outbound access, or enable full outbound access with a 0.0.0.0/0 security group rule.
Note
-
On Linux, additional steps are required to manage Docker as a non-root user.
-
These scripts also support deployment to an existing VNET (Virtual Network) on GCP. If you already have a VPC, you must have access to the associated project to retrieve the necessary network details. Additionally, ensure that your environment meets the prerequisites outlined in the following section before proceeding with deployment to an existing VPC.
Prerequisites for existing VNET
A VNET with the following:
-
One Subnet
-
Subnet Network Security Group must allow HTTP (80) and HTTPS (443) from CIDR's that need access to Insights.
-
A bastion host to be used to deploy the terraform code and Insights.
Billable Azure services
The following Azure services incur charges for this configuration stage (based on the Terraform plan):
-
Azure Virtual Machines (Compute) —
-
Bastion Linux VM.
-
AKS node pool VM instances (Virtual Machine Scale Set).
-
-
Azure Managed Disks — OS disks for the bastion VM and AKS nodes, plus persistent volumes provisioned via the
premium2-diskStorageClass and Rook-Ceph OSD PVCs. -
Azure Files — file shares provisioned via the
sharedfilesStorageClass (Standard_ZRS). -
Azure Load Balancer (Standard) — provisioned by AKS (outbound type loadBalancer) and by the Ingress Controller Service.
-
Public IPv4 addresses — static public IP for the bastion host and load balancer frontends.
-
Network egress — internet egress via the load balancer and any inter-zone data transfer.
-
Azure Key Vault — created when secrets encryption is enabled. Named
<cluster-name>-kv. -
Azure User-Assigned Managed Identity — created when secrets encryption is enabled for AKS KMS integration.
Environment setup
To extract the artifact, execute the following:
tar xzvf kxi-terraform-*.tgz
This command creates the kxi-terraform directory. The commands below are executed within this directory and thus use relative paths.
To change to this directory execute the following:
cd kxi-terraform
The deployment process is performed within a Docker container which includes all tools needed by the provided scripts. A Dockerfile is provided in the config directory that can be used to build the Docker image. The image name is versioned based on the value specified in the version.txt file at the root of the kxi-terraform directory.
To build the Docker image using the correct version tag, execute one of the following scripts:
./scripts/build-image.sh
.\scripts\build-image.bat
Service Principal Setup
The following Terraform scripts require a Service Principal with appropriate permissions which are defined in the config/kxi-azure-tf-policy.json file config/kxi-azure-tf-policy.json file. The service principal should already exist.
Note
The below commands should be run by a user with admin privileges.
Update config/kxi-azure-tf-policy.json and replace the following:
<role-name\>is your desired role name<subscription-id\>is your Azure Subscription ID
Create role:
az role definition create --role-definition config/kxi-azure-tf-policy.json
Note
The role needs to be created only once and then it can be reused.
Assign role to Service Principal:
az role assignment create --assignee "${CLIENT_ID}" --role "${ROLE_NAME}" --subscription "${SUBSCRIPTION_ID}"
where:
CLIENT_IDis the Application (client) ID of an existing Service PrincipalROLE_NAMEis the role name created in the previous stepSUBSCRIPTION_IDis the Azure Subscription ID
Configuration
The Terraform scripts are driven by environment variables, which configure how the Kubernetes cluster is deployed. These variables are populated by running the configure.sh script as follows.
./scripts/configure.sh
.\scripts\configure.bat
-
Select
Azureand enter your credentials:Select Cloud Provider Choose: AWS > Azure GCPSet Azure Client ID > a7c7dd92-c0a2-48fd-8ceb-ab134fa41939Set Azure Client Secret > ••••••••••••••••••••••••••••••••••••••••Set Azure Subscription ID > 5b07c795-8e5f-4979-aa44-c9bed5b513c5Set Azure Tenant ID > c004d551-3955-4f08-9eca-49867395bb69 -
Select the Region to deploy into:
Select Region centralindia centralus centralusstage centraluseuap eastasia eastasiastage eastus eastusstage eastus2 eastus2stage eastus2euap eastusstg europe france francecentral francesouth germany germanynorth germanywestcentral india israel israelcentral italy italynorth japan japaneast japanwest jioindiacentral jioindiawest korea koreacentral koreasouth mexicocentral newzealand newzealandnorth northcentralus -
Select the Architecture Profile:
Select Architecture Profile Choose: > HA Performance Cost-Optimised -
Select if you are deploying to an existing VNET or want to create one:
Are you using an existing Virtual Network or wish to create one
Choose:
> New Virtual Network
Existing Virtual Network
If you choose Existing Virtual Network, you are asked the following questions; if you select New Virtual Network, skip ahead to the next part.
Please enter the vnet name of the existing virtual network: > vnet-abcd Please enter subnet name: > vnet-abcd-subnet Please enter the network security group name which is attached to the bastion host you are deploying from: > vnet-bastion-sg Please enter the Azure resource group name where the Virtual Network,Subnet and Network Security Group are created: > tfscripts-vpc-resource-group -
Select the
Storage Option:Please select the Storage Option Choose: > Rook-Ceph Managed Lustre -
If you are using
Rook-Cephwith either thePerformanceorHAprofiles, you must enter which storage type to use for rook-ceph.Performance uses rook-ceph storage type of managed by default. Press **Enter** to use this or select another storage type: Choose: > managed premium2-disk -
If you are using
Rook-CephwithCost-Optimised, the following is displayed:Cost-Optimised uses rook-ceph storage type of managed. If you wish to change this please refer to the docs. -
If you are using
Rook-Ceph, you need to enter how much capacity you require. To use the default capacity of100Gi, press Enter.Set how much capacity you require for rook-ceph, press Enter to use the default of 100Gi Note this is the usable storage with replication > Enter rook-ceph disk space (default: 100) -
If you are using
Managed Lustrewith theHA profile, the following is displayed:HA uses Managed Lustre with Minimum Capacity 4TiB and Throughput 500MBps/TiB. You can update a Lustre Filesystem after it's created on the Azure console. -
If you are using
Managed Lustrewith thePerformanceprofile, the following is displayed:Performance uses Managed Lustre with Minimum Capacity 4TiB and Throughput 500MBps/TiB. You can update a Lustre Filesystem after it's created on the Azure console. -
If you are using Managed Lustre with the Cost-Optimized profile, the following is displayed:
Cost-Optimised uses Managed Lustre with Minimum Capacity 16TiB and Throughput 125MBps/TiB. You can update a Lustre Filesystem after it's created on the Azure console. -
Enter environment name which acts as an identifier for all resources.
Set environment name (Up to 8 character, can only contain lowercase letters and numbers)
> insights
Note
When you are deploying to an existing VNET, the following step is not required.
-
Enter IPs/Subnets in CIDR notation to allow access to the Bastion Host and VPN
Set Network CIDR that will be allowed VPN access as well as SSH access to the bastion host For convenience, this is pre-populated with your public IP address (using command: curl -s ipinfo.io/ip). To specify multiple CIDRs, use a comma-separated list (for example, 192.1.1.1/32,192.1.1.2/32). Do not include quotation marks around the input. For unrestricted access, set to 0.0.0.0/0. Ensure your network team allows such access. > 0.0.0.0/0 -
Enter IPs/Subnets in CIDR notation to allow HTTP/HTTPS access to the cluster's ingress.
Set Network CIDR that will be allowed HTTPS access For convenience, this is pre-populated with your public IP address (using command: curl -s ipinfo.io/ip). To specify multiple CIDRs, use a comma-separated list (for example, 192.1.1.1/32,192.1.1.2/32). Do not include quotation marks around the input. For unrestricted access, set to 0.0.0.0/0. Ensure your network team allows such access. > 0.0.0.0/0 -
SSL certificate Configuration
Choose method for managing SSL certificates ---------------------------------------------- Existing Certificates: Requires the SSL certificate to be stored on a Kubernetes Secret on the same namespace where Insights is deployed. Cert-Manager HTTP Validation: Issues Let's Encrypt Certificates; fully automated but requires unrestricted HTTP access to the cluster. Choose: > Existing Certificates Cert-Manager HTTP Validation -
Select the Ingress Controller to deploy
Select Ingress Controller
----------------------------------------------
ingress-nginx: Current default controller. Note: soon to be EOL.
nginx-community (F5): Next-generation controller.
Choose:
> ingress-nginx (default, soon to be EOL)
nginx-community (F5)
Note
The
ingress-nginxcontroller is the current default but is approaching end-of-life. Thenginx-community (F5)option deploys the next-generation NGINX Ingress Controller maintained by F5. New deployments are recommended to usenginx-community (F5). -
Select whether to enable Kubernetes secrets encryption:
Enable Kubernetes secrets encryption at rest?
----------------------------------------------
Encrypts all Kubernetes secrets in etcd using a cloud-managed KMS key (AWS KMS / Azure Key Vault / Cloud KMS).
Recommended for production clusters.
Choose:
> Yes (Recommended)
No
Custom tags
The config/default_tags.json file includes the tags that will be applied to all resources. You can add your own tags in this file to customize your environment.
Deployment
To deploy the cluster and apply configuration, execute the following:
./scripts/deploy-cluster.sh
.\scripts\deploy-cluster.bat
Note
A pre-deployment check is performed before proceeding further. If the check fails, the script exits immediately to avoid deployment failures. You must resolve all issues before executing the command again.
This script executes a series of Terraform and custom commands and may take some time to run. If the command fails at any point due to network issues or timeouts, you can execute again until it completes without errors. If the error is related to the Cloud Provider account, for example limits, you must resolve them first before executing the command again.
If any variable in the configuration file needs to be changed, the cluster should be destroyed first and then re-deployed.
For easier searching and filtering, the created resources are named/tagged using the azure-${ENV} prefix. For example, if the ENV is set to demo, all resource names/tags include the azure-demo prefix.
Cluster Access
To access the cluster, execute the following:
./scripts/manage-cluster.sh
.\scripts\manage-cluster.bat
This command starts a Shell session on a Docker container, generates a kubeconfig entry, and connects to the VPN. Once the command completes, you can manage the cluster through helm/kubectl.
Note
-
The
kxi-terraformdirectory on the host is mounted on the container on /terraform. Files and directories created while using this container are persisted if they are created under/terraformdirectory even after the container is stopped. -
If other users require access to the cluster, they need to download and extract the artifact, build the Docker container and copy the
kxi-terraform.envfile as well as theterraform/azure/client.ovpnfile (generated during deployment) to their own extracted artifact directory on the same paths. Once these two files are copied, the above script can be used to access the cluster.
The following kubectl commands can be used to retrieve information about the installed components.
-
List Kubernetes Worker Nodes
kubectl get nodes -
List Kubernetes namespaces
kubectl get namespaces -
List cert-manager pods running on cert-manager namespace
kubectl get pods --namespace=cert-manager -
List ingress controller pods (the namespace depends on your selected ingress controller)
# If using ingress-nginx kubectl get pods --namespace=ingress-nginx # If using nginx-community (F5) kubectl get pods --namespace=nginx-community -
List rook-ceph pods running on rook-ceph namespace
kubectl get pods --namespace=rook-ceph
DNS Configuration
Hostname
When deploying kdb Insights Enterprise you will need to configure a Hostname which you will use to access the application's User Interface. The Hostname should match a record you will create in your domain name system (DNS) service.
DNS Record
When creating your DNS record, the Record name should match the Hostname that you configured when deploying kdb Insights Enterprise (refer to the previous section), and the Value must be the External IP address of the cluster's ingress LoadBalancer as described below. In Azure, the Record type must be set to A.
You can get the cluster's ingress LoadBalancer's External IP by running the following command:
# If using ingress-nginx
kubectl get svc -n ingress-nginx ingress-nginx-controller

# If using nginx-community (F5)
kubectl get svc -n nginx-community nginx-community-controller
Example output (ingress-nginx):
NAME                       TYPE           CLUSTER-IP      EXTERNAL-IP        PORT(S)                      AGE
ingress-nginx-controller   LoadBalancer   10.1.253.109   172.202.236.43      80:30941/TCP,443:31437/TCP   110s
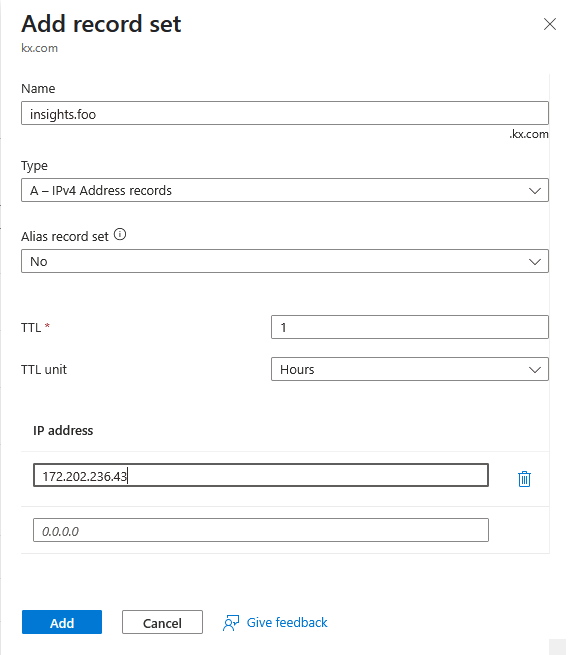
Using the output above, create an A record for your hostname which has the value 172.202.236.43.
For example, if your hostname was insights.foo.kx.com, you would create a record in Azure DNS as in the screenshot below.
Ingress Certificate
The hostname used for your kdb Insights Enterprise deployment is required to be covered by a CA-signed certificate.
Note
Self-signed certificates are not supported.
The Terraform scripts support Existing Certificates and Cert-Manager with HTTP Validation.
Existing Certificate
You can generate a certificate for your chosen hostname and pass the cert.pem and cert.key files during the installation of kdb Insights Enterprise.
Cert-Manager with HTTP Validation
Another option for meeting the requirement of a CA-signed coverage is to use cert-manager and Let's Encrypt with HTTP validation. This feature can be enabled by selecting this option during the DNS configuration.
Note
This option introduces a security consideration, because Let's Encrypt must connect to your ingress to verify domain ownership, which necessitates unrestricted access to your ingress LoadBalancer.
Advanced Configuration
There are other automated approaches which are outside the scope of the Terraform scripts. One such approach is to use cert-manager and Let's Encrypt with DNS validation. This option can be configured to work with AWS Route53.
Next Steps
Once you have the DNS configured and have chosen your approach to the Certification of your hostname, you can proceed to the kdb Insights Enterprise installation.
Environment destroy
Before you destroy the environment, make sure you don't have any active shell sessions on the Docker container. You can close the session by executing the following:
exit
To destroy the cluster, execute the following:
./scripts/destroy-cluster.sh
.\scripts\destroy-cluster.bat
If the command fails at any point due to network issues/timeouts you can execute again until it completes without errors.
Note
-
In some cases, the command may fail due to the VPN being unavailable or Azure resources not cleaned up properly. To resolve this, delete
terraform/azure/client.ovpnfile and execute it again. -
Even after the cluster is destroyed, the disks created dynamically by the application may still be present and incur additional costs. You should review the Azure Disks to verify if the data is still needed.
Uploading and Sharing Cluster Artifacts
To support collaboration, reproducibility, and environment recovery, this Terraform client script provides built-in functionality to upload key configuration artifacts to the cloud backend storage associated with your deployment. These artifacts allow other users or automation systems to connect to the environment securely and consistently.
What Gets Uploaded?
The following files are uploaded to your backend storage under the path ENV which is defined within kxi-terraform.env:
-
version.txt: Contains version metadata for the deployment. -
terraform/azure/client.ovpn: VPN configuration for secure access. -
kxi-terraform.env: The environment file with sensitive credentials removed.
When Are Files Uploaded?
The upload is automatically triggered at the end of the deployment process by:
./scripts/deploy-cluster.sh
.\scripts\deploy-cluster.bat
The internal upload_artifacts function performs the upload to the following backend:
- Blob container (
https://${KX_STATE_STORAGE_ACCOUNT_NAME}.blob.core.windows.net/${KX_STATE_BUCKET_NAME}/${ENV}/)
These files can then be downloaded by teammates or automation scripts to replicate access and configuration.
You can also run this command manually within the manage-cluster.sh script by running:
./scripts/terraform.sh upload-artifacts
.\scripts\terraform.bat upload-artifacts
Cleaning Up Artifacts
To ensure artifacts don’t persist unnecessarily in your backend storage, the system also supports automatic cleanup. These files are deleted at the end of the cluster teardown with the following command:
./scripts/destroy-cluster.sh
.\scripts\destroy-cluster.bat
The cleanup is performed by the delete_uploaded_artifacts function and removes the same files from the corresponding ENV location in your backend (stored in kxi-terraform.env).
This keeps your backend clean and prevents the reuse of stale or outdated configuration files.
Advanced configuration
You can further configure your cluster by editing the newly generated kxi-terraform.env file in the current directory. These edits must be made prior to running the deploy-cluster.sh script. The list of variables which can be edited are given below:
| Environment Variable | Details | Default Value | Possible Values |
|---|---|---|---|
| TF_VAR_enable_metrics | Enables forwarding of container metrics to Cloud-Native monitoring tools | false | true / false |
| TF_VAR_enable_logging | Enables forwarding of container metrics to Cloud-Native monitoring tools | false | true / false |
| TF_VAR_default_node_type | Node type for default node pool | Depends on profile | VM Instance Type |
| TF_VAR_rook_ceph_pool_node_type | Node type for Rook-Ceph node pool (when configured) | Depends on profile | VM Instance Type |
| TF_VAR_letsencrypt_account | If you intend to use cert-manager to issue certificates, then you need to provide a valid email address if you wish to receive notifications related to certificate expiration | root@emaildomain.com | email address |
| TF_VAR_bastion_whitelist_ips | The list of IPs/Subnets in CIDR notation that are allowed VPN/SSH access to the bastion host. | N/A | IP CIDRs |
| TF_VAR_insights_whitelist_ips | The list of IPs/Subnets in CIDR notation that are allowed HTTP/HTTPS access to the VPC | N/A | IP CIDRs |
| TF_VAR_letsencrypt_enable_http_validation | Enables issuing of Let's Encrypt certificates using cert-manager HTTP validation. This is disabled by default to allow only pre-existing certificates. | false | true / false |
| TF_VAR_rook_ceph_storage_size | Size of usable data provided by rook-ceph. | 100Gi | XXXGi |
| TF_VAR_enable_cert_manager | Deploy Cert Manager | true | true / false |
| TF_VAR_enable_ingress_nginx | Deploy the ingress-nginx Ingress Controller (legacy, soon to be EOL). Mutually exclusive with TF_VAR_enable_nginx_community. |
true | true / false |
| TF_VAR_enable_nginx_community | Deploy the nginx-community (F5) Ingress Controller (next-generation). Mutually exclusive with TF_VAR_enable_ingress_nginx. |
false | true / false |
| TF_VAR_enable_sharedfiles_storage_class | Create storage class for shared files | true | true / false |
| TF_VAR_enable_internal_load_balancer | Create internal load balancer for deploying private clusters | false | true / false |
| TF_VAR_enable_secrets_encryption | Enable envelope encryption of Kubernetes secrets using an Azure Key Vault key. Enabling this on an existing cluster requires cluster recreation. | true | true / false |
| TF_VAR_rook_ceph_mds_resources_memory_limit | The default resource limit is 8Gi. You can override this to change the resource limit of the metadataServer of rook-ceph. NOTE: The MDS Cache uses 50%, so with the default setting, the MDS Cache is set to 4Gi. | 8Gi | XXGi |
| TF_VAR_bastion_disk_size | Size of the root disk for the bastion host in GB | 30 | XX |
Important
The TF_VAR_enable_ingress_nginx and TF_VAR_enable_nginx_community variables are mutually exclusive — exactly one must be set to true. The configure script handles this automatically, but if you are editing kxi-terraform.env manually, ensure you do not enable both simultaneously.
Breaking change
Enabling secrets encryption on Azure switches the AKS cluster identity from SystemAssigned to UserAssigned. This is a breaking change for existing clusters and forces cluster recreation. If you are enabling this on an existing deployment, you must destroy the cluster first and re-deploy.
The Key Vault created for encryption is named <cluster-name>-kv and has purge protection enabled, which prevents immediate deletion.
Update whitelisted CIDRs
To modify the whitelisted CIDRs for HTTPS or SSH access, update the following variables in the kxi-terraform.env file:
# List of IPs or Subnets that will be allowed VPN access as well as SSH access
# to the bastion host for troubleshooting VPN issues.
TF_VAR_bastion_whitelist_ips=["192.168.0.1/32", "192.168.0.2/32"]

# List of IPs or Subnets that will be allowed HTTPS access
TF_VAR_insights_whitelist_ips=["192.168.0.1/32", "192.168.0.2/32"]
Once you have updated these with the correct CIDRs, run the deploy script:
./scripts/deploy-cluster.sh
.\scripts\deploy-cluster.bat
Existing VNET notes
If you're deploying to an existing VNET, ensure that the subnet that is used does not restrict traffic over http (80) and https (443) from the sources you intend to use to access kdb Insights.