Packaging quickstart
By the end of this quickstart section you will be able to:
- Create a package locally that contains a pipeline and a database
- Upload and deploy the package to kdb Insights Enterprise
- Manage the package in the kdb Insights Enterprise UI
- Add a UDF to the package and use it in the kdb Insights Enterprise UI
- Add a Custom API to the package and use it in the kdb Insights Enterprise UI
Deploy a database and pipeline
Create the package locally
To create a local package that contains a pipeline to inject 100 random floats between 0 and 100 and writes them to the database follow the steps below:
-
Set your package path:
This can be done in configuration to avoid this step.
export KX_PACKAGE_PATH=docs-packages/packages export KX_ARTIFACT_PATH=docs-packages/artifacts mkdir -p $KX_PACKAGE_PATH mkdir -p $KX_ARTIFACT_PATH -
Create a package that contains a database and a single table:
export PKG=mypackage
kxi package init ${PKG} --version 1.0.0
kxi package add --to mypackage database --name mydb
kxi package add --to mypackage table --name mytab
Creating package at location: mypackage Writing mypackage/manifest.yaml Writing mypackage/manifest.yaml Writing mypackage/manifest.yamlDefault table definition.
By default when a table is added to a package it is defined as a partitioned table with 2 columns:
t1:timestamp andx1:float.This is all that is required for the quickstart, but if you wish to update the table you can edit the
tables/mytab.yamlfile. -
Add query components, which are required to allow you to query the data ingested into the database:
kxi package add --to $PKG router
kxi package add --to $PKG agg
kxi package add --to $PKG rc
Writing mypackage/manifest.yaml Writing mypackage/manifest.yaml Writing mypackage/manifest.yaml -
Add a pipeline to inject 100 random floats between 0 and 100:
kxi package add --to ${PKG} pipeline --name mypipeline
cat << EOF > ${PKG}/src/mypipeline.q
demodata: ([] t1: 100#2024.03.15D00:00:00; x1: 100?100.0)
.qsp.run
        .qsp.read.fromExpr["demodata"]
        .qsp.write.toStream["mytab";"mypackage-mydb"]
EOF
Writing mypackage/manifest.yamlPipeline source file
To change the source file of the pipeline you can modify the
specfield inpipelines/mypipeline.yamlin your package. -
Check your package contains all the expected components:
kxi package info ${PKG}==PATH== /builds/kxdev/kxinsights/documentation/code-kx-com/mypackage ==OBJECT== Package ==Manifest== uuid: bfbe3a15-8c50-47b6-87e2-cf87fa680695 name: mypackage version: 1.0.0 metadata: description: '' authors: - {} entrypoints: default: init.q tables: mytab: file: tables/mytab.yaml databases: mydb: dir: databases/mydb shards: - mydb-shard tables: [] pipelines: mypipeline: file: pipelines/mypipeline.yaml router: router/router.yaml
Upload and deploy the package
To upload the package to kdb Insights Enterprise follow the steps below:
-
Pack the package. Making sure to define the version of the package on the command line.
kxi package packit ${PKG} --version 1.0.0 --tagRefreshing package before packing... Writing mypackage/manifest.yaml Creating package from mypackage Package created: /tmp/artifact_store/mypackage-1.0.0.kxi mypackage-1.0.0.kxipackitcreates.kxipackage and writes it toKX_ARTIFACT_PATH. -
List the current
.kxipackages available locally inKX_ARTIFACT_PATH.kxi package list --artifacts{ "mypackage": [ { "fields": {}, "version": "1.0.0" } ] } -
List the currently available packages on kdb Insights Enterprise:
kxi package remote-list{}Currently there are no packages available.
-
Push your package to kdb Insights Enterprise:
kxi package push ${PKG}/1.0.0{ "mypackage": [ { "version": "1.0.0", "_status": "InstallationStatus.SUCCESS" } ] } -
Re-run the
remote-listcommand. Your new package now appears in this list:kxi package remote-list{ "mypackage": [ "1.0.0" ] }At this stage, your package is uploaded to kdb Insights Enterprise and the database and pipeline will be visible in the UI.
-
Deploy the package to ingest the data into the database:
kxi package deploy $PKG/1.0.0
Manage the package in the UI
If you log into your kdb Insights Enterprise instance you can:
-
See
mypackageandmypipelineare displayed in the left-hand menu as shown below.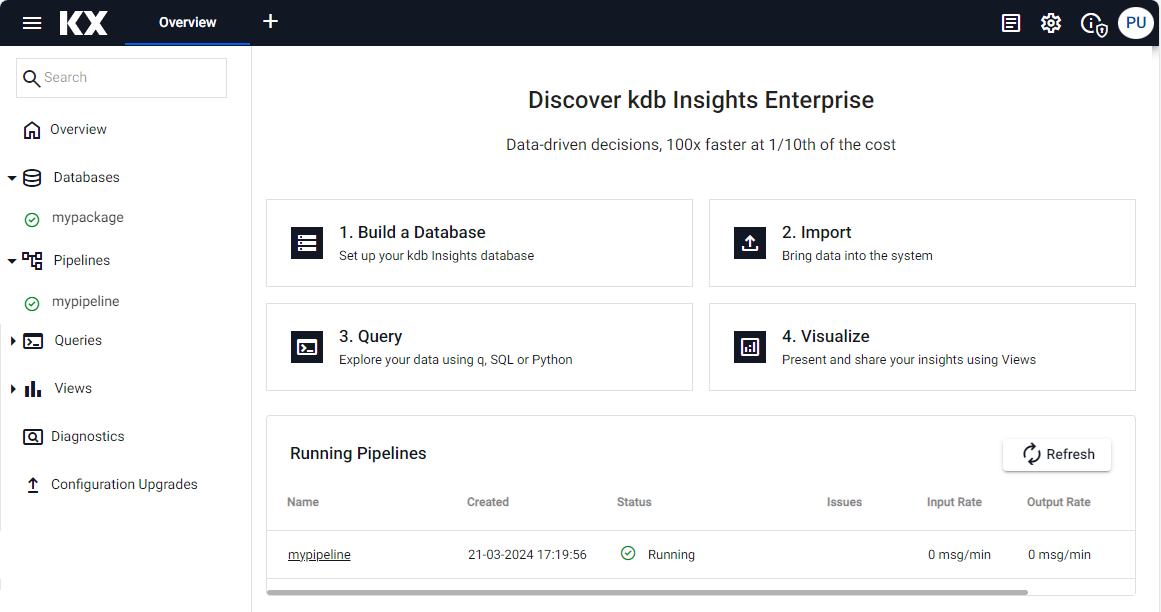
-
View the database details, make modifications and redeploy via the UI.

-
View the pipeline details, make modifications to the pipeline settings and redeploy via the UI.

Managing pipelines that are defined using q or Python via the CLI.
Currently if a pipeline specification is defined via the CLI using q or Python code, rather than using the Pipeline Editor in the UI, you cannot edit the code in the UI only the pipeline settings."
-
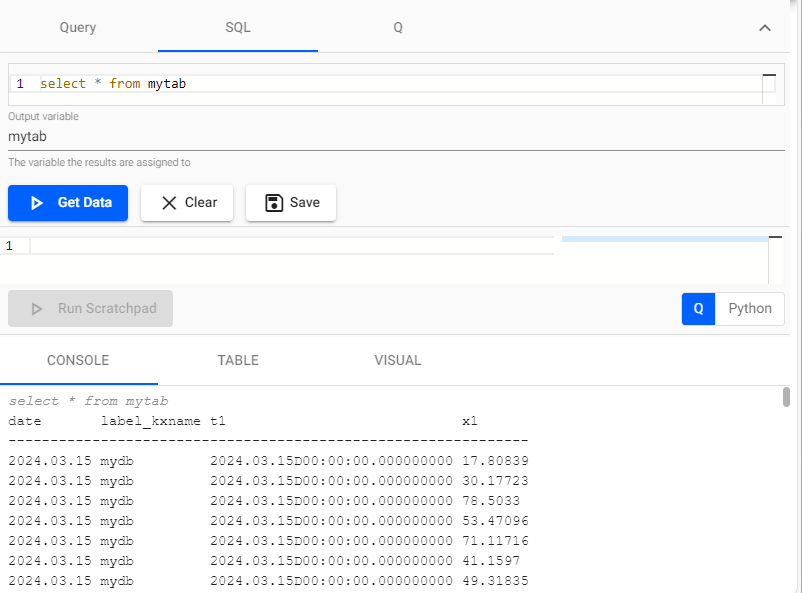
Query the data in the database using the Query Window.
Add a UDF
In this quickstart section, you will add a UDF to the package that only returns the values where the columns x is less than 10.
Update the local package
To add a UDF to the package take the following steps:
-
Create a file
src/myudf.qwithin themypackagedirectory that will contain the UDF.This file contains a UDF.
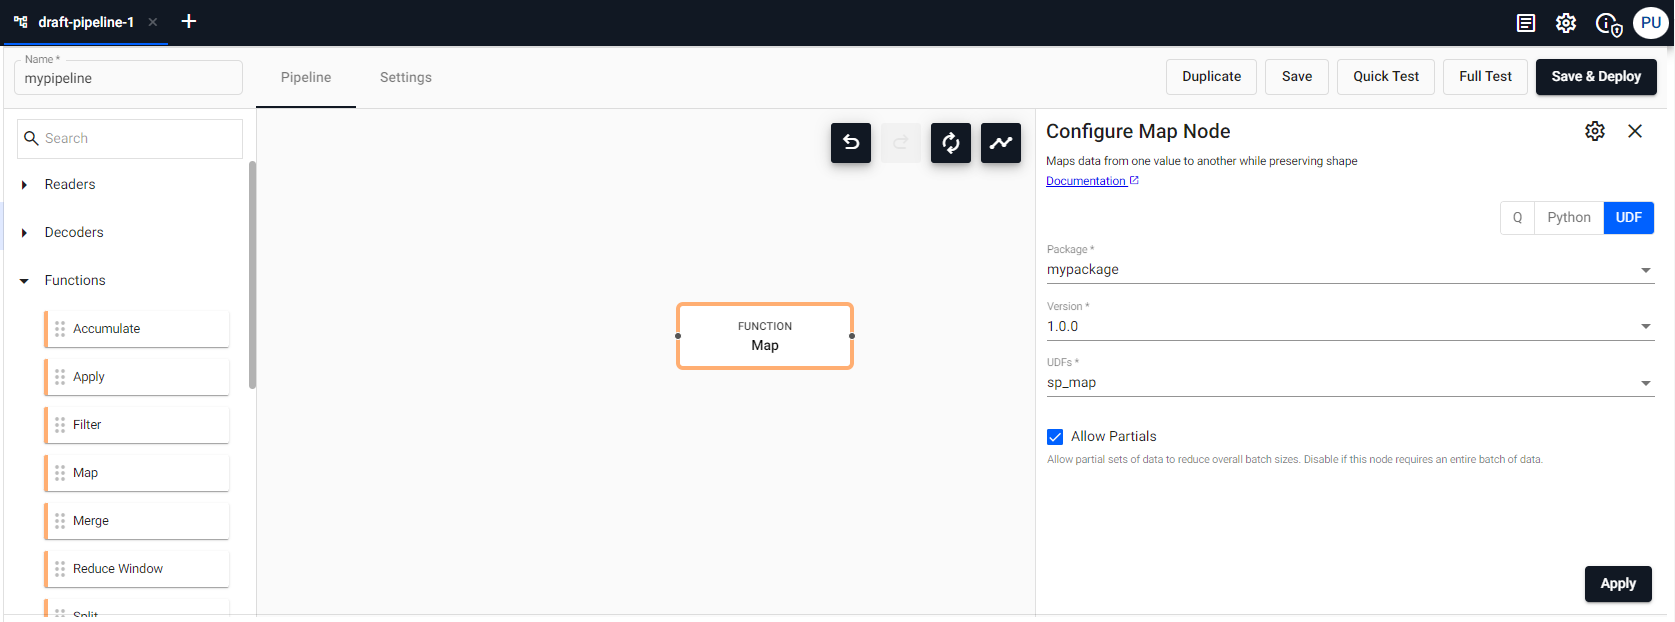
cd ${PKG}
mkdir -p src/

cat << EOF > src/myudf.q
// @udf.name("sp_map")
// @udf.tag("sp")
// @udf.category("map")
.test.sp.map:{[table;params]
    select from table where x1<10
 }
EOF
cd ..
The decorators
@udf.*ensure that it will be listed as one of the UDFs available for use in the Map function of the Pipeline Editor and namedsp_map. -
Modify the
init.qfile which is your default entrypoint in order to ensure that your new file gets loaded by default.cd ${PKG} cat << EOF > init.q // Load the src/myudf.q file relative to package root .kxi.packages.file.load["src/myudf.q"] EOF cd .. -
Check your package:
kxi package info ${PKG}==PATH== /builds/kxdev/kxinsights/documentation/code-kx-com/mypackage ==OBJECT== Package ==Manifest== uuid: bfbe3a15-8c50-47b6-87e2-cf87fa680695 name: mypackage version: 1.0.0 metadata: description: '' authors: - {} entrypoints: default: init.q tables: mytab: file: tables/mytab.yaml databases: mydb: dir: databases/mydb shards: - mydb-shard tables: [] pipelines: mypipeline: file: pipelines/mypipeline.yaml router: router/router.yamlThe local package now includes a new udf
myudf.
Update and deploy the package
To update the package created in the previous section in kdb Insights Enterprise follow the steps below:
-
Teardown the currently deployed package.
kxi package teardown ${PKG} -
Deploy the updated package:
kxi package packit $PKG --version 1.0.0 --tag
kxi package push $PKG/1.0.0 --force
kxi package deploy $PKG/1.0.0
Use the UDF
If you log into your kdb Insights Enterprise instance you can now leverage your code in the UI in the following ways:
-
List and load the content of a package within a Query session.
// List all packages
.kxi.packages.list.all[]

// Load the package
.kxi.packages.load["mypackage";"1.0.0"]

// View the populated context from the package
.test

// List all available UDFs
.kxi.udfs.list.all[]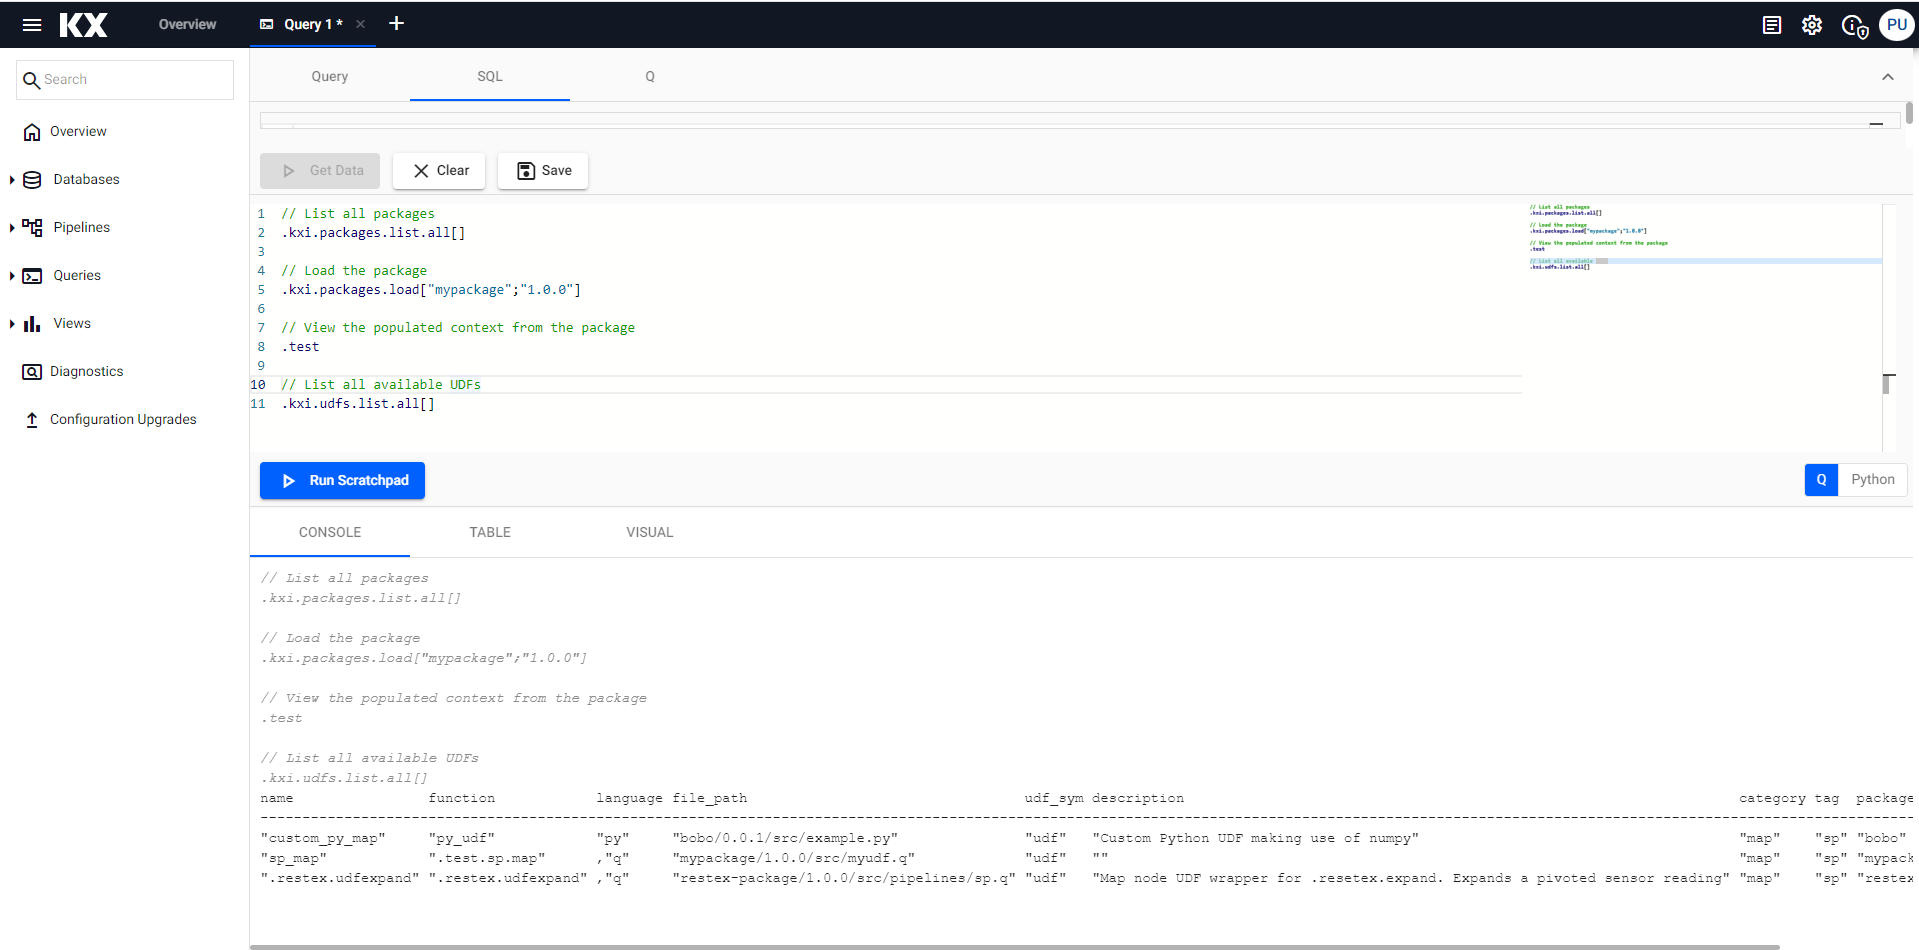
-
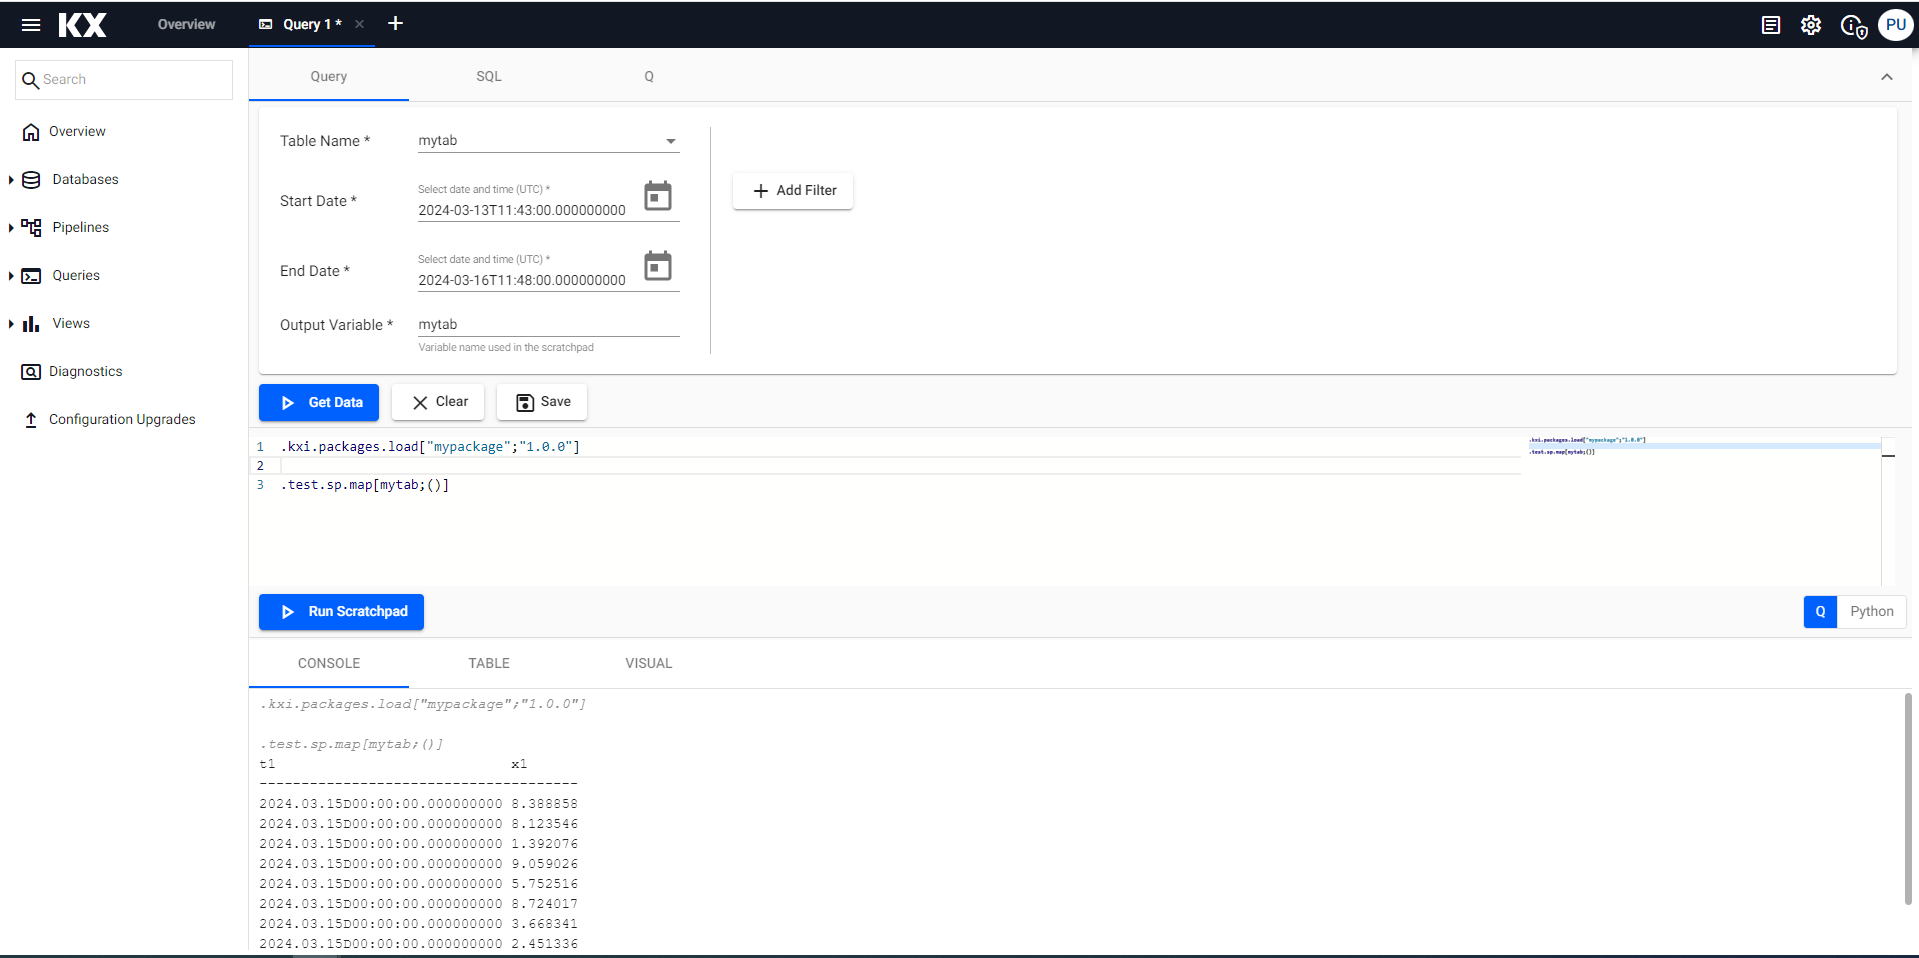
Using the UDF within a scratchpad.
-
Use the UDF in a Function node within a Pipeline Editor.
Use a Custom API
In this quickstart section, you will add a Custom API to the package that multiplies a selected column by a multiplier and returns the original data and a running average of the multiplied column.
Update the local package
To add a Custom API to the package defined in the previous section, take the following steps:
-
Add an entrypoint and the custom code to be used when querying the database (this is done by the Data Access processes). The code multiplies the selected column by the specified multiplier and registers the API:
kxi package add --to $PKG entrypoint --name data-access --path src/da.q
cat << 'EOF' > $PKG/src/da.q
.example.daAPI:{[table;column;multiplier;startTS;endTS]
    data:.kxi.selectTable[table;(startTS;endTS);();0b;enlist column;()!()];
    res:?[data;();0b;`original_col`multiplied_col!(column;(*;column;multiplier))];
    (multiplier;res)
    };
.da.registerAPI[`.example.daAPI;
    .sapi.metaDescription["Example API"],
    .sapi.metaParam[`name`type`isReq`description!(`table;-11h;1b;"Table to query")],
    .sapi.metaParam[`name`type`isReq`description!(`column;-11h;1b;"Column to multiply")],
    .sapi.metaParam[`name`type`isReq`description!(`multiplier;-7h;1b;"Multiplier")],
    .sapi.metaParam[`name`type`isReq`description!(`scope;-99h;0b;"Workaround")],
    .sapi.metaReturn[`type`description!(98h;"Result of the select.")],
    .sapi.metaMisc[enlist[`safe]!enlist 1b]
    ];
EOF
Writing mypackage/manifest.yamlSee other examples of registering an API here
-
Add an entrypoint and the custom code to be used when aggregating the data (this is done by the Aggregator). The code calculates the running average of the multiplied column returned when querying the database and registers the API:
kxi package add --to $PKG entrypoint --name aggregator --path src/agg.q
cat << 'EOF' > mypackage/src/agg.q
.example.aggAPI:{[tbls]
    razed:raze last each tbls;
    res:select original_col, multiplied_col_avg: avgs multiplied_col from razed;
    .sapi.ok res
    };
.sgagg.registerAggFn[`.example.aggAPI;
    .sapi.metaDescription["Average aggregator"],
    .sapi.metaParam[`name`type`description!(`tbls;0h;"Tables received from DAPs")],
    .sapi.metaReturn`type`description!(98h;"Running average of multiplied column");
    `.example.daAPI
    ];
EOF
Writing mypackage/manifest.yamlSee other examples of registering an API here
-
Add the environment flags to the package specification to ensure the entrypoints are loaded:
kxi package add --to $PKG deployment-config
echo "env: [{name: KXI_PACKAGES, value: mypackage:1.0.0}]" > $PKG/deployment_config/deployment_config.yaml
Writing mypackage/manifest.yamlThe local package now includes a new Custom API
daAPI.
Upload and deploy the package
To update the package follow the steps below:
-
Teardown the currently deployed package.
kxi package teardown ${PKG} -
Deploy the package:
kxi package packit $PKG --version 1.0.0 --tag
kxi package push $PKG/1.0.0 --force
kxi package deploy $PKG/1.0.0
Create a View
To create a View that uses the Custom API, follow the instructions below:
- Log into your kdb Insights Enterprise instance.
- Create a new View by selecting the plus icon at the top toolbar and select View.
-
Upload the ready-made View:
- Click on the link here to display a JSON representation of the ready-made View in a new browser window.
- Select all the text in the new browser window and copy it into an empty text file using the editor of your choice.
- Save the file on your local machine. You must use a .json extension for this file.
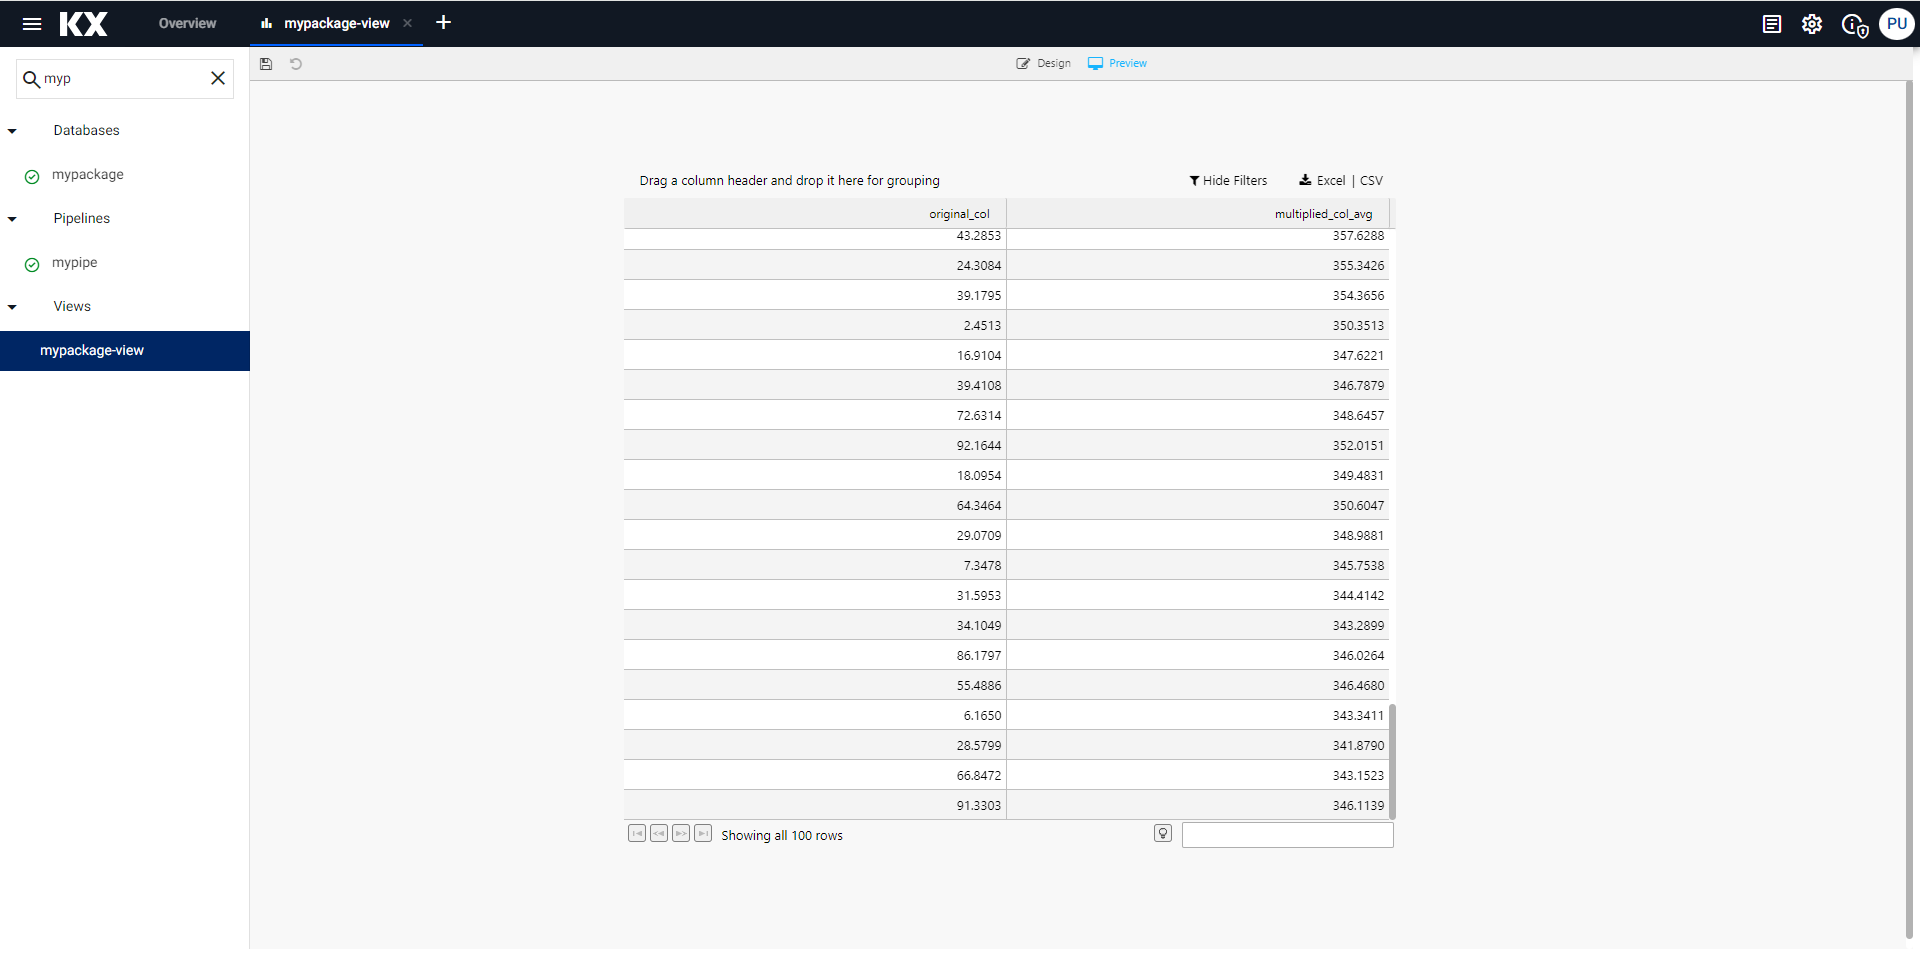
- Drag the file over the View. When the workspace is highlighted in blue and Drop Dashboards to Import is displayed in the center of the workspace, release the file. The ready-made View
mypackage-viewis now displayed in a new tab. This View displays a grid that includes two columns, the original value from the demo data and a running average of the column multiplied by 7.
-
To modify the multiplier that is used to select the values:
- With the Data Grid selected in the new View, open the Data Source and choose the
mypackage-nodeData Source from the list on the left-hand side. - Expand the
.examplenode to display thedaAPIAPI.
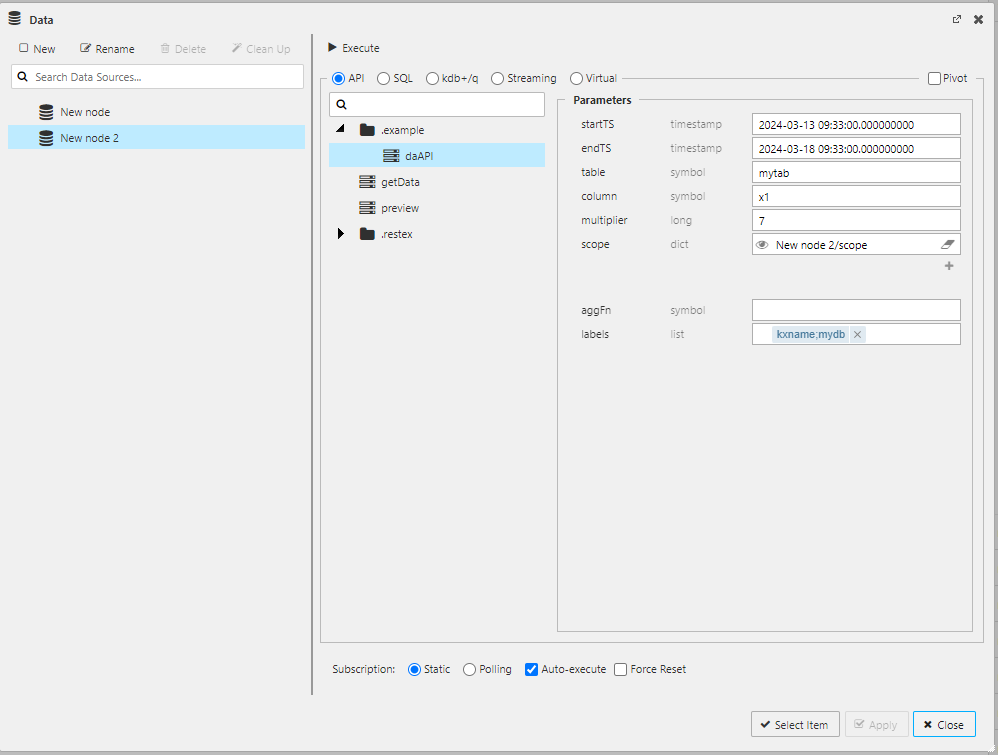
- Update the multiplier value from 7 to any value you wish.
- Select Apply and then Select Item to update the Data Grid with the new multiplier.
- With the Data Grid selected in the new View, open the Data Source and choose the
Querying over HTTPS
You can also call your Custom API via REST by supplying the API parameters.
-
Authenticate to your kdb Insights Enterprise:
INSIGHTS_TOKEN=`curl -s --header "Content-Type: application/x-www-form-urlencoded" \
    -d "grant_type=client_credentials&client_id=$INSIGHTS_CLIENT_ID&client_secret=$INSIGHTS_CLIENT_SECRET" \
    "${INSIGHTS_URL}/auth/realms/insights/protocol/openid-connect/token" | jq -cr ".access_token"`
This example requires the following parameters:
INSIGHTS_URL,INSIGHTS_CLIENT_IDandINSIGHTS_CLIENT_SECRET -
Run the REST request calling your
daAPICustom API and storing the returned data:DATA=`curl -s -X POST "${INSIGHTS_URL}/servicegateway/example/daAPI" \ -H "Content-Type: application/json" \ -H "Accept: application/json" \ -H "Authorization: Bearer $INSIGHTS_TOKEN" \ -d "$(jq -n \ '{ table : "mytab", column : "x1", multiplier : "3", startTS : "2024.03.14D00:00:00", endTS : "2024.03.16D00:00:00", scope : { "assembly" : "mypackage" } }' | jq -cr .)"` -
Display the resulting data:
echo $DATA | jq -cr '.payload'
[{"original_col":17.80839,"multiplied_col_avg":53.42516},{"original_col":30.17723,"multiplied_col_avg":71.97842},...
Remove a package
To remove the package created in this quickstart from kdb Insights Enterprise, run the following command:
kxi package remote-remove $PKG/1.0.0 --force
{
  "mypackage": [
    {
      "_status": "DELETED",
      "version": "1.0.0"
    }
  ]
}
remote-remove
remote-remove by default removes the packages but not the .kxi package file.
To clear the .kxi files run:
kxi package remote-remove --artifacts ${PKG}/1.0.0 --force
{
  "mypackage": [
    {
      "_status": "DELETED",
      "version": "1.0.0"
    }
  ]
}
You can also remove your locally stored packages and .kxi files in a similar way:
kxi package uninstall $PKG/1.0.0 --force && kxi package uninstall --artifacts $PKG/1.0.0 --force
{}
{
    "mypackage": [
        {
            "_status": "DELETED",
            "version": "1.0.0"
        }
    ]
}