Work area
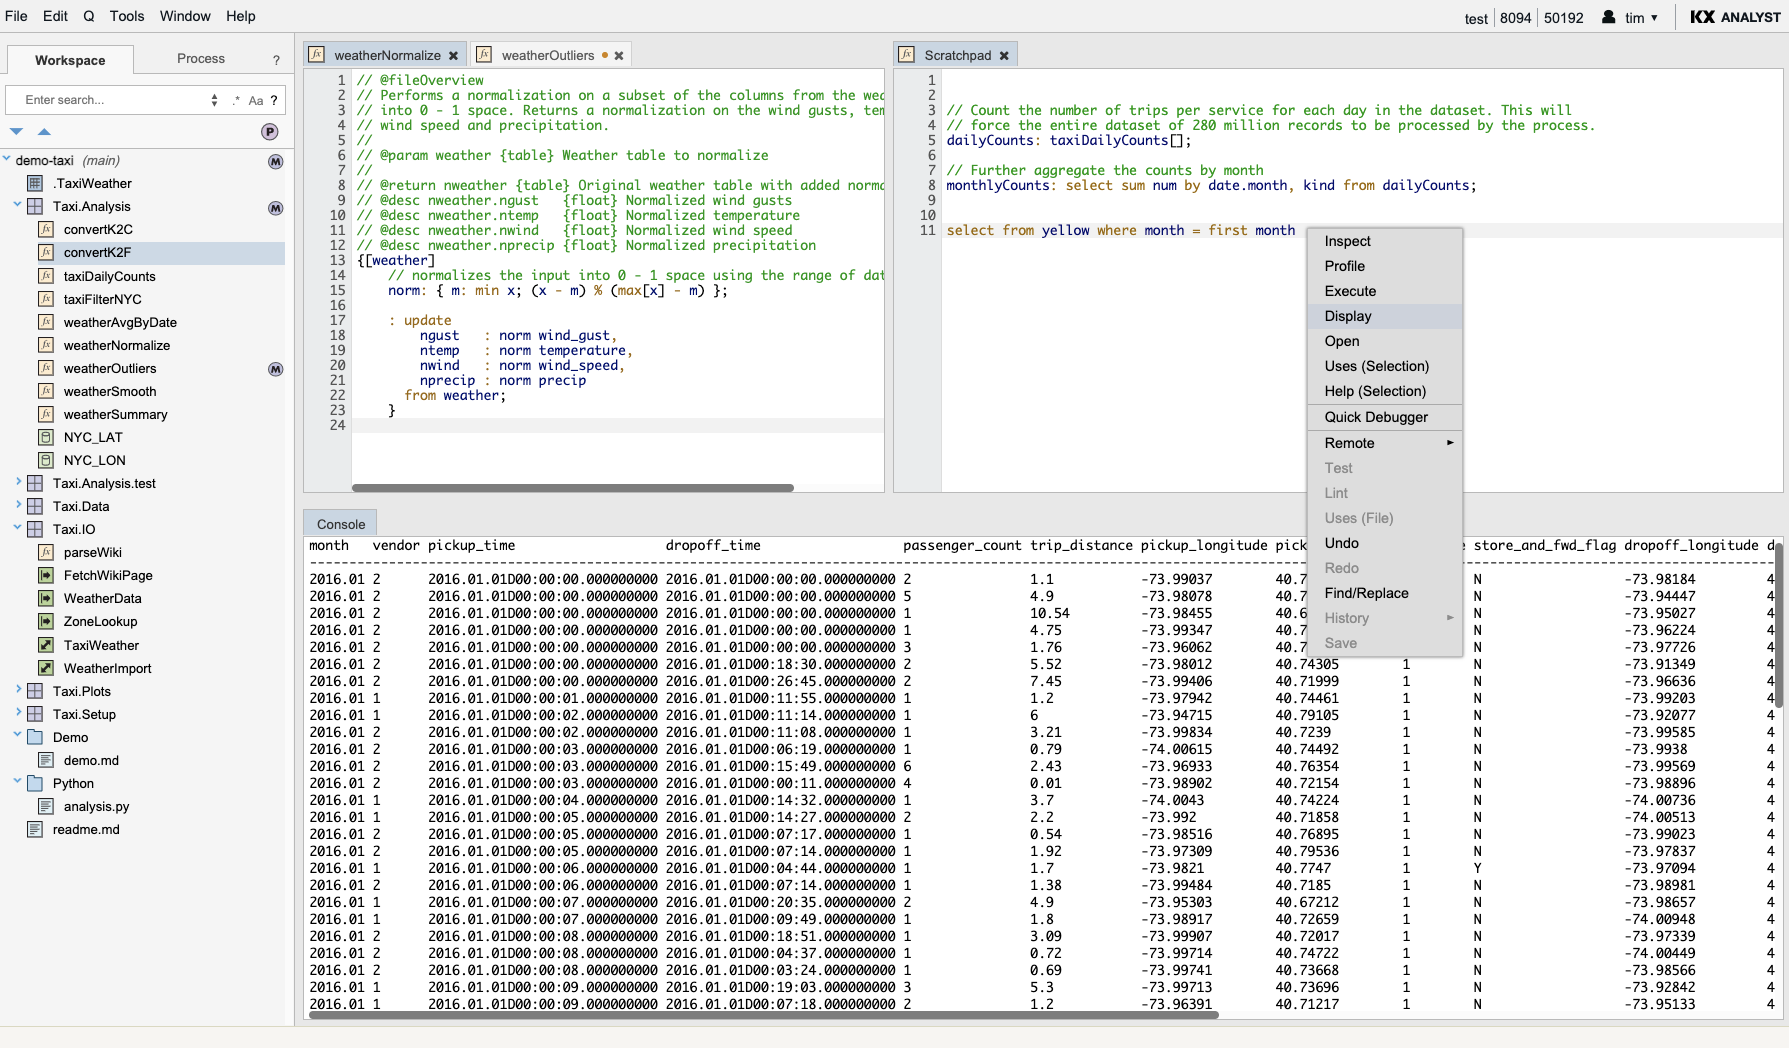
The Work area contains panes that can contain components such as editors, gg plots, text views, rendered Markdown and the console.
In the example below, the work area has been split horizontally, and the top half split again vertically. Tabs can be moved between regions by drag-and-drop, or undocked into their own windows. Spreadsheets and some other tools open in their own windows.
| command | description |
|---|---|
| Undock | Undocks the currently selected tab. |
| Close | Closes the currently selected tab. |
| Close Others | Closes all but the currently selected tab in a given view. |
| Close Following | Closes any tabs following the currently selected tab in a given view. |
| Close All | Close all tabs in a given view. |
| Close By Name... | Close tabs based on the artifact name. |
| Split Vertically | Split a view vertically. |
| Close Vertical Split | Closes the currently selected vertical split pane. |
| Split Horizontally | Split a view horizontally. |
| Close Horizontal Split | Closes the currently selected horizontal split pane. |
New
Artifacts and repositories are created by picking the appropriate New > (Repository, Module, Function, etc) items, from the File or context menu.
Repositories are containers for artifacts. Modules and spreadsheets are top-level artifacts and cannot be nested. Module names can start with a period or a letter, followed by alphanumeric characters with non-consecutive periods. Spreadsheet names must start with a period.
Functions and data artifacts must be located in a module, whereas folders, files, and test files may be nested in repositories, modules, or folders.
Local modules
Modules defined with a leading period (e.g. .myModule) create a locally scoped module.
All references to variables in the module implicitly reference the module scope.
Functions defined in the module can be referenced outside of the module by providing the explicit module reference, e.g. .moduleName.functionName.
Global modules
Modules can also be defined in the kdb+ global namespace by omitting the leading period, e.g. Module.
Global modules are loaded into the global environment making it easy to access global tables, variables or functions.
Functions, data initializations and managed artifacts can be created inside a module by right-clicking a module, and selecting a type under the New menu option. All names must start with a letter, and can contain only alphanumeric characters and non-consecutive periods.
Open
Artifacts are opened by double-clicking their icon or choosing File > Open. If they are already opened in a docked editor, they will gain focus. If they are open and undocked, a status message will be displayed.
Edit artifacts
Artifacts are edited using a standard text editor with q code completion and colorization.
Functions and other data artifacts such as Spreadsheets can be saved with compilation errors. To help users locate functions with errors, their names are shown in red. Only functions and data types support compilation error reporting. The error message can be viewed by hovering over the artifact with the error.
Scratchpads
Scratchpads are script editors not associated with any specific artifacts. A scratchpad can be opened by picking Scratchpad from the Tools menu. They cannot be saved and do not appear in the workspace, remote, or process views. Multiple scratchpads can be open simultaneously. They are automatically saved on logout, but cannot be named or versioned.
See Text Editor for more about editing
Rename
To rename an artifact:
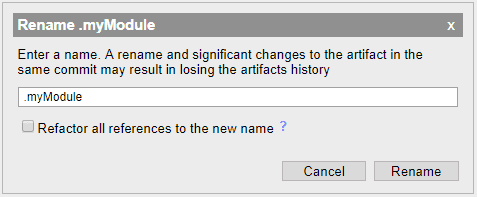
- Right-click on the artifact and pick Rename… from the context menu.
- Type a new name in the Rename dialog.
- Click Rename.
It is possible to refactor references to functions, data artifacts, and modules during a rename.
To refactor references to an artifact:
- Right-click on the artifact and pick Rename… from the context menu.
- Type a new name in the Rename dialog.
- Check the box marked Refactor all references to the new name.
- Click Rename.
Refactoring an artifact will refactor references in functions, data artifacts, spreadsheets, q files, and test files. It will also rename associated tests and, in the case of modules, other modules in the same namespace.
When renaming an artifact, it is possible for a function or data artifact in the global namespace to move into a qualified namespace, or vice versa.
Some rename operations can lead to broken function or data references that cannot be resolved with the refactor tool. These types of errors can occur under three conditions:
- A module whose name begins with a
.is renamed to a module without a leading. - A module whose name lacks a leading
.is renamed to a module with a leading. - A function whose name has a leading
.and is renamed to a function without a leading.
To avoid potential problems that could occur due to unexpected broken references, renames that meet any of the above criteria will not lead to refactoring of the content of a file, though artifact names and dependencies may be refactored.
Functions can contain qSQL expression that use global functions. The refactor tool will only identify and replace functions used in qsql statements if the full function name has a leading .. This is because the function identified by a name that lacks a leading . depends execution context of qsql statement. This rule applies to functions names in the qsql statement preceding the from clause and following the where clause. The refactor tool can find and modify functions between the from and where clause.
select .. by .. from t where ..
Delete
Deleting an artifact removes it from the workspace. If the artifact being deleted had been committed, it will be shown with a red X indicating it has been marked for deletion from the workspace. To delete the artifact from the workspace the deletion must be published. This will also delete the artifact from the Git repository. Note that deleted artifacts are excluded from searches and other operations. Git repositories keep a full history of committed changes to artifacts, including deletions.
To delete an artifact:
- Select the artifact you wish to delete
- Pick Delete from the File or context menu
- Confirm the deletion
One or more artifact icons will update.
Move
Moving an artifact can be done by dragging an artifact or selected group of artifacts to another module, folder, or repository. Move can also be done using the Cut and Paste options in the context or Edit menus.

Inspect
To inspect an artifact, right-click on the artifact and pick Inspect… from the context menu. The artifact will open in the Visual Inspector.
Loading a repository
A repository must be loaded into the workspace before artifacts can be pushed or pulled. Repositories created in the IDE using the New > Repository... sidebar context menu option are stored locally on the server, and can be retrieved using the Git > Shared Repositories menu option. This will open the opening the shared repositories dialog.
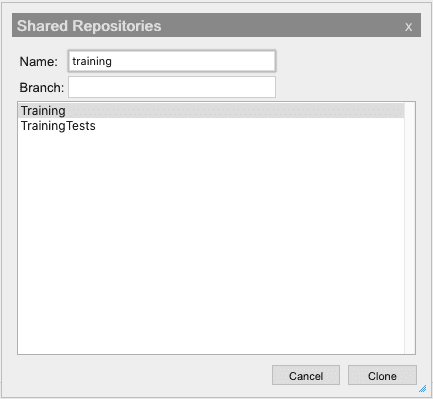
It is also possible to clone remote repositories into the workspace; see the Clone command below.
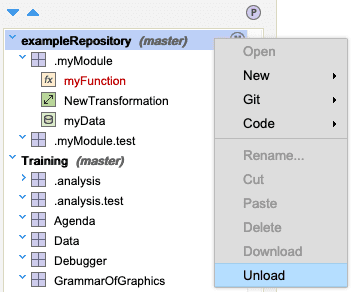
Unloading a repository
Unloading removes a repository from the workspace. Any uncommitted modifications or additions are discarded, but the repository will remain available at its remote location. For repositories created from within the IDE, this means they will still be available under the Remote view and can be reloaded.
To unload a repository:
- Click the Workspace tab to switch to the Workspace view.
- Right-click the repository and pick Unload from the context menu.
Push
Pushing a repository pushes the current state of the artifacts being managed by that repository to the remote, making them available to anyone who has access to the repository. In order to push a module or function, you need to push the repository containing it. A repository may not have any conflicted artifacts if it is to be pushed.
To push to a repository:
- Select the repository.
- Pick Git > Push from the context menu, or Push from the File menu.
- If the repository is not hosted locally on this server, you may be prompted for a username and password.
- Type a commit message for this push and click OK. This will show up in the version history for the repository.
The artifacts being managed by the repository will update their status to reflect that they have been committed.
Pull
Pulling a repository brings the latest version of the artifacts from the repository into your workspace. It is also used to switch between branches. To pull a repository it must be in the committed state, i.e. have no modifications.
To pull from a repository:
- If the artifacts contained by the repository are not already in a committed state, either commit them or revert them to an earlier committed version.
- Pick Git > Pull from the context menu, or Pull from the File menu.
- If the repository is not hosted locally on this server, you may be prompted for a username and password.
- Select the repository branch you want to pull, and click OK.
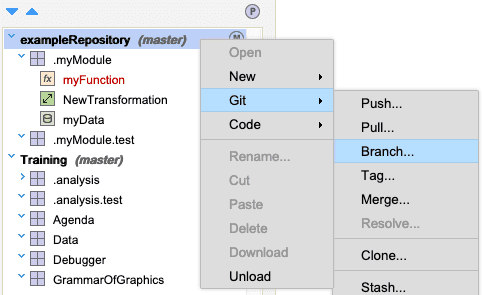
Branch
Branching allows you to create a new repository branch. Branches must be pushed before they are available for other users to pull.
To branch a repository:
- Right-click on the repository and select Git > Branch from the context menu or Branch from the File menu.
- Type a branch name in the dialog.
- Click OK.
In the example below, the repository is loaded and following the above instructions allows the user to select or create a new branch.
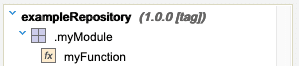
Tag
Tagging allows you to attach a label, and optionally a message, to a commit. Tags can be pulled, but unlike branches they cannot be modified. When working in a tag, you must branch to commit your changes. Tags are indicated by the [tag] suffix. Unlike a branch, a tag is not checked out automatically when it is created.
To tag a repository:
- Right-click on the repository and select Git > Tag from the context menu, or Tag from the File menu.
- Type a Tag name in the dialog.
- Add an author, email, or description to create an annotated tag. Leave all three blank to create a lightweight tag.
- Click OK.
Merge
Merge allows you to merge a branch into your current repository branch.
To merge a branch:
- Pull the desired destination branch.
For example, if you want to merge branch
b1intomain, pullmain. - Right-click on the repository and select Merge from the context menu.
- If the repository is not hosted locally on this server, you may be prompted for a username and password.
- Select the branch you wish to merge into the current branch. Click OK.
In the above example, you would select
b1. - Resolve any conflicts, and push the results of the merge.
Conflicts
Artifacts within repositories can become conflicted if there are two valid versions of the file available.
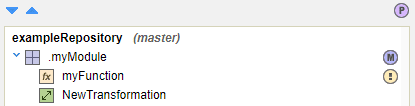
An artifact can become conflicted in two ways:
- Conflicts trying to push changes. This means some other user has made changes to the same artifact that you have, and has pushed those changes. When you try to push your changes, the artifact will be marked as conflicted.
- Merge conflicts. There are changes in the branch that you are trying to merge that conflict with changes in your current branch.
In either case, right-click the artifact marked as conflicted and pick Resolve from the context menu to resolve the conflict. You will need to do this for each artifact that has been marked as conflicted.
Resolve
The conflict resolution tool is similar to the diffing tool used to compare artifact history, though it has more versions that can be compared.
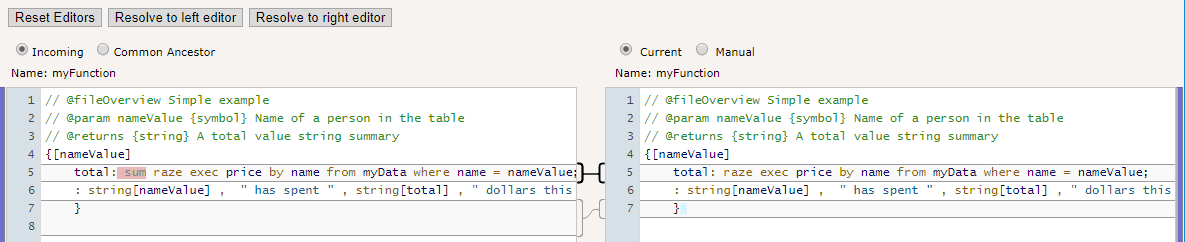
The current version is the last committed version in the workspace. The manual version starts with the same contents as the current version, but unlike the current version, it can be modified.
The incoming version is the version changed elsewhere that conflicts with the current version, and the common ancestor is the last version that the incoming and current versions share common history with.
The radio buttons above the editors switch which version the editor is displaying.
Any of the four versions can be chosen as the resolution by selecting that radio button, and resolving to the corresponding editor. This will close the resolution window and clear the conflict in the workspace.
After resolving all conflicts, push the repository to publish your resolution.
Cloning
Other than cloning a repository using the Remote tab, repositories can be cloned by selecting Git > Clone… or _New > Clone Repository… from the workspace's context menu.
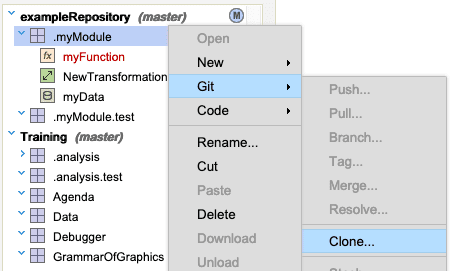
This will open a dialog that allows one to provide the Origin, Username, SSH Key, and Password for accessing the repository to clone.
Stashing changes
It is possible to stash your local changes to a repository so that you can switch to another branch without having to commit the changes. The stashed changes can then be applied later.
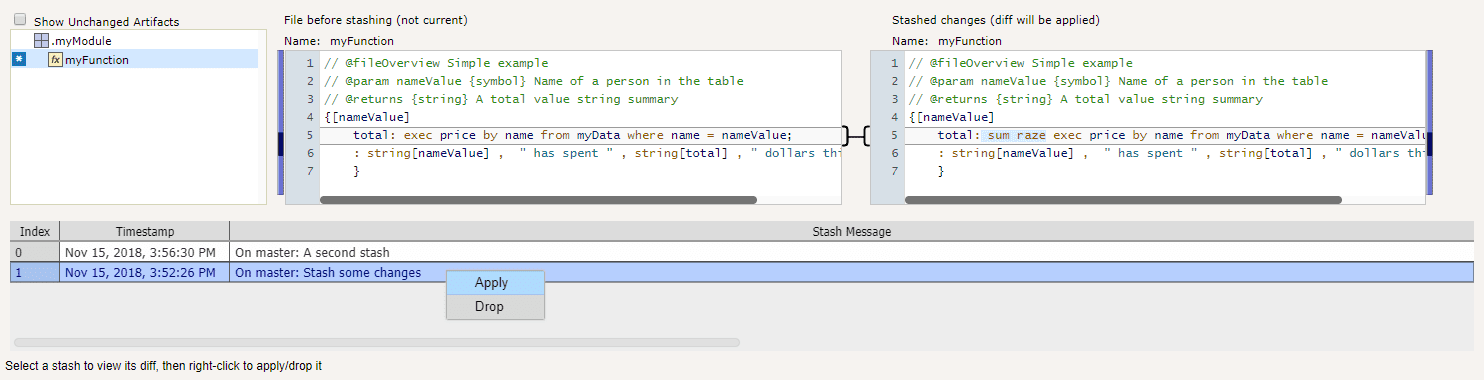
To stash your current changes to a repository, select the repository and click Git > Stash.... A dialog will open where you may enter a message for this stash. Click OK to stash the current changes, causing your repository to revert to a clean working directory, or click Stash List to view a list of all current stashes.
To apply the stash, select the repository and click Git > Apply Stash.... This will open a new window where you can view a list of all stashed changes. To apply a given stash, right click the stash and select Apply. You can also delete the saved stash by selecting Drop. The changes are viewable in the panes above the stash list.
History for artifacts
Right-clicking an artifact and selecting Git > History allows you to view and compare versions of that artifact. It also allows you to move back and forth through the various versions of the artifact. There are two ways of reverting an artifact to a previous version from the File menu:
- Git > Reset allows you to revert quickly to the most recent committed version of the artifact.
- Git > History allows you to revert to any committed or saved version of the artifact.
To revert an artifact from the context menu:
- Select the artifact and pick Git > Reset... from the context menu to revert to the latest committed version.
-
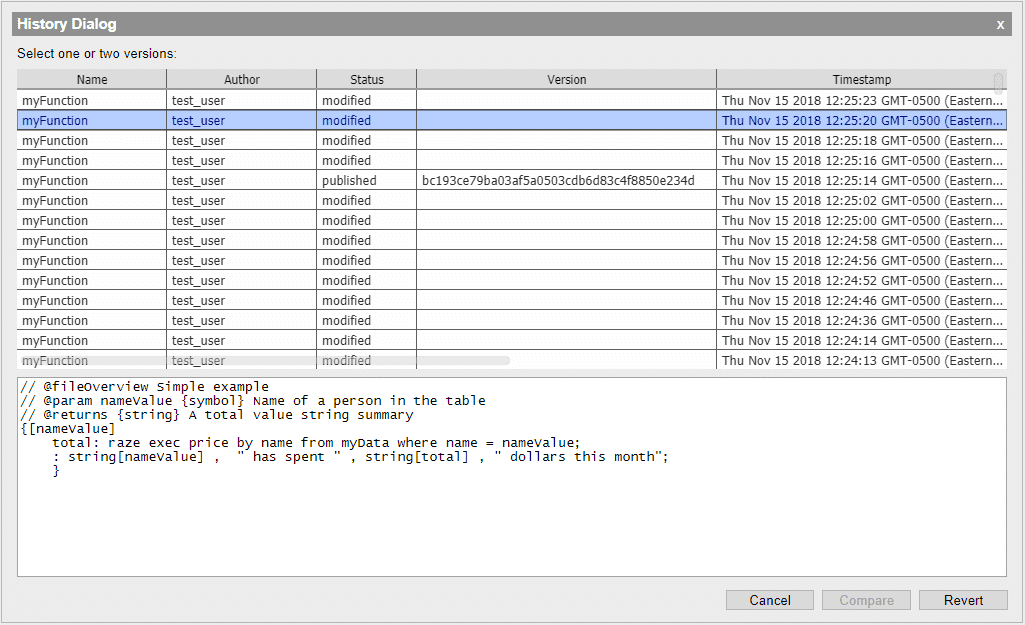
Otherwise select Git > History.... A version dialog will appear with information about previous versions of the artifact. From the dialog, you can select a version and update or compare two versions of the artifact.
-
Updating an artifact will update the artifact to the selected version.
-
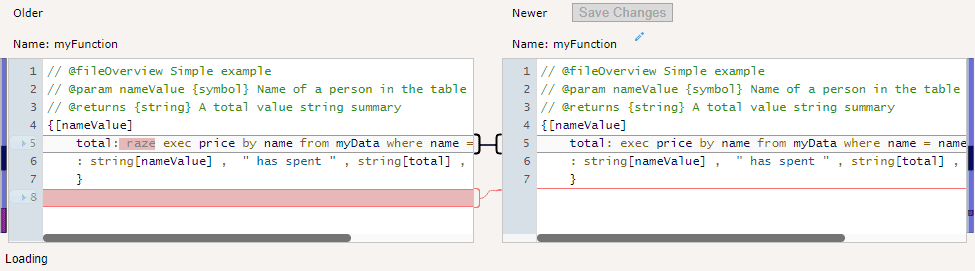
Comparing an artifact by using Ctrl+Click on Windows/Linux or ⌘+Click on macOS to select two versions of the artifact and click Compare. The diffing tool will open in a separate tab. Any regions that have been added appear in blue. Any regions that have been deleted appear in red. Uncolored regions have not been changed. The regions with changes can be moved from one editor to another by pressing the arrow icons in the margins. The editor on the right can be edited. Any changes can be saved by clicking the Save button, which saves the version in the right-hand editor.
History for repositories
To compare versions for all items in a repository and view their history, right-click on the repository and pick History > View History in the context menu. The repository diffing tool will open as shown below.
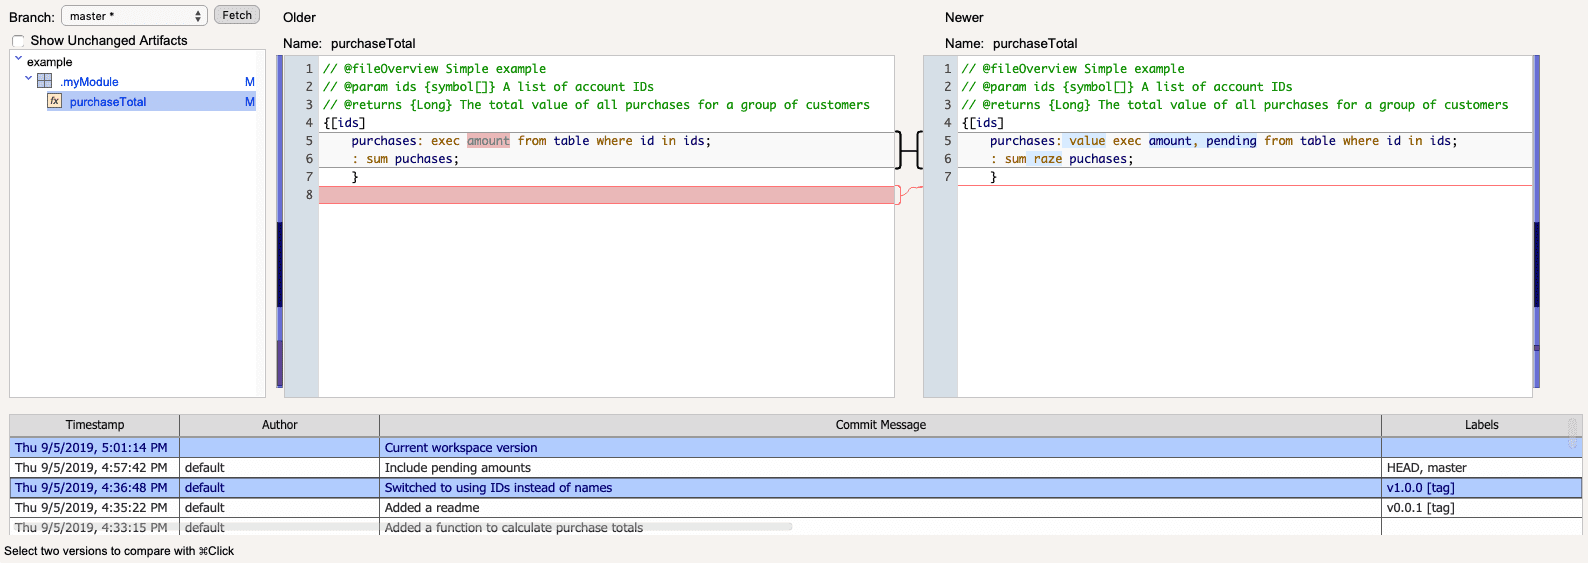
At the bottom is the version pane, which lists every commit to the repository. It shows the timestamp, author, commit message, and labels. The Labels column will show git references, including HEAD, branches and tags. To compare two versions, click on one, and Ctrl+Click on Windows/Linux or ⌘+Click on macOS on another. This will show the changes to the artifacts in the sidebar.
An artifact can be in one of four states.
| icon | description |
|---|---|
 |
The artifact is in the newer version, but not in the older version |
 |
The artifact is in the older version, but is not in the newer version |
 |
The artifact is in both versions, but has been modified since the older of the two versions, or has modified children. A modified icon does not necessarily indicate the contents have changed. If an artifact is renamed it will show as being modified. |
| If there is no icon, the artifact has not changed between versions |
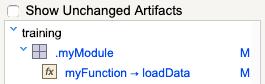
The icon does not indicate that the change happened in the newer version, but does indicate that there has been a change between versions. It could have happened in the newer version, or in an intermediate version. If there has been a rename, the old name will appear to the left of the new name, with an arrow showing the name changed.
Clicking an artifact will load it into the editors on the right, which show the contents of the older and newer versions. They are both read-only. Individual artifacts cannot be updated from this tool, and must be updated by right-clicking them in the search pane and picking History > View History from the context menu.
The Fetch button fetches any changes from the remote repository into the workspace.
Repository settings
To view the settings for a repository, right-click the repository and pick Git > Settings.... This will open a dialog that shows the repository Origin, Username, Git Author, Git Email, and SSH Key. You can modify any of these settings by clicking Save.
Test
Test allows you to run qCumber tests. Tests are typically stored in a .test module, e.g. ExampleModule.test.
A qCumber test has the file suffix of .quke.

To run a test from a .quke artifact, pick Test > Run from its context menu.
The test will run and the result will be displayed in the console.
To run a suite of tests, pick Test > Run from the context menu of the module, folder, or repository containing the tests. All of the tests under it will run, and the results will be displayed in the console.
Exporting to a q script
Modules may be exported to a kdb+ self-contained script file, that can be loaded into a vanilla q process. If a module uses any of the IDE's libraries, those libraries will need to be present to execute the module.
An exported module will be written to the specified directory.
Any files in the module will be written to a folder with the same name as the module.
Any functions or data initializations will be written to a .q file with the same name as the module,
e.g. moduleName.q.
There are a few ways to export a module.
- Click the module in the searchpane, then in the main menu click File > Export….
- Click the module in the searchpane, then click Code > Export....
- Click the module in the searchpane, then click New > Q File From Module.
The first two of those options will open the export dialog seen below, which permits you to choose where the exported files are saved, as well as options to refine the exported script. The final option does not provide a dialog, and instead merely saves the unencrypted exported script as a file artifact in the workspace.
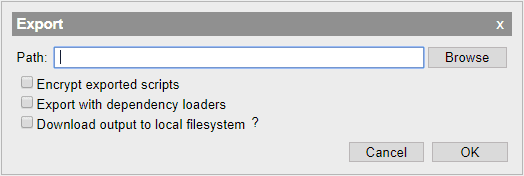
Only absolute path names are permitted. Clicking Browse will open the file browser to select the location to save the file.
The Encrypt exported scripts checkbox provides the option to encrypt functions, data initializations,
and files if they end in .q, though all other generic files will remain unencrypted. Any q module names
that start with a dot will produce hidden files.
Exporting to the local filesystem is supported by checking the Download output to local filesystem box.
Dependency list
The Dependency List is used to define dependencies of a module. Module dependencies are used to determine what order modules are loaded in. Module dependencies can be defined by clicking on a module and picking Code > Dependency List… from the workspace context menu.
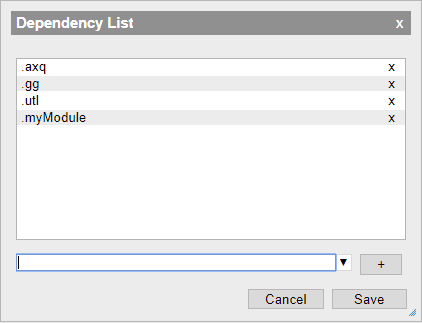
Modules can be added by typing the module name into the input and pressing the + button. Click the arrow to see a list of modules within the workspace that could be included. The dependency list is shown in the central pane. Click the X next to a given name to remove it from the dependency list.
Uploading files
To upload files from your local machine, click New > Upload Local Files in the searchpane. To upload files from the server, click New > Upload From Server in the searchpane.
In either case, a dialog will open that allows you to select a file from your local machine. Click Browse to open the file browser to search for the desired file.
You may also check the Import Q script as modules, functions, and data objects box to
import any files ending in the .q extension as modules, functions
and data artifacts as appropriate.
A file ending in the .q extension that is loaded as an artifact in the workspace can be
converted to a module by right-clicking on the file and selecting New > Module From Q File.
File browser columns
The file browser displays various configurable fields for each record. The following table outlines the available columns in the file browser.
| column | description |
|---|---|
| Name | Name of the resource on disk |
| Date Modified | Last time that this resource was modified |
| Type | See Resource Types for more information |
| Size | Human readable size of resource on disk |
| Bytes | Literal number of bytes of resource on disk |
| Owner | Name of user that owns this resource |
| Group | Name of group that has access to this resource |
| Date Accessed | Last time that this resource was accessed |
| Permissions | Resource permission triplets in form of owner-group-other |
To change which columns are displayed, click the Settings button in the top right-hand corner of the file browser.
Resource types
The type of a resource is a representation of the format of the item on disk. Resources are categorized into the following standard types:
- Block device
- Character device
- Directory
- FIFO/pipe
- Symlink
- Regular file
- Socket
The file browser performs a special check for kdb+ data types to determine if there are kdb+ databases on disk. The file browser will categorize kdb+ databases as:
- kdb+ serialized
- kdb+ splayed
- kdb+ partitioned
The console
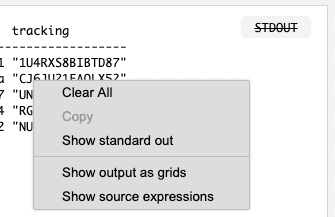
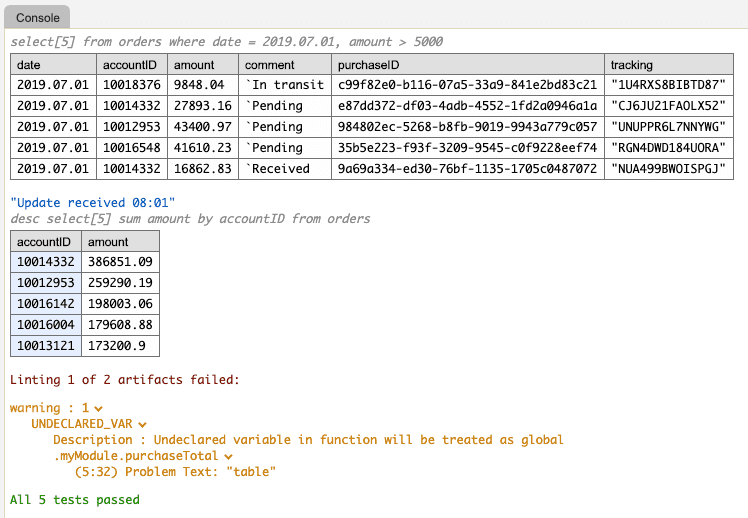
The console displays the results of evaluating expressions, as well as test results, STDOUT and STDERR messages, and the output of some tools, such as the linter.
This is an example of grid view, which works better for unicode text. Optionally, the expression that generated each output can be shown above the result. This shows an evaluation, a STDOUT message, another evaluation, a linter warning, and test results.
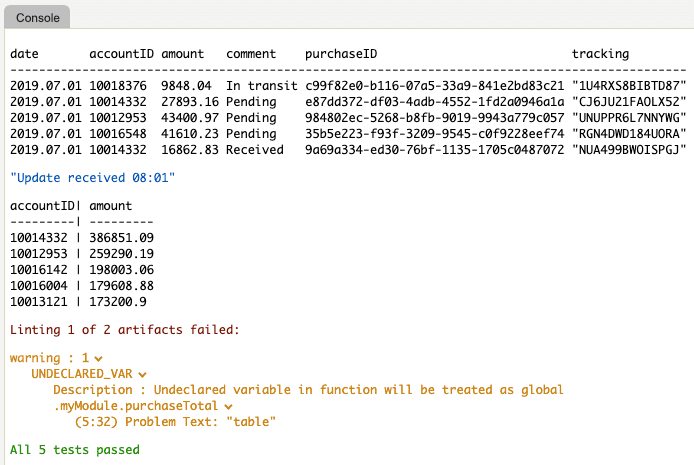
This shows the same data in text format used by the q command line REPL. The evaluated expressions have been toggled off.
The console options can be set from the context menu. There is also an option to hide standard out messages. When this is set, the client will then discard any incoming STDOUT messages, and an icon will be displayed in the upper right corner. Re-enabling standard out messages will not show messages that were discarded.