Developer walkthrough
A simple workflow for q development.
Pre-flight
Read the Getting Started section.
Log in to Developer and create a workspace.
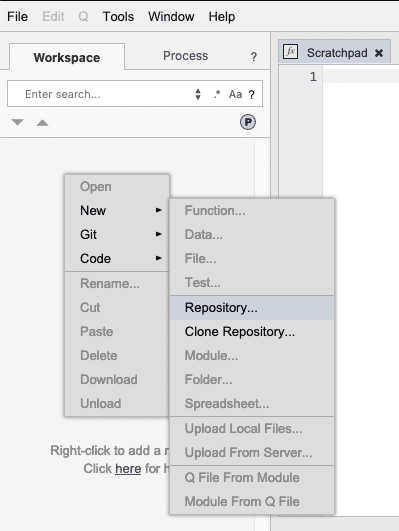
Create a repository. Repositories allow you to save versions of your work in a repository to share with other people and allow them to work on items in the repository as well. People who have access to the repository can push changes to it and pull changes from it. Right-click in the left tree pane of the window. A context menu will appear. Select New > Repository… from the context menu.
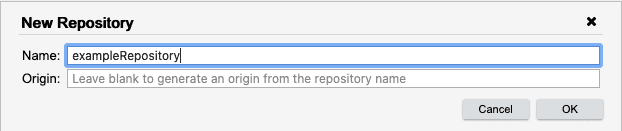
The New Repository dialog will appear. If this walkthrough is being done collaboratively, use a name that is unlikely to have been used before and is unique - for example: usernameDevWalkthrough, replacing username with your Developer username. Going forward, the walkthrough will refer to the repository as exampleRepository.
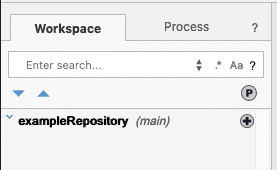
The repository will now appear in the tree.
Create a module in the workspace
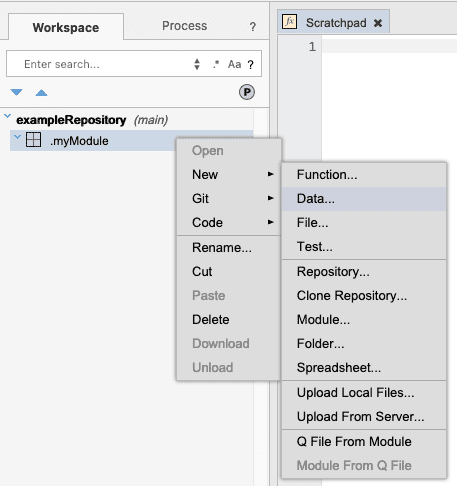
Create a module in the repository. Right-click on the repository and select New… > Module… from the menu. Modules are packages of artifacts and may contain code functions, code scripts, transformations, visualizations, and more.
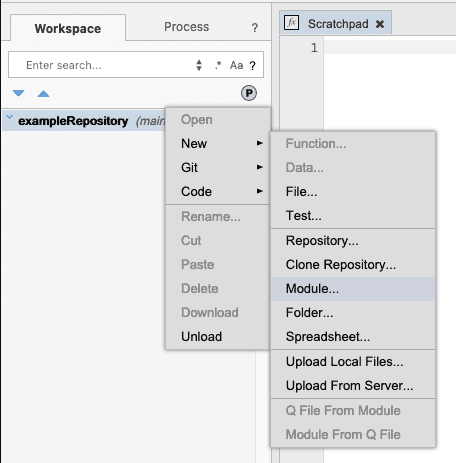
Type .myModule in the dialog box and press OK.

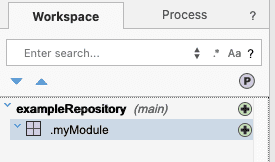
The module will appear in the search pane. The small green plus sign indicates that the module has been added to the workspace but not yet committed or pushed to the repository. All entities are managed by Developer and saved into the Developer repository.
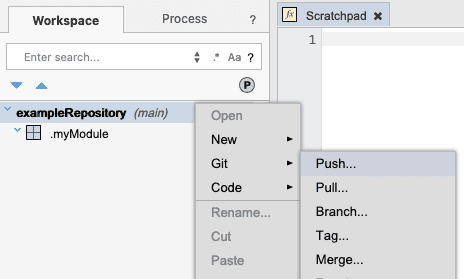
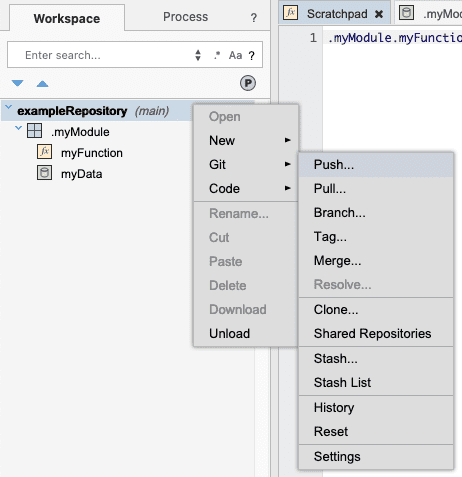
Right-click on the repository and select Git > Push from the context menu.
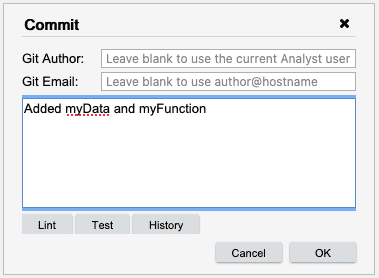
The Commit Message dialog will appear. This dialog allows you to enter a commit message, as well as set the Git author and Git email fields for this commit. Since you may be pushing changes to the repository on a regular basis, it makes sense to provide a meaningful commit message. Leaving the author and email fields blank, enter a commit message and click OK.

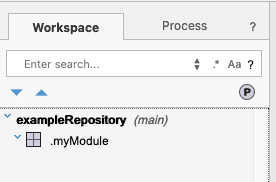
Notice that the icon disappears from .myModule. This means that anyone else who has access to the repository is now able to load the repository.
Now let’s add some dummy data to our module. Right-click on the module and pick New… > Data… from the context menu. The Data type allows you to create data (e.g. constants, variables, etc) and have it initialized whenever you load the module into your workspace. For example, when you first log on to your workspace, if the module is in your workspace, then the data will be loaded and ready for use.
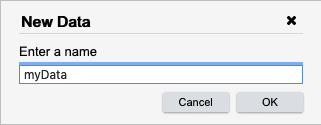
Type myData in the input field for the data file name and click OK.
myData is now added to the workspace tree, and an editor for the artifact is opened. Type the following into the editor for myData. In this example, we are creating a simple dummy table.

Inspect the dataset using the console and Visual Inspector
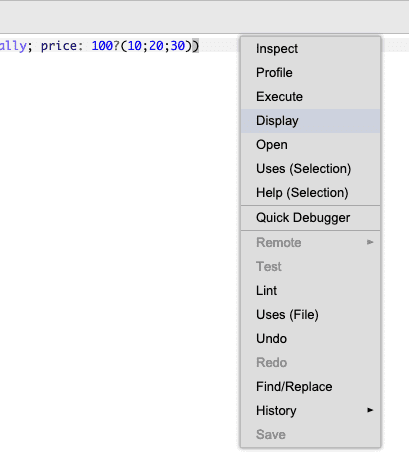
Right-click on the line of code and pick Display from the context menu, or alternatively place your cursor on that line and use the keyboard combination ⌘D (macOS) or Ctrl-D (Windows/Linux).
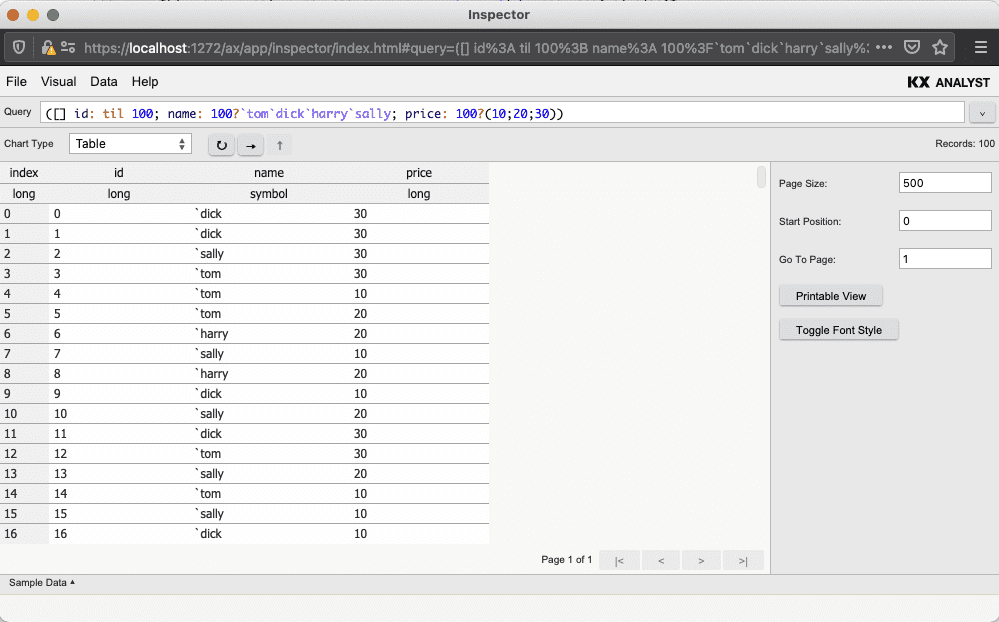
The table data will appear in the console.

Right-click on the line of code and pick Inspect from the context menu, or use the keyboard combination ⌘I (macOS) or Ctrl-I (Windows/Linux). A new window will open showing the table data in the Visual Inspector. Developer makes it easy for you to view and manipulate data while you create functions and script files. Close the Inspector window after you have looked at the data.
Save the function by selecting the .myModule.myData tab (if it is not already selected) and pressing ⌘S (macOS) or Ctrl-S (Windows/Linux). You can also use the File menu or the context menu to save the function.
Add a function to a module
Now let’s add a function to the module. Right-click on the module and pick New > Function… from the context menu
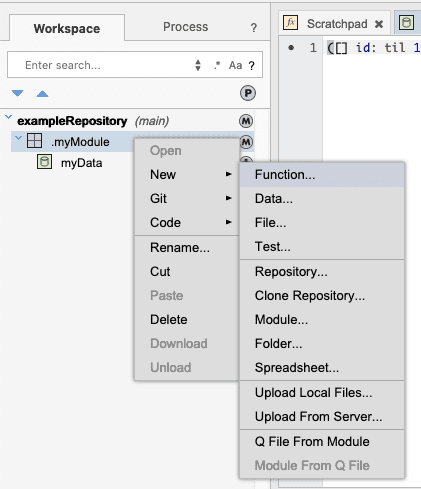
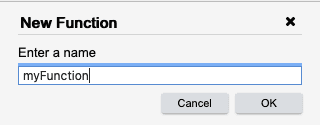
Enter myFunction in the dialog box and click OK.
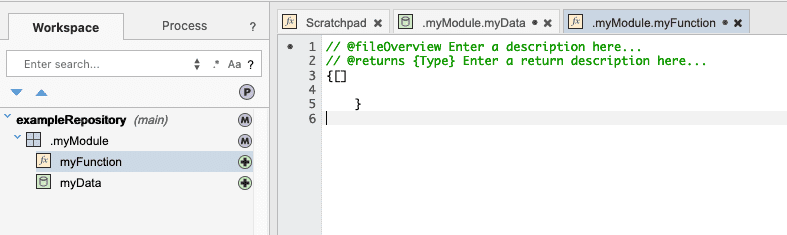
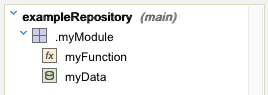
The search pane updates. myFunction is added to the module. Notice that myData and myFunction are both shown with a green + icon, used to indicate that these items have been added but not yet committed/pushed. The module updates to contain a blue M to indicate that the module has been modified. The new function body is opened in a tab in the Explorer.
Edit a function using the editor
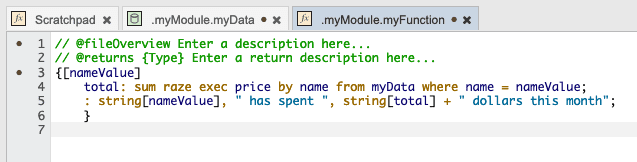
Now let’s edit our first function. You write function parameters between the square brackets separated by a semicolon. You write the function body between the curly brackets. QDoc for the function goes above the function definition. In this simple example, we will be passing a symbol name to the function. The function will select all of the price values for a given name from our dummy dataset and then sum the values to create a total. It will then return a string containing the name and total. Enter the following into the myFunction tab.

Add a dataset to the function
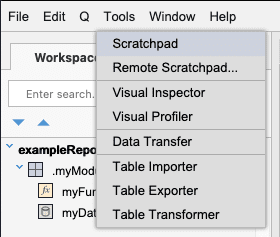
Now let's switch to the Scratchpad tab. Developer will by default open a Scratchpad for new workspaces, but additional Scratchpads can be opened at any time by picking Tools > Scratchpad.
Run the function
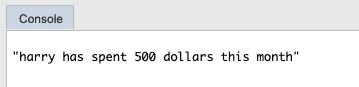
If you remember, our dataset contained the names `tom`dick`harry and `sally. To test our function, type .myModule.myFunction `harry into the Scratchpad and press ⌘D (macOS) or Ctrl-D (Windows/Linux).

Debug the function using the Quick Debugger
The console should display a similar output. Note that the amount spent is likely to be different, as myData is randomly generated.
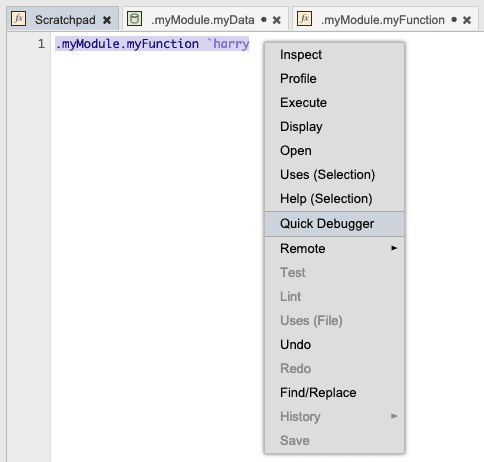
Now let’s cause the function to error and use the Quick Debugger to discover the error. Replace one of the , from line 6 with a + and save the function. Trying to use + to join strings will cause an error.
Let’s use the Quick Debugger to track down the problem. Highlight the function, right-click and pick Quick Debugger from the context menu.
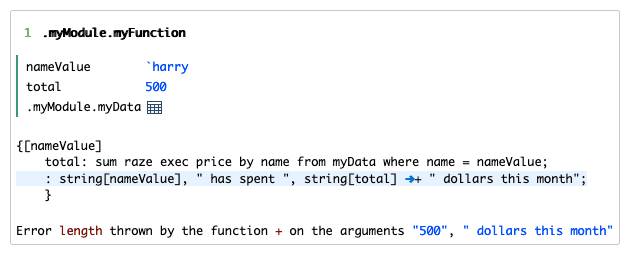
The Quick Debugger will open in a separate tab. The function definition is loaded, and you can see that `harry has been assigned to the parameter, and what the value assigned to total is. The Quick Debugger prints where the error occurred and why at the bottom of the frame, and we can clearly see that the error is originating from our use of +.
Save and publish the module to the shared repository
Now that we know what the issue is, we can go back and fix our function to use , instead of +. Replace the + with , on line 6 of myFunction, and then save the change. Now that we've fixed our function, we should push the module to the shared repository to make it available for other developers to use and modify. Right-click your repository in the search pane and pick Git > Push .
The Commit Message dialog will appear. Type an appropriate message and click OK.
The tree will update and the modification icons will disappear.
Write a test for the function
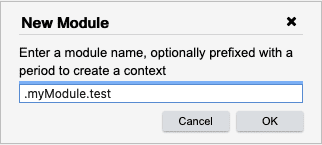
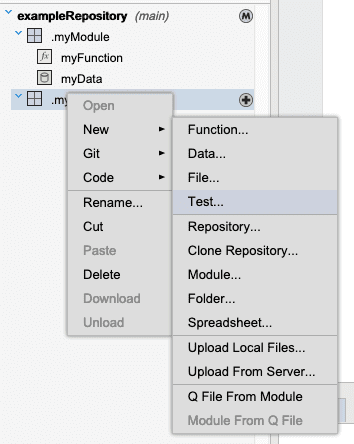
Now we should write a test for our function. Developer supports behavior-driven test development using qCumber and QuickCheck. To add a qCumber test, right-click on the repository in the search pane and add a new module. Keep in mind that if you wish to take advantage of Developer’s built-in testing framework you should name your test module the same name as the module you are going to test and suffix the name with .test. So in the case of .myModule, we would create a test module called .myModule.test as shown below.
Now we create a test file by right-clicking on the test module and picking New > Test… from the context menu.
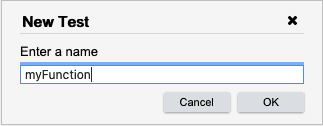
In the function-name dialog, you would match your test file with your code function by using the same name for your test file as your code function. Type .myFunction into the dialog and click OK.
The test will populate the tree with the appropriate .quke extension and the file will open in the explorer with the basic test template.
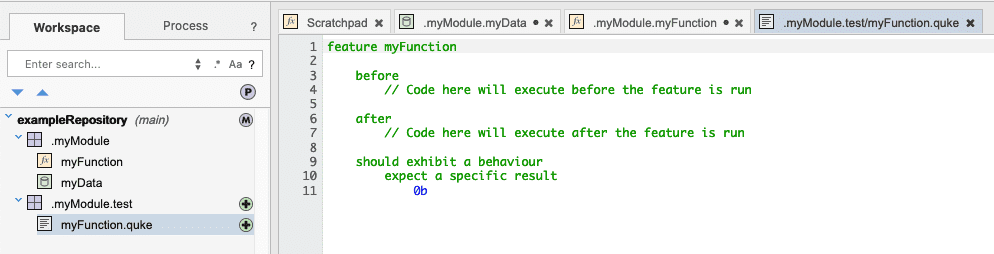
Once the file has been created, enter the following simple qCumber test. When executed, this test will use the symbols `tom and `dick to pass to myFunction. The test expects the return type to be string. Please see the Testing section for more information about testing with qCumber and QuickCheck.

Run the test
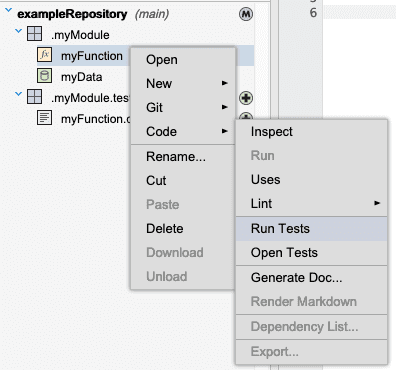
Now right-click on the module (.myModule), or the test module (.myModule.test) or the function, or the test itself, and pick Code > Run Tests from the context menu. If you select a module, all of the tests for that module are run. If you select just the function or test, only the associated test file is run.
Save and publish the test module to the shared repository
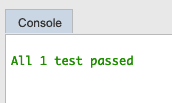
The console should report how many tests passed. When you are satisfied with the test, push it to the repository.
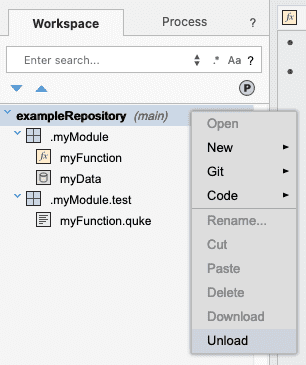
Now that we are done with the repository, it can be unloaded from your workspace by right-clicking the repository and picking Unload.
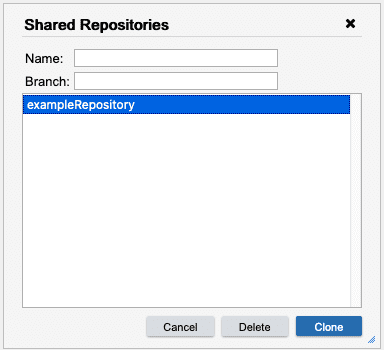
To clone your repository into your workspace, click on the Git > Shared Repositories context menu option to view a list of available repositories. You will see your repository listed here, as well as any other repositories other users have created and pushed. This list can be searched by name and branch name. Pick your repo and click Clone.
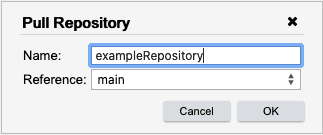
The Pull Repository dialog appears. It allows you to pull a specific branch of the repository, or rename the repository. Leave the defaults and Click OK.
Summary
From this walkthrough, you can see how a developer might write, organize, debug, and test their code. For more information about the various components, please see other sections of this user guide.