KDB.AI Server on Azure AI Tech Stack
This section details how to utilize Microsoft Azure OpenAI with KDB.AI Server.
You can significantly speed up the process of building and deploying AI applications by accessing fully configured instances of KDB.AI, Azure Machine Learning (AzureML), and Azure OpenAI.
This guide shows you how to deploy a complete technical stack and start building AI-powered applications with KDB.AI samples already loaded.
Prerequisites
Before you can deploy and setup KDB.AI on Azure Machine Learning Studio, ensure you have fulfilled the following prerequisites.
Azure account and permissions
- Ensure you have an active account for Azure Machine Learning Studio.
- Enable the Azure OpenAI service in the subscription you wish to use. To submit an application, navigate here.
- Deploy to the Sweden Central region ONLY due to model availability.
- Ensure the person deploying from Azure Marketplace has set the following role based access control permissions for you:
- If you are creating a new resource group, you need Owner role on the subscription you want to deploy into.
- If you have an existing resource group, you need the User Access Administrator role on the subscription and Owner role on the resource group that you want to deploy into.
- Have at least four Dedicated Cores within Azure ML available in your region. This can be checked here.
Only the user deploying the solution is able to access and use the Azure ML workspace. A compute instance cannot be shared with other users in your workspace.
KDB.AI license
Ensure you have signed up for a KDB.AI license and have accepted KX's end user license agreement. After accepting the KDB.AI license agreement, you will receive an email containing setup instructions and your license file. The license file is needed as part of the deployment process workflow.
Bearer token
Once you receive your registration email, you need to obtain a bearer token.
- Log into the KX downloads portal.
- Once authenticated, navigate to https://portal.dl.kx.com/auth/token.
- Click ADD NEW BEARER TOKEN.
- Click COPY BEARER.
- Paste this somewhere until you need it later; you can only view the bearer token once.
Deploy
Once the prerequisites are met, do the following.
You can watch an overview video here or follow the steps below.
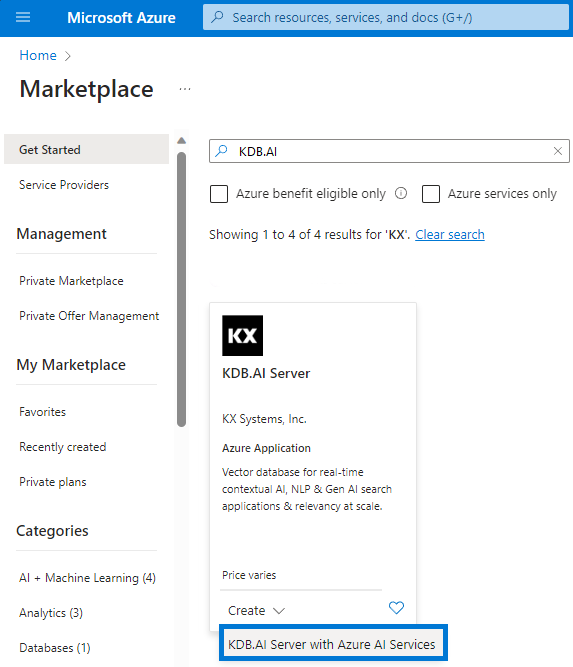
- Login to Azure Marketplace.
- Enter KDB.AI into the Search the Marketplace field on the Get Started page.
- On the KDB.AI Server plan, click Create > KDB.AI Server with Azure AI Services.
Basics tab
- In the Project details area, select the Subscription that has the OpenAI Service enabled.
- Then either select an existing Resource group, or create a new one.
- In the Instance details area, ensure the Region is set to Sweden Central.
- Enter a Base resource name that is unique across your deployments.
- Click Next.
Credentials tab
- Add your KX License as received in your registration email.
- Enter your Username for KX Downloads portal.
- Add your Bearer token for KX Downloads portal.
- Confirm your Bearer token for KX Downloads portal.
Configuration tab
- Select your Compute SKU requirement.
- Select your required Storage Size (GB).
- In the IP address of the client connecting to Azure ML Studio field, enter the Public IP address of the machine from which you wish to connect to Azure AI Machine Learning Studio.
- Optional: enter the Object Id of a Group whose members can later upgrade KDB.AI to a newer version.
- Click Next.
API Keys tab
To enable all notebook features, enter your API keys. These keys are securely stored in the Azure Key Vault for automatic loading. Alternatively, you can leave these fields blank and enter the keys later when needed.
Review + create tab
Review your details and click Create.
If you have any difficulty during sign-up, please contact Support or join our Slack channel so we can help resolve your issues.
Setup
Now you have deployed the product and logged into Azure, follow the steps to start using KDB.AI.
- Navigate to your
 Azure Machine Learning workspace in the newly created Resource Group and click the
  button.
 - Open Notebooks from the Authoring section in the left-hand side menu.
- Navigate to the KDBAI folder under the Files tab, which contains a set of samples.
- Open the Jupyter Notebook you wish to run.
- Check the selected kernel is Python 3.10 - SDK v2 in the top right-hand area of the window. If it is not, select it from the drop down menu.
- To run the sample, you can either run each cell individually or click Run all cells.
- Once the Notebook runs you should see the output of each step below the cell.
Troubleshooting
If you cannot see the Files tab in Authoring/Notebooks it may be because your Public IP has changed since the deployment.
- Navigate to the
 Storage account called st + Base resource name in the newly created Resource Group.
 - Follow this tutorial to Add your client IP address and Save it.
If you need help, feel free to reach out to the KDB.AI Slack community or email support@kdb.ai.
Next steps
Now that you have KDB.AI running on Azure ML, read our KDB.AI documentation to learn how to set up your tables and insert some data, or walk through our Quickstart Guide, which outlines how you can create a vector index and query it with semantic search.
If you are new to vector databases, read our Fundamentals articles to give you the rundown. These include a vector embeddings explainer, methods of similarity search, vector indexing basics, and more.
You are responsible for procuring and for the cost of cloud services, which are subject to their own terms and conditions. Cloud services pricing is based on Azure’s pricing calculator.
Azure links
Here are some useful links to information on using the Azure services.