KX Delta Platform — Aircraft Telemetry Tutorial
Prerequisite
This tutorial assumes you have already completed a standard installation of KX Delta Platform. All steps below build on that baseline.
This series walks you through building a complete aircraft telemetry data capture system from scratch using KX Delta Platform. The use case is intentionally simple - tracking changes in aircraft altitude over time - so you can focus on learning KX Delta Platform rather than the domain.
By the end of this series, you will have:
- Defined a telemetry data schema
- Configured a messaging server, ticker plant, real-time database, and historical database
- Written and published a simulated data feed using q code in KX Analyst
- Automated that feed on a 1-second timer
- Visualized the live data in a KX Dashboard with a table grid, dropdown filter, and line graph
System architecture
The system you are building uses a set of interconnected KX Delta Platform components. In a production environment you would have external data sources and feed handlers. In this tutorial, the airTelRTE real-time engine process acts as the simulated data source. See the schematic below for an overview of this example system.
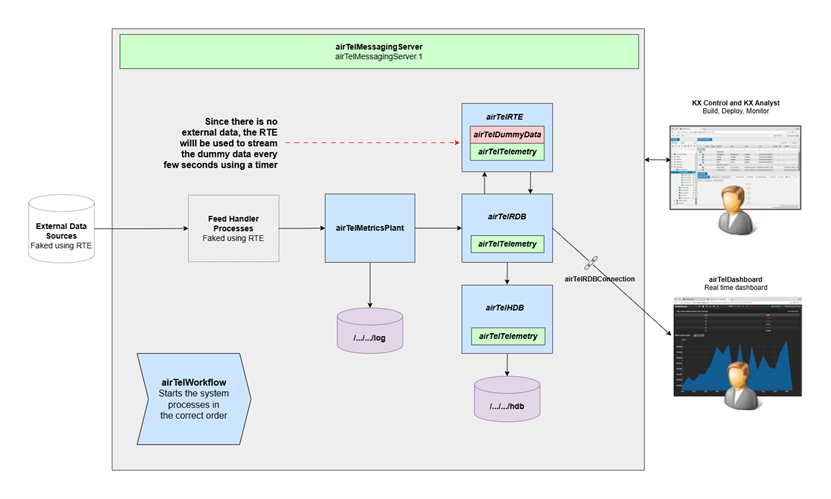
Component summary:
| Component | Role |
|---|---|
airTelMessagingServer |
Discovery service — allows processes to find each other |
airTelMetricsPlant |
Ticker plant (TP) — logs all records to disk and distributes to subscribers |
airTelHDB |
Historical database (HDB) — stores data from prior days on disk |
airTelRDB |
Real-time database (RDB) — holds today's in-memory data |
airTelRTE |
Real-time engine — generates and publishes simulated telemetry |
airTelWorkflow |
Groups and orchestrates all the above processes |
Design conventions
Establish these naming rules before you create anything, and apply them consistently throughout the series.
Do
- Choose a naming format and stick to it (for example, camelCase or underscore-separated). In this tutorial all entities are prefixed with
airTelfollowed by the entity type - for example,airTelRDB. - Relate entity names to their group using a shared prefix (for example,
airTelSchemaGroup). - Use the description field to explain the purpose of each entity.
- Add comments to functions.
- Delete entities once they are no longer needed.
Do not
- Modify anything prefixed with
DS,Dx,Dmx, orDelta- these are standard built-ins. Copy them if customization is needed. - Use names that are so short they become meaningless.
How to use this guide
Work through the files in order. Each file builds directly on the previous one.
| File | Contents |
|---|---|
| Setup | Create a package — your first entity in KX Control |
| Schema and infrastructure | Define the data schema, messaging server, config parameters, and metrics plant |
| Databases and workflow | Manage instances, create the HDB and RDB, and build the workflow |
| Analytics | Write q analytics in KX Analyst, create the RTE, and verify data flow |
| Automation and dashboard | Automate the data feed on a timer and visualizing it in a dashboard |
Remote deployment
This tutorial is written for a local installation. This minimizes setup complexity and removes environment-specific sources of error, so you can focus on learning KX Delta Platform.
In production, KX Delta Platform typically runs on a remote server while you access the UI through a browser on your local machine. The steps are the same, but a few things require additional attention:
- Ports — remote environments, such as cloud VMs, often require ports to be explicitly opened before they are accessible. See KX Delta Platform ports for reference.
- Remote host access — if the target machine is managed by your IT team, coordinate access before you begin.
- Licenses — your license must match your target deployment configuration. Ensure the hostname in the license aligns with the machine where KX Delta Platform is installed.
Port assignments reference
| Process | Port |
|---|---|
airTelMessagingServer |
8000 |
airTelMetricsPlant |
8001 |
airTelHDB |
8002 |
airTelRDB |
8003 |
airTelRTE |
8004 |
To check whether a port is free on Linux before assigning it:
ss -ltnp | grep :8000
If the command returns nothing, the port is available. If it returns output, choose a different port.
Next step
Start the guide by setting up your system.