Query & Load Data Panel
This page describes how to retrieve data from your kdb Insights Enterprise deployment for analysis using the Query & Load Data panel.
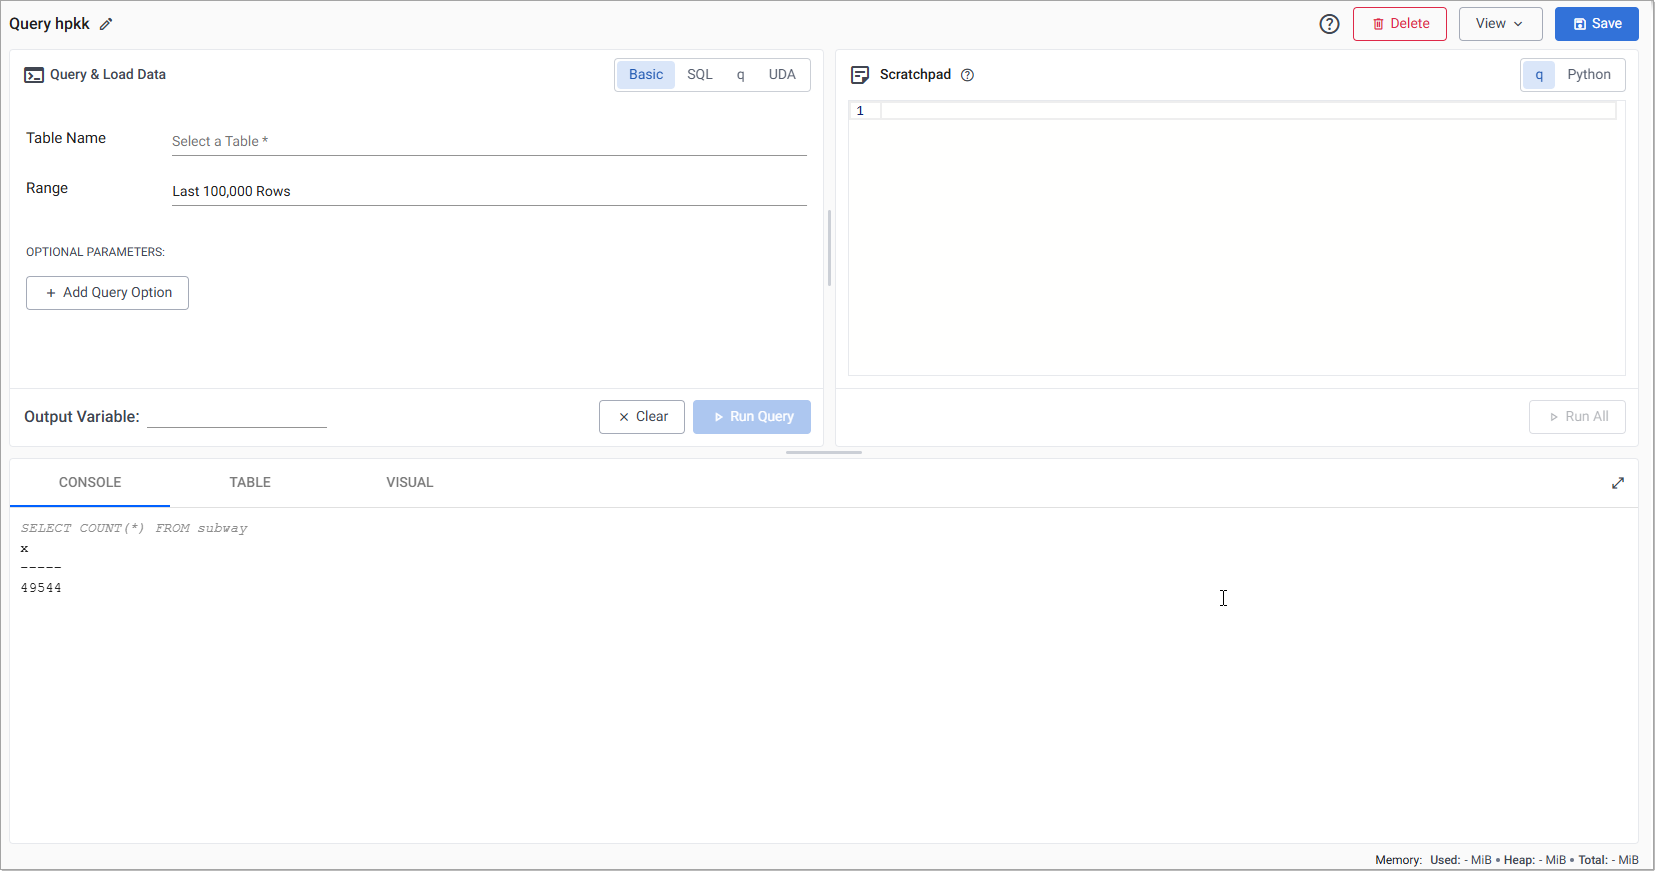
The Query & Load Data panel is the top left-hand section of the Query window and is used to query your database.
If this panel is not visible, click View, in the top left-hand corner, and toggle Query Panel to display it.
Create Query
To create a query:
-
Open the Query window by clicking + beside Queries in the left-hand menu, or using one of the other methods described here.
-
Create a query using one of the following methods:
-
You have the option to set an Output Variable.
-
Once your query is created, click Run Query.
-
The result of your query is assigned to a variable in Python or q based on the language currently selected in the language tab of the scratchpad.
-
View and analyze your query output in the output panel, at the bottom of the screen.
-
Each query is assigned a system defined name, displayed in the title bar of the query window.
- Click Save to save the query with the system defined name. A notification is displayed indicating that the query has been saved.
Saved queries
The saved query is tied to your current browser session and device. Other users cannot access your saved query.
To rename and save the query:
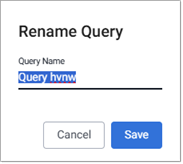
- Click the pencil icon beside the query name in the title bar and enter a new name.
- Click OK.
Saved queries are listed on the left-hand menu under Queries.
-
Click Clear to clear your query and start a new one.
Basic query
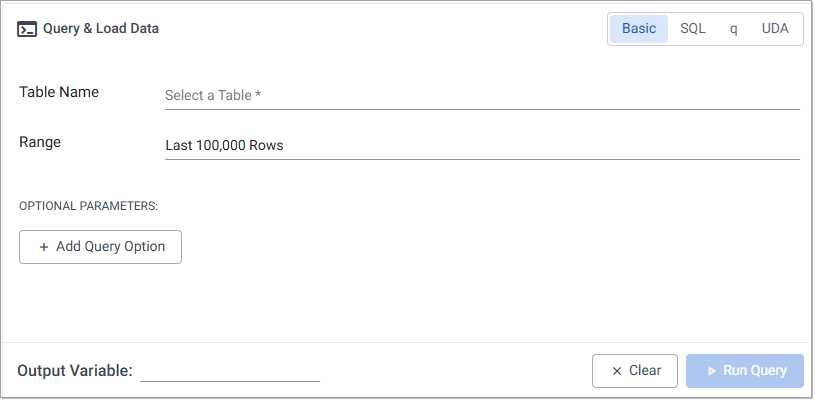
The Basic tab of the Query & Load Data panel allows you to retrieve data from the database without having to write code. You can use it to return data within specific ranges and apply filters, to that data. The Basic tab is the first tab displayed when you open the Query window.
This screen contains:
The following table describes the parameters of the Basic tab.
| Parameter | Description | ||||||||||||||||||
|---|---|---|---|---|---|---|---|---|---|---|---|---|---|---|---|---|---|---|---|
| Table Name | The name of the table that you're querying. Click on this field to display a list of tables that are available in deployed databases. Click on a table name or use the search box to refine the list. The message No deployed tables available is displayed when there are no tables because no databases have been deployed. 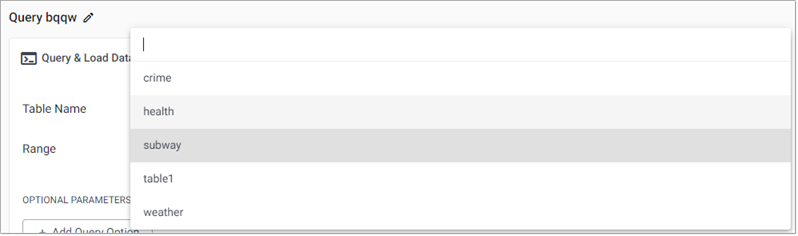 |
||||||||||||||||||
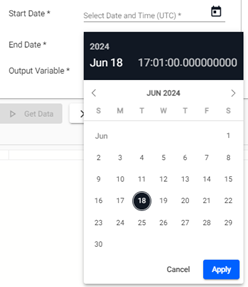
| Range | This enables you to specify an initial query condition based on either: ROWS, TIME, or DATE. Click on the drop-down list to open the Select Range dialog. Choose from the predefined options, or select the custom option at the end of the list. 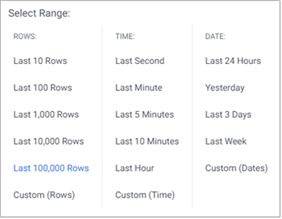 If the selected table is a splayed table, the time and date range options are not displayed. 
|
||||||||||||||||||
| Output Variable | You can set a name for the variable to which this data is assigned. Refer to Create Query for details about Output Variables. | ||||||||||||||||||
Click Clear at any stage to reset the value in this tab.
Query options
You can select from the following query options by clicking Add Query Option from under Optional Parameters.
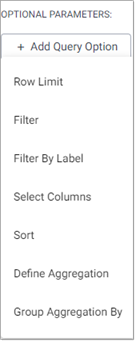 |
Row Limit |
| Filter | |
| Filter by label | |
| Select Columns | |
| Sort | |
| Define Aggregation | |
| Group Aggregation By |
Row Limit is only available when a time or date value is specified in Range.
Combining Filters
You can apply multiple filters, as well as combine filters of different types except for select columns and define aggregations, which cannot be combined.
Row Limit
To conserve memory usage, for very large datasets, you can set limits on the number of rows returned by your query. By default this is set to the last 100,000 rows.
Select Custom (Rows) from the Range drop-down. From here you can:
- Enter a new value in Limit (Rows), under Optional Parameters, to change the number of rows returned.
- Click First to have the first rows in your database returned.
- Click Last to have the last rows in your database returned.
- Remove the row limit filter by clicking the icon beside the filter.

Alternatively, if a time or date range has been specified and you want to change it to a row limit, click Add Query Option under optional parameters and click Row Limit.
Filter
The Filter option is used for applying custom filtering to the query.

To apply a filter you must specify the following:
| Field name | Description |
|---|---|
| Select Column | The column to be selected. |
| Select Function | The function to be used to apply the filtering logic which is one of:in likenot equalwithin<<==>=> |
| FX Parameter | An input provided by you which defines the item against which the column is compared. |
Filter By Label
The Filter By label option allows you to query specific tables.

To apply a Filter By label you must specify the following:
| Field name | Description |
|---|---|
| Key | Select the key value of the label that was assigned to the database. |
| Value | Select the value(s) of the label(s) to query from the tables that correspond to the label. |
If no label is selected then all corresponding tables are queried.
Select Columns
The Select Columns option provides the ability to filter the query results to display selected columns only.

Click on the Select Columns field, and choose the column(s) from the list displayed.
- This list represents the columns in the table selected under Table Name.
- Only one Select Columns filter is allowed.
- The Define Aggregations filter cannot be combined with a Select Columns filter.
Sort
The Sort option allows you to sort the results of a returned query based on the column chosen in the Select Column field.

Define Aggregation
The Define Aggregation option allows you to apply aggregations to specified columns of the table returning the result as an additional column.

To apply an aggregation you must specify the following:
| Field name | Description |
|---|---|
| Set Return Column | The column the results of the aggregation are returned to. |
| Select Aggregation | The aggregations available to you are as follows: count last sum prd (product) min max all any var (variance) avg (average) dev (deviation) svar (sample variance) sdev (standard deviation) |
| Select Column | The column the aggregation is applied to. |
The Select Columns filter cannot be combined with a Define Aggregation filter.
Group Aggregation By
The Group Aggregation By option allows you to group the results of aggregations based on the Selected Column.

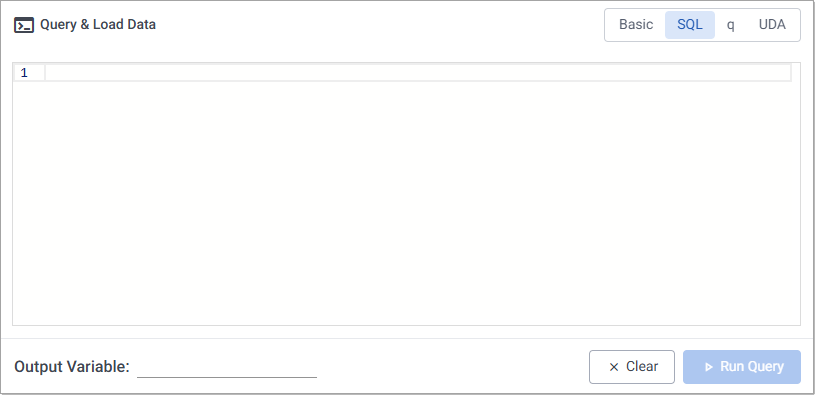
Query using SQL
Use the SQL query option, in the Query panel, to query the tables available within your deployment using SQL syntax. These queries can run in a distributed manner across all available data associated with a table.
-
Enter your query in the SQL tab as shown below:
-
You can set an Output Variable to which this data is assigned. Refer to Create Query for details about Output Variables.
- Click Run Query to run the query.
- Review the results.
SQL query API
The ANSI SQL implementation used here is based on the kdb Insights SQL API.
This provides a subset of an ANSI SQL compliant API. The limitations of this are outlined here.
Query using q
To query your data using qSQL, click the q tab in the Query panel.
This option only works when Query Environment(s) are enabled
Refer to System Information for details on how to check the status.
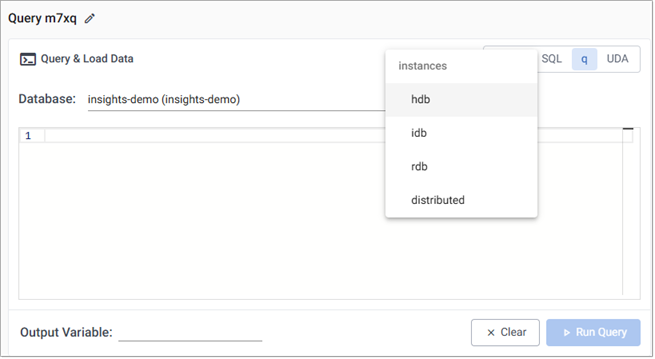
- Select a Database.
The message No deployed database available is displayed when there are no databases deployed. -
Select an option from the instances drop-down.
- You can direct your query to a specific instance of your database (HDB, IDB, or RDB) to query data within the corresponding time window covered by that instance.
- Or set it to distributed, to distribute the query across all the available instances.
-
Enter your query in the q tab panel:
-
You can set an Output Variable to which this data is assigned. Refer to Create Query for details about Output Variables.
-
Click Run Query to run the query.
-
Click Run Query to run the query.
- Review the results.
Query using UDA
User Defined Analytics (UDAs) create custom analytics that are tailored to your specific needs, enabling you to extend the capabilities of kdb Insights beyond its standard functionality. See UDA Overview to learn more about UDAs.
You can run a UDA in the Query panel, and specify values for its required and optional parameters. Refer to UDA parameters for details about supported, unsupported and distinguished parameter types.
To run UDAs in the Query panel.
-
Click on the UDA tab, as shown below:
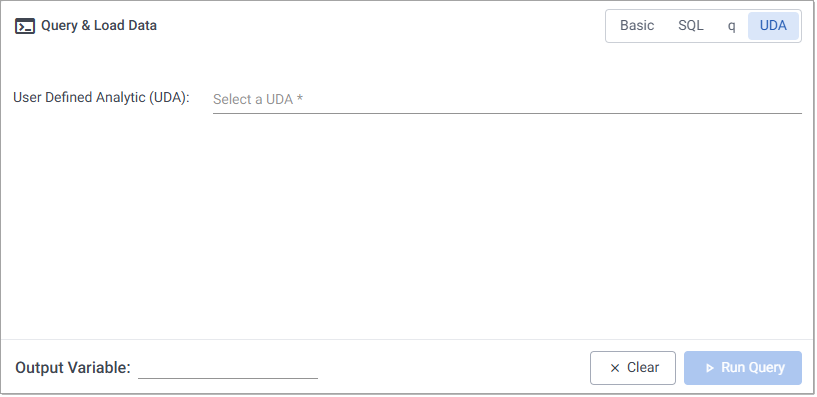
The User Defined Analytic (UDA) drop-down contains a list of UDAs that have already been created and deployed to Insights Enterprise via a package.
-
Select a UDA from the list.
The message There is no available UDAs is displayed when there are no UDAs available for query.
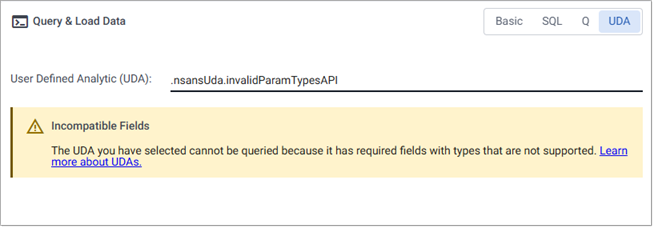
A warning is displayed if the selected UDA cannot be queried. This occurs if there is no metadata associated with it or it contains required fields with unsupported types, preventing it from being queried.
-
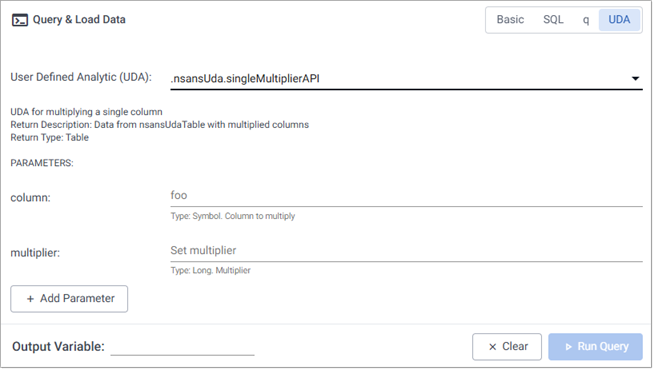
Next, specify values for all required parameters.
The required parameters of the UDA are displayed, as shown in the example below, with variations depending on the UDA definitions. Date fields feature date/time selectors for easy data entry. The following example UDA has two required parameters: column and multiplier.
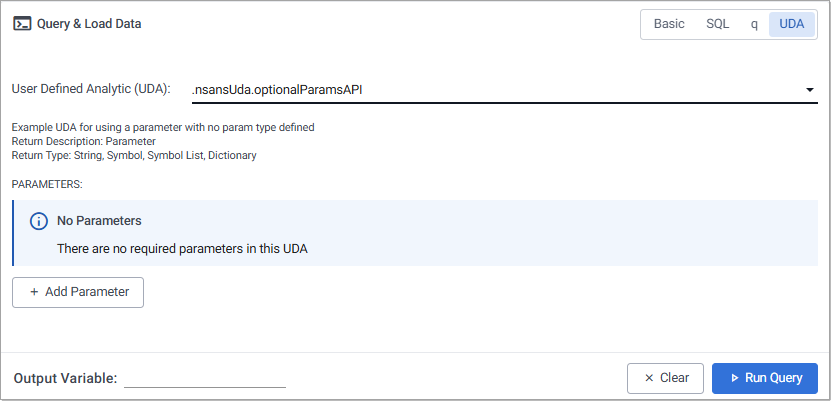
A notification is displayed if the selected UDA does not contain any required parameters.
The system validates the entered parameter values to ensure they meet the required format and criteria, displaying an error message if the data is incorrect. The following shows the error displayed when a GUID is expected but not entered.

-
Next, click + Add Parameter to configure any optional or distinguished parameters.
You may need to use the right-hand scroll bar to locate the Add Parameter button.
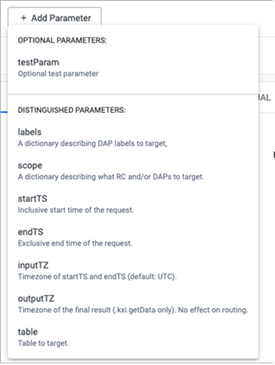
You can remove any optional parameter by clicking the trashcan icon to the right of the parameter. In the following example the labels parameter is optional and can be removed.

When a parameter references a database table, ensure that the database containing the table is deployed before running the query. Refer to Deploying a database for details.
-
You can set an Output Variable to which this data is assigned. Refer to Create Query for details about Output Variables.
-
Click Run Query to run the query.
-
Click Run Query to run the query.
- The UDA is processed and returns the analytics results in the query output tabs.
UDAs can only query tables in their own package
To successfully call the UDA on tables outside of the package that it is defined, you need to define a scope parameter in the UDA metadata so that the service gateway knows which aggregator to route the query through. However, the scope parameter is a dictionary argument and therefore is not supported by the UDA Query tab. Refer to deploying UDAs from the CLI for details on setting the scope parameter when deploying UDAs.
UDA Parameters
This section provides information on the following:
- Supported q types for UDA parameters
- Distinguished parameters
- Unsupported parameter types for UDA parameters
Supported q types for UDA parameters
The supported q types for UDA parameters within the web interface are: AnyMap, Boolean, GUID, Byte, Short, Int, Long, Real, Float, Symbol, Timestamp, Month, Date, DateTime, Timespan, Minute, Second, Time, Char, String, Table, Dictionary, and Lists.
Refer to Datatypes in kdb+ for details about these q types.
A list of symbols is also supported when defined as follows:
.kxi.metaParam[`name`type`isReq`description!(`byCols;11 -11h;1b;"Column(s) to count by.")].
The expected type of parameter is displayed under the data entry field.
Multi-type parameters
The web interface supports UDA parameters that can take on multiple types. The parameter defaults to the first type listed when registering the UDAs metadata. An additional parameter must be used to cast multi-type parameters to their intended type within the logic of that UDA itself.
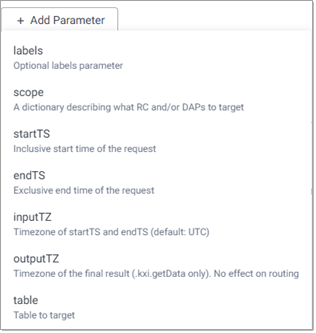
Distinguished parameters
UDAs can accept distinguished parameters for routing, even if they are not included in the UDA’s metadata.
The distinguished parameters are labels, scope, startTS, endTS, inputTZ, outputTZ, table.
Unknown API error
When distinguished parameters are not set, the error "Querying database using (UDA) raised - Unknown API: Please try adding a distinguished parameter before running again" appears because Insights cannot route the query. Set the parameters and try again.
Refer to Distinguished parameters for further details.
Unsupported parameter types
Parameters that can't be represented in the web interface are general lists (lists containing multiple types), functions, and nested types (that is, 77+t – memory-mapped list of lists of type t).
The supported temporal type is an atomic timestamp (-12h), which is of the form yyyy.mm.ddDhh:mm:ss.xxxxxxxxx.
For example, 2024.11.06D14:48:36.000000000. This is formatted in q as dateDtimespan which maps to 2024-11-06T14:48:36.000000000 when selecting a specific timestamp on the Query tab date picker.
If invalid parameter types are defined for a UDA, the following error is displayed:
Query output
The results of your query are displayed in the tabs of the output panel at the bottom of the Query window. See here for full details on the results and how they can be displayed.
Next Steps
- Create ad hoc queries using the scratchpad
- Perform further analysis and development in the scratchpad using q
- Perform further analysis and development in the scratchpad using python